

<服务>OpenVPN后续更新
目录:
确认环境
| 主机 | 节点 | 内网IP | 外网IP | 网关 |
|---|---|---|---|---|
| mysql | Aclient | 192.168.1.205 | 无 | 192.168.1.201 |
| why-1 | AVPNserver | 192.168.1.201 | 192.168.0.201 | 192.168.0.1 |
| why-2 | BVPNclient | 192.168.2.202 | 192.168.0.202 | 192.168.0.1 |
| apache | Bclinet | 192.168.2.204 | 无 | 192.168.2.202 |
需求为两台内网机器能互相ping通。
前提
- 防火墙关闭
- selinux关闭
- 网关转发开启sysctl -p中net.ipv4.ip_forward = 1(只要求VPN主机)
- 没有转发,可以通过
iptables -t nat -L -n查看
确认Aclient
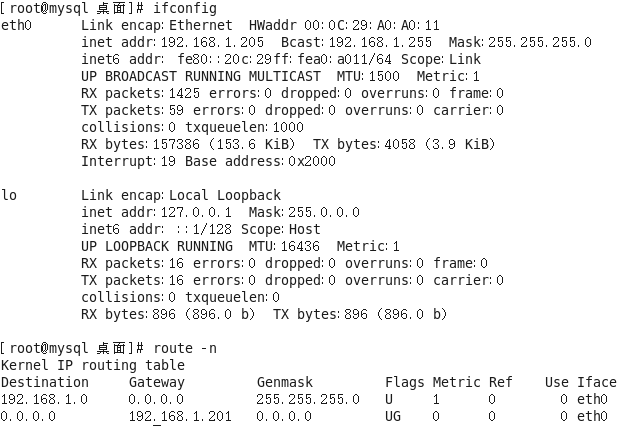
这边我是通过配置内网机器默认网关为VPNserver内网IP实现的
当然也可以加回包路由route add -net 10.8.0.0/24 gw 192.168.1.201
确认AVPNserver
[root@why-1 ~]# route -n
Kernel IP routing table
Destination     Gateway         Genmask         Flags Metric Ref    Use Iface
10.8.0.2        0.0.0.0         255.255.255.255 UH    0      0        0 tun0
192.168.1.0     0.0.0.0         255.255.255.0   U     1      0        0 eth1
10.8.0.0        10.8.0.2        255.255.255.0   UG    0      0        0 tun0
192.168.0.0     0.0.0.0         255.255.255.0   U     1      0        0 eth0
0.0.0.0         192.168.0.1     0.0.0.0         UG    0      0        0 eth0
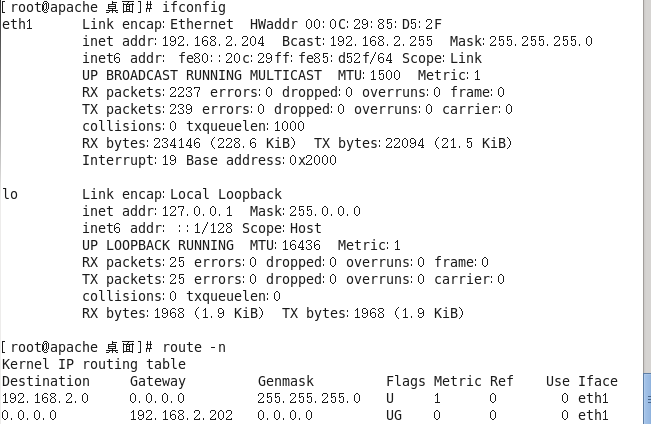
确认BVPNclient
[root@why-2 ~]# route -n
Kernel IP routing table
Destination     Gateway         Genmask         Flags Metric Ref    Use Iface
10.8.0.5        0.0.0.0         255.255.255.255 UH    0      0        0 tun0
192.168.2.0     0.0.0.0         255.255.255.0   U     0      0        0 eth1
10.8.0.0        10.8.0.5        255.255.255.0   UG    0      0        0 tun0
192.168.1.0     10.8.0.5        255.255.255.0   UG    0      0        0 tun0
192.168.0.0     0.0.0.0         255.255.255.0   U     0      0        0 eth0
169.254.0.0     0.0.0.0         255.255.0.0     U     1002   0        0 eth0
169.254.0.0     0.0.0.0         255.255.0.0     U     1003   0        0 eth1
0.0.0.0         192.168.0.1     0.0.0.0         UG    0      0        0 eth0
确认Bclient
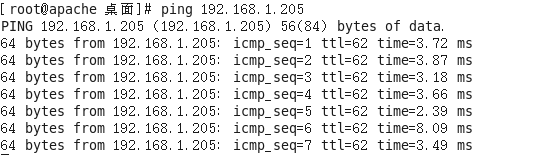
网络互通性确认
[root@why-2 ~]# ping 192.168.1.205
PING 192.168.1.205 (192.168.1.205) 56(84) bytes of data.
64 bytes from 192.168.1.205: icmp_seq=1 ttl=63 time=31.8 ms
64 bytes from 192.168.1.205: icmp_seq=2 ttl=63 time=1.64 ms
^C
--- 192.168.1.205 ping statistics ---
2 packets transmitted, 2 received, 0% packet loss, time 1172ms
rtt min/avg/max/mdev = 1.640/16.766/31.892/15.126 ms


现在是apache无法通过why-2到why-1最后到mysql服务器上再接收到回来的包,下面我们就通过抓包进行实现
通过抓包添加路由
先在why-2上进行抓包
[root@why-2 ~]# tcpdump -n icmp
tcpdump: verbose output suppressed, use -v or -vv for full protocol decode
listening on eth0, link-type EN10MB (Ethernet), capture size 65535 bytes
22:03:08.620195 IP 192.168.2.204 > 192.168.1.205: ICMP echo request, id 21261, seq 204, length 64
22:03:09.620377 IP 192.168.2.204 > 192.168.1.205: ICMP echo request, id 21261, seq 205, length 64
22:03:10.620913 IP 192.168.2.204 > 192.168.1.205: ICMP echo request, id 21261, seq 206, length 64
22:03:11.620856 IP 192.168.2.204 > 192.168.1.205: ICMP echo request, id 21261, seq 207, length 64
22:03:12.620886 IP 192.168.2.204 > 192.168.1.205: ICMP echo request, id 21261, seq 208, length 64
22:03:13.620914 IP 192.168.2.204 > 192.168.1.205: ICMP echo request, id 21261, seq 209, length 64
22:03:14.620879 IP 192.168.2.204 > 192.168.1.205: ICMP echo request, id 21261, seq 210, length 64
22:03:15.626852 IP 192.168.2.204 > 192.168.1.205: ICMP echo request, id 21261, seq 211, length 64
22:03:16.629583 IP 192.168.2.204 > 192.168.1.205: ICMP echo request, id 21261, seq 212, length 64
22:03:17.634659 IP 192.168.2.204 > 192.168.1.205: ICMP echo request, id 21261, seq 213, length 64
22:03:18.634538 IP 192.168.2.204 > 192.168.1.205: ICMP echo request, id 21261, seq 214, length 64
22:03:19.635684 IP 192.168.2.204 > 192.168.1.205: ICMP echo request, id 21261, seq 215, length 64
22:03:20.635751 IP 192.168.2.204 > 192.168.1.205: ICMP echo request, id 21261, seq 216, length 64
22:03:21.636223 IP 192.168.2.204 > 192.168.1.205: ICMP echo request, id 21261, seq 217, length 64
22:03:22.636234 IP 192.168.2.204 > 192.168.1.205: ICMP echo request, id 21261, seq 218, length 64
22:03:23.636281 IP 192.168.2.204 > 192.168.1.205: ICMP echo request, id 21261, seq 219, length 64
22:03:24.644371 IP 192.168.2.204 > 192.168.1.205: ICMP echo request, id 21261, seq 220, length 64
22:03:25.687303 IP 192.168.2.204 > 192.168.1.205: ICMP echo request, id 21261, seq 221, length 64
^C
18 packets captured
18 packets received by filter
0 packets dropped by kernel
可以看到包可以进过这里,但是没有回去的包
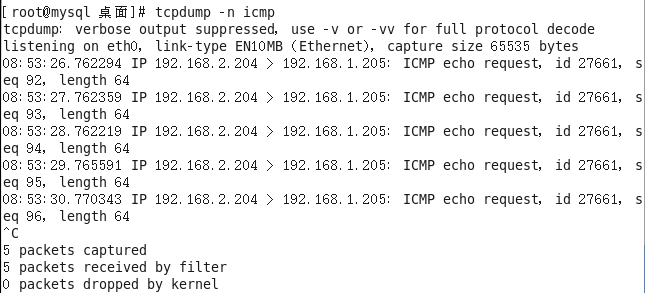
再在why-1上进行抓包
[root@why-1 ~]# tcpdump -n icmp
tcpdump: verbose output suppressed, use -v or -vv for full protocol decode
listening on eth0, link-type EN10MB (Ethernet), capture size 65535 bytes
22:06:47.614591 IP 192.168.2.204 > 192.168.1.205: ICMP echo request, id 27661, seq 19, length 64
22:06:48.614375 IP 192.168.2.204 > 192.168.1.205: ICMP echo request, id 27661, seq 20, length 64
22:06:49.613839 IP 192.168.2.204 > 192.168.1.205: ICMP echo request, id 27661, seq 21, length 64
22:06:50.614248 IP 192.168.2.204 > 192.168.1.205: ICMP echo request, id 27661, seq 22, length 64
22:06:51.613514 IP 192.168.2.204 > 192.168.1.205: ICMP echo request, id 27661, seq 23, length 64
22:06:52.613072 IP 192.168.2.204 > 192.168.1.205: ICMP echo request, id 27661, seq 24, length 64
^C
6 packets captured
8 packets received by filter
0 packets dropped by kernel
先在apache上进行抓包
配置
Server端配置
[root@why-1 ~]# vi /etc/openvpn/server.conf
client-config-dir /etc/openvpn/ccd
去掉duplicate-cn
route 192.168.2.0 255.255.255.0
查看Client端内容cert why.crt
[root@why-2 ~]# cat /etc/openvpn/client.conf
client
dev tun
proto tcp
remote 192.168.0.201 54321
resolv-retry infinite
nobind
persist-key
persist-tun
ca ca.crt
cert why.crt
key why.key
ns-cert-type server
comp-lzo
verb 3
--script-security 3
根据client端crt文件名字进行创建文件,我这边是why.crt
[root@why-1 ~]# mkdir /etc/openvpn/ccd
[root@why-1 ~]# cd !$
cd /etc/openvpn/ccd
[root@why-1 ccd]# touch why
[root@why-1 ccd]# echo 'iroute 192.168.2.0 255.255.255.0' >> why
重启服务
[root@why-1 ccd]# service openvpn stop
正在关闭openvpn:                                          [确定]
[root@why-1 ccd]# service openvpn start
正在启动 openvpn:                                         [确定]
企业中的默认网关不为openvpnserver,就需要添加路由,即目标网段的路由为vpn网关,当然也可以在默认网关添加目标网段的路由为vpn网关。
其实实质就是推送两条路由,route 192.168.2.0 255.255.255.0是在server端生成获得的路由为192.168.2.0/24 gw 10.8.2.0,而iroute 192.168.2.0 255.255.255.0是在client端生成路由获得的路由为192.168.2.0/24 gw 192.168.2.202
翻墙
正常我们使用openvpn只是在连接内网的情况下使用,而我们访问网页仍通过正常上上网方式,当然如果需要网页浏览也使用vpn,就需要进行如下配置并通过www.ip138.com验证,不过暂时没有aws的机器,等以后更新
OpenVPN负载均衡
两个相同server
- 两个相同ca,配置文件(local ip不同)的server
- client端为相同配置文件(连接机器的ip和配置文件名字不同)
- 如果第一个不通就连第二个
一个client配置文件
- 两个相同ca,配置文件(local ip不同)的server
- 在配置文件中配置两个参数和多个ip
- 在拨号连接的时候client随机选择客户端,在VPNserver宕机的情况下自动重连其他机器
修改客户端文件
remote server1.mydomain #负载均衡server
remote server2.mydomain
remote-random           #使用负载均衡
resolv-retry            #重连时间
第一种就适用于,两个vpn server在不同的地方,一个连接公司内网,一个可以翻墙 第二种就是由客户端主宰进行调度,适合公司内部使用,或者企业机房互联,不过需要进行一下连接网关的设置,例如keepalived或者脚本判断等。
通过DNS轮询实现负载均衡
- 两个相同ca,配置文件(local ip不同)的server
- 在配置文件中配置两个参数并将IP指向域名
- 通过DNS轮询A记录实现负载均衡
安装DNS
[root@why-3 ~]# yum install -y bind bind-chroot bind-libs caching-nameserver ypbind
[root@why-3 ~]# vi /etc/named.conf
        listen-on port 53 { any; };
        allow-query     { any; };       #修改允许所有IP访问
zone "whysdomain.com"{                  #添加区文件
        type master;
        file "whysdomain.com.db";       #相对路径/var/named
};
[root@why-3 ~]# cd /var/named/
[root@why-3 named]# vi whysdomain.com.db
@       IN      SOA     whysdomain      root (
                2008030201
                1H
                15M
                1W
                1D )
        IN      NS      @
        IN      A       127.0.0.1
vpn     IN      A       192.168.0.201   #vpn解析到该IP
vpn     IN      A       192.168.0.203
启动DNS
[root@why-3 named]# service named start
Generating /etc/rndc.key:                                  [确定]
启动 named:                                               [确定]
如果遇到了卡在Generating /etc/rndc.key,可执行rndc-confgen -r /dev/urandom -a再启动
[root@why-3 named]# lsof -i:53
COMMAND  PID  USER   FD   TYPE DEVICE SIZE/OFF NODE NAME
named   7194 named   20u  IPv4  32079      0t0  TCP localhost:domain (LISTEN)
named   7194 named   21u  IPv4  32081      0t0  TCP 192.168.0.203:domain (LISTEN)
named   7194 named   22u  IPv4  32083      0t0  TCP 192.168.3.203:domain (LISTEN)
named   7194 named   23u  IPv6  32085      0t0  TCP localhost:domain (LISTEN)
named   7194 named  512u  IPv4  32078      0t0  UDP localhost:domain
named   7194 named  513u  IPv4  32080      0t0  UDP 192.168.0.203:domain
named   7194 named  514u  IPv4  32082      0t0  UDP 192.168.3.203:domain
named   7194 named  515u  IPv6  32084      0t0  UDP localhost:domain

[root@why-3 named]# host whysdomain.com                     #此时检测dns不生效
whysdomain.com has address 121.42.37.139
whysdomain.com mail is handled by 10 mxw.mxhichina.com.
whysdomain.com mail is handled by 5 mxn.mxhichina.com.
[root@why-3 named]# vi /etc/resolv.conf                     #修改DNS文件
[root@why-3 named]# cat /etc/resolv.conf
# Generated by NetworkManager
#nameserver 8.8.8.8
#nameserver 114.114.114.114
nameserver 192.168.0.203
[root@why-3 named]# host vpn.whysdomain.com                 #检测dns
vpn.whysdomain.com has address 192.168.0.203
vpn.whysdomain.com has address 192.168.0.201
[root@why-3 named]# nslookup vpn.whysdomain.com
Server:     192.168.0.203
Address:    192.168.0.203#53

Name:   vpn.whysdomain.com
Address: 192.168.0.201
Name:   vpn.whysdomain.com
Address: 192.168.0.203

[root@why-3 named]# ping vpn.whysdomain.com
PING vpn.whysdomain.com (192.168.0.203) 56(84) bytes of data.
64 bytes from 192.168.0.203: icmp_seq=1 ttl=64 time=0.040 ms
64 bytes from 192.168.0.203: icmp_seq=2 ttl=64 time=0.013 ms
64 bytes from 192.168.0.203: icmp_seq=3 ttl=64 time=0.044 ms
^C
--- vpn.whysdomain.com ping statistics ---
3 packets transmitted, 3 received, 0% packet loss, time 3134ms
rtt min/avg/max/mdev = 0.013/0.032/0.044/0.014 ms
[root@why-3 named]# ping vpn.whysdomain.com
PING vpn.whysdomain.com (192.168.0.201) 56(84) bytes of data.
64 bytes from why-1 (192.168.0.201): icmp_seq=1 ttl=64 time=2.50 ms
64 bytes from why-1 (192.168.0.201): icmp_seq=2 ttl=64 time=0.455 ms
64 bytes from why-1 (192.168.0.201): icmp_seq=3 ttl=64 time=0.439 ms
^C
--- vpn.whysdomain.com ping statistics ---
3 packets transmitted, 3 received, 0% packet loss, time 2082ms
rtt min/avg/max/mdev = 0.439/1.131/2.501/0.969 ms
可以看到第一次ping到的是192.168.0.201,第二次是192.168.0.203
windows修改完DNS需要执行ifconfig /flushdns
修改客户端文件
remote vpn.whysdomain.com   #负载均衡server
remote-random               #使用负载均衡
resolv-retry                #重连时间
在windows上还需要禁用注册表才能实现,不推荐,其实DNS的A记录可以用于很多地方,例如MySQL等服务的负载均衡,不过不使用于长连接。
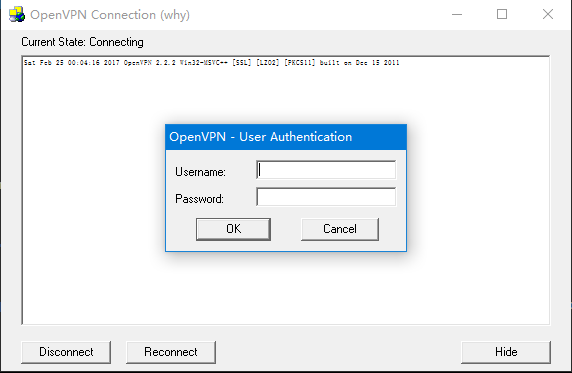
OpenVPN本地认证
需要用到的参数
- username-as-common-name 使用客户提供的UserName作为Common Name,正常我们连接VPN的时候都是不需要用户的
- client-cert-not-required 不需要客户端证书
- auth-user-pass-verify /etc/openvpn/checkpsw.sh via-env 匿名用户用过命令查询用户和密码,查询脚本和认证方式,脚本可以为shell或者php,通过接收VPN客户端的用户名和密码与本地文件进行验证以返回值进行判断,如果认证方式为via-env就是通过环境变量进行验证,如果是via-file就是通过临时文件认证
添加检测脚本
[root@why-1 ~]# wget -q -P /etc/openvpn/ http://openvpn.se/files/other/checkpsw.sh      #需要翻墙,所以可以把我的复制粘贴到脚本中
[root@why-1 ~]# cd /etc/openvpn
[root@why-1 openvpn]# cat checkpsw.sh
#!/bin/sh
###########################################################
# checkpsw.sh (C) 2004 Mathias Sundman <mathias@openvpn.se>
#
# This script will authenticate OpenVPN users against
# a plain text file. The passfile should simply contain
# one row per user with the username first followed by
# one or more space(s) or tab(s) and then the password.

PASSFILE="/etc/openvpn/psw-file"
LOG_FILE="/var/log/openvpn-password.log"
TIME_STAMP=`date "+%Y-%m-%d %T"`

###########################################################

if [ ! -r "${PASSFILE}" ]; then
  echo "${TIME_STAMP}: Could not open password file \"${PASSFILE}\" for reading." >> ${LOG_FILE}
  exit 1
fi

CORRECT_PASSWORD=`awk '!/^;/&&!/^#/&&$1=="'${username}'"{print $2;exit}' ${PASSFILE}`

if [ "${CORRECT_PASSWORD}" = "" ]; then
  echo "${TIME_STAMP}: User does not exist: username=\"${username}\", password=\"${password}\"." >> ${LOG_FILE}
  exit 1
fi

if [ "${password}" = "${CORRECT_PASSWORD}" ]; then
  echo "${TIME_STAMP}: Successful authentication: username=\"${username}\"." >> ${LOG_FILE}
  exit 0
fi

echo "${TIME_STAMP}: Incorrect password: username=\"${username}\", password=\"${password}\"." >> ${LOG_FILE}
exit 1
脚本添加执行权限
[root@why-1 openvpn]# chmod +x /etc/openvpn/checkpsw.sh
[root@why-1 openvpn]# ll checkpsw.sh
-rwxr-xr-x 1 root root 1191 2月  24 23:33 checkpsw.sh
脚本解析
PASSFILE="/etc/openvpn/psw-file"                    #密码文件
LOG_FILE="/var/log/openvpn-password.log"            #log文件
TIME_STAMP=`date "+%Y-%m-%d %T"`                    #时间戳

###########################################################

if [ ! -r "${PASSFILE}" ]; then                     #判断密码文件是否可读
  echo "${TIME_STAMP}: Could not open password file \"${PASSFILE}\" for reading." >> ${LOG_FILE}
  exit 1
fi

CORRECT_PASSWORD=`awk '!/^;/&&!/^#/&&$1=="'${username}'"{print $2;exit}' ${PASSFILE}`       #密码文件根据传入的用户名取出密码

if [ "${CORRECT_PASSWORD}" = "" ]; then
  echo "${TIME_STAMP}: User does not exist: username=\"${username}\", password=\"${password}\"." >> ${LOG_FILE}
  exit 1
fi

if [ "${password}" = "${CORRECT_PASSWORD}" ]; then  #如果密码
  echo "${TIME_STAMP}: Successful authentication: username=\"${username}\"." >> ${LOG_FILE}
  exit 0
fi

echo "${TIME_STAMP}: Incorrect password: username=\"${username}\", password=\"${password}\"." >> ${LOG_FILE}
exit 1
创建登录的用户名密码文件
[root@why-1 openvpn]# touch psw-file
[root@why-1 openvpn]# echo 'why 123456' >> psw-file
[root@why-1 openvpn]# echo 'mabiao 123456' >> psw-file
[root@why-1 openvpn]# chmod 400 psw-file
[root@why-1 openvpn]# chattr +i psw-file
[root@why-1 openvpn]# service openvpn stop
正在关闭openvpn:                                          [确定]
[root@why-1 openvpn]# service openvpn start
正在启动 openvpn:                                         [确定]
Client端操作
[root@why-2 ~]# vi /etc/openvpn/client.conf
cert client.crt     #删除
key client.key      #删除
auth-user-pass      #添加,询问用户名和密码
重启Client端服务
[root@why-2 ~]# ps -ef | grep openvpn
root      6778     1  0 18:10 ?        00:00:07 /usr/local/sbin/openvpn --config /etc/openvpn/client.conf
root      8211  8189  0 23:57 pts/1    00:00:00 grep openvpn
[root@why-2 ~]# pkill openvpn
可能会遇到的问题
如果连接失败出现WARNING: this configuration may cache passwords in memory -- use the auth-nocache option to prevent this
详细报错
Sat Feb 25 00:26:18 2017 OpenVPN 2.2.2 Win32-MSVC++ [SSL] [LZO2] [PKCS11] built on Dec 15 2011
Sat Feb 25 00:26:24 2017 NOTE: OpenVPN 2.1 requires '--script-security 2' or higher to call user-defined scripts or executables
Sat Feb 25 00:26:24 2017 LZO compression initialized
Sat Feb 25 00:26:24 2017 Control Channel MTU parms [ L:1544 D:140 EF:40 EB:0 ET:0 EL:0 ]
Sat Feb 25 00:26:24 2017 Socket Buffers: R=[65536->65536] S=[65536->65536]
Sat Feb 25 00:26:24 2017 Data Channel MTU parms [ L:1544 D:1450 EF:44 EB:135 ET:0 EL:0 AF:3/1 ]
Sat Feb 25 00:26:24 2017 Local Options hash (VER=V4): '69109d17'
Sat Feb 25 00:26:24 2017 Expected Remote Options hash (VER=V4): 'c0103fa8'
Sat Feb 25 00:26:24 2017 Attempting to establish TCP connection with 192.168.0.201:54321
Sat Feb 25 00:26:24 2017 TCP connection established with 192.168.0.201:54321
Sat Feb 25 00:26:24 2017 TCPv4_CLIENT link local: [undef]
Sat Feb 25 00:26:24 2017 TCPv4_CLIENT link remote: 192.168.0.201:54321
Sat Feb 25 00:26:24 2017 TLS: Initial packet from 192.168.0.201:54321, sid=ab71931e cb9e9afb
Sat Feb 25 00:26:24 2017 WARNING: this configuration may cache passwords in memory -- use the auth-nocache option to prevent this
Sat Feb 25 00:26:24 2017 VERIFY OK: depth=1, /C=CN/ST=BJ/L=Beijing/O=why/OU=why/CN=why-1/name=why/emailAddress=93216193@qq.com
Sat Feb 25 00:26:24 2017 VERIFY OK: nsCertType=SERVER
Sat Feb 25 00:26:24 2017 VERIFY OK: depth=0, /C=CN/ST=BJ/L=Beijing/O=why/OU=why/CN=server/name=why/emailAddress=93216193@qq.com
Sat Feb 25 00:26:25 2017 Data Channel Encrypt: Cipher 'BF-CBC' initialized with 128 bit key
Sat Feb 25 00:26:25 2017 Data Channel Encrypt: Using 160 bit message hash 'SHA1' for HMAC authentication
Sat Feb 25 00:26:25 2017 Data Channel Decrypt: Cipher 'BF-CBC' initialized with 128 bit key
Sat Feb 25 00:26:25 2017 Data Channel Decrypt: Using 160 bit message hash 'SHA1' for HMAC authentication
Sat Feb 25 00:26:25 2017 Control Channel: TLSv1, cipher TLSv1/SSLv3 DHE-RSA-AES256-SHA, 1024 bit RSA
Sat Feb 25 00:26:25 2017 [server] Peer Connection Initiated with 192.168.0.201:54321
Sat Feb 25 00:26:27 2017 SENT CONTROL [server]: 'PUSH_REQUEST' (status=1)
Sat Feb 25 00:26:27 2017 AUTH: Received AUTH_FAILED control message
Sat Feb 25 00:26:27 2017 TCP/UDP: Closing socket
Sat Feb 25 00:26:27 2017 SIGTERM[soft,auth-failure] received, process exiting
Sat Feb 25 00:26:27 2017 OpenVPN 2.2.2 Win32-MSVC++ [SSL] [LZO2] [PKCS11] built on Dec 15 2011
在server.conf中添加--script-security 3 #允许用户自定义执行脚本
--script-security是在2.1版本以上增加的功能
- -0代表严格的不能调用
- -1缺省,可以调用一些内部的插件
- -2允许用户自定义的脚本
- -3允许密码等通过该脚本
[root@why-1 openvpn]# vi /etc/openvpn/server.conf
[root@why-1 openvpn]# tail -4 /etc/openvpn/server.conf
auth-user-pass-verify /etc/openvpn/checkpsw.sh via-env
username-as-common-name
client-cert-not-required
--script-security 3
[root@why-1 openvpn]# service openvpn restart
正在关闭openvpn:                                          [确定]
正在启动 openvpn:                                         [确定]
特别说一下,这个openvpn,如果用init.d的方式启动,就用init.d的方式关闭,如果用指定配置文件启动,那么就pkill关闭
此次的流程就是通过client端定义用户名密码验证,在登录框中输入用户名和密码,传递到via-env作为参数传入脚本,脚本比对传入用户名和密码与文件中是否符合,根据返回值判断是否成功。
当然,可以修改脚本通过数据库等进行比对,只需要修改一下获取参数的方式即可。
配置OpenVPN通过ldap认证
我们需要OpenVPN通过python的ldap模块进行验证,实现上面shell脚本的功能,下面提供方案仅供参考,LDAP安装和使用,包括创建用户可以参考
安装依赖
[root@why-1 openvpn]# yum install -y openldap-clients openldap nscd nss nss-pam-ldapd nss-ldap python-ldap
如果出错就一个一个装
创建认证文件
[root@why-1 openvpn]# vi users-allowd.conf              #用于进行授权的文件
[root@why-1 openvpn]# cat users-allowd.conf
wanghongyu
[root@why-1 openvpn]# vi user.conf
[root@why-1 openvpn]# cat user.conf                     #用于测试的文件
wanghongyu
123456
创建测试脚本
[root@why-1 openvpn]# vi check_credit.py
[root@why-1 openvpn]# chmod +x check_credit.py
[root@why-1 openvpn]# cat check_credit.py
#!/usr/bin/python
import sys
import os
import logging
import ldap

#setting ldap
ldap_uri = "ldap://whysdomain.com:389"
ldap_starttls = True
ldap_dn = 'uid=%s,ou=People,dc=whysdomain,dc=com'

#setting log
log_filename = "/etc/openvpn/vpn.log"
log_format = "%(asctime)s %(levelname)s %(message)s"
log_level = logging.DEBUG

#setting authorization
auth_filename = "/etc/openvpn/users-allowed.conf"

def get_users(fpath):
    fp = open(fpath,"rb")
    lines = fp.readlines()
    fp.close()
    users = {}
    for line in lines:
        line = line.strip()
        if len(line) <= 0 or line.startswith('#'):
            continue
        users[line] = True
    return users

def get_credits(fpath):
    fp = open(fpath,"rb")
    lines = fp.readlines()
    fp.close()
    assert len(lines) >= 2,"invalib credit file"
    username = lines[0].strip()
    password = lines[1].strip()
    return (username,password)

def check_credits(username,password):
    passed = False
    ldap.set_option(ldap.OPT_PROTOCOL_VERSION,ldap.VERSION3)
    l = ldap.initialize(ldap_uri)
    if ldap_starttls:
        l.start_tls_s()
    try:
        l.simple_bind_s(ldap_dn%(username,),password)
        passed = True
    except ldap.INVALID_CREDENTIALS,e:
        logging.error("username,'%s'/password,'%s' failed verifying"%(username,password))
    l.unbind()
    return passed
def main(argv):
    credit_fpath = argv[1]
    (username,password) = get_credits(credit_fpath)
    if len(username) <= 0 or len(password) <=0:
        logging.error("invalid creadits for user '%s' %username")
        return 1
    logging.info("user'%s',password'%s' request logining"%(username,password))
    if check_credits(username,password):
        users = get_users(auth_filename)
        if not username in users:
                logging.error("user'%s' not authorized to access"%username)
                return 1
        logging.info("access of user '%s' granted"%username)
        return 0
    else:
        logging.error("access of user '%s' denied"%username)
        return 1

if __name__ == "__main__":
    logging.basicConfig(format=log_format,filename=log_filename,level=log_level)
    if len(sys.argv) != 2:
        logging.fatal("usage:%s<credit-file>"%sys.argv[0])
        sys.exit(1)
    rcode = 1
    try:
        rcode = main(sys.argv)
    except Exception,e:
        logging.fatal("exception happened:%s"%str(e))
    sys.exit(rcode)
判断脚本正确性
[root@why-1 openvpn]# python check_credit.py user.conf
[root@why-1 openvpn]# echo $?
1
[root@why-1 openvpn]# cat vpn.log
2017-02-25 02:23:47,329 INFO user'wanghongyu',password'123456' request logining
2017-02-25 02:23:48,109 CRITICAL exception happened:{'info': 'TLS error -5938:Encountered end of file', 'desc': 'Connect error'}
如果遇到该问题,可以
创建私钥
[root@why-1 openvpn]# cd /etc/openldap/certs
[root@why-1 certs]# openssl genrsa -out ldap.key 2014
[root@why-1 certs]# ll
总用量 64
-rw-r--r-- 1 root root 65536 2月  21 00:28 cert8.db
-rw-r--r-- 1 root root 16384 2月  21 00:28 key3.db
-r-------- 1 root root    45 2月  21 00:28 password
-rw-r--r-- 1 root root 16384 2月  21 00:28 secmod.db
生成签名请求
[root@why-1 certs]# openssl genrsa -out ldap.key 2014
Generating RSA private key, 2014 bit long modulus
...........+++
......+++
e is 65537 (0x10001)
[root@why-1 certs]# openssl req -new -key ldap.key -out ldap.csr
You are about to be asked to enter information that will be incorporated
into your certificate request.
What you are about to enter is what is called a Distinguished Name or a DN.
There are quite a few fields but you can leave some blank
For some fields there will be a default value,
If you enter '.', the field will be left blank.
-----
Country Name (2 letter code) [XX]:CN
State or Province Name (full name) []:BJ
Locality Name (eg, city) [Default City]:Beijing
Organization Name (eg, company) [Default Company Ltd]:hy
Organizational Unit Name (eg, section) []:^C
[root@why-1 certs]# openssl req -new -key ldap.key -out ldap.csr
You are about to be asked to enter information that will be incorporated
into your certificate request.
What you are about to enter is what is called a Distinguished Name or a DN.
There are quite a few fields but you can leave some blank
For some fields there will be a default value,
If you enter '.', the field will be left blank.
-----
Country Name (2 letter code) [XX]:CN
State or Province Name (full name) []:BJ
Locality Name (eg, city) [Default City]:Beijing
Organization Name (eg, company) [Default Company Ltd]:why
Organizational Unit Name (eg, section) []:why
Common Name (eg, your name or your server's hostname) []:why-1
Email Address []:why

Please enter the following 'extra' attributes
to be sent with your certificate request
A challenge password []:123456
An optional company name []:why
公钥
[root@why-1 certs]# openssl x509 -req -days 1095 -in ldap.csr -signkey ldap.key -out ldap.crt
Signature ok
subject=/C=CN/ST=BJ/L=Beijing/O=why/OU=why/CN=why-1/emailAddress=why
Getting Private key
修改权限
[root@why-1 certs]# chmod 700 /etc/openldap/certs
[root@why-1 certs]# chown ldap.ldap /etc/openldap/certs -R
修改配置文件,添加证书路径
[root@why-1 certs]# vim /etc/openldap/ldap.conf
TLS_CACERTDIR /etc/openldap/certs
修改openldap配置文件
[root@why-1 certs]# vim /etc/openldap/slapd.conf
TLSCertificateFile /etc/openldap/certs/ldap.crt
TLSCertificateKeyFile /etc/openldap/certs/ldap.key
重启slapd服务
[root@why-1 certs]# slaptest -u
config file testing succeeded
[root@why-1 certs]# /etc/init.d/slapd restart
Stopping slapd:                                            [  OK  ]
Starting slapd:                                            [  OK  ]
[root@why-1 certs]# netstat -tunlp |grep slapd
tcp        0      0 0.0.0.0:389                 0.0.0.0:*                   LISTEN      5757/slapd
tcp        0      0 :::389                      :::*                        LISTEN      5757/slapd
重试
[root@why-1 openvpn]# python check_credit.py user.conf
[root@why-1 openvpn]# echo $?
0
[root@why-1 openvpn]# cat vpn.log
2017-02-25 03:33:24,278 INFO user'wanghongyu',password'123456' request logining
2017-02-25 03:33:24,591 INFO access of user 'wanghongyu' granted
当然如果不希望打印到日志中密码可以修改脚本
修改配置文件
[root@why-1 openvpn]# vi server.conf
[root@why-1 openvpn]# tail -4 server.conf
auth-user-pass-verify /etc/openvpn/check_credit.py via-file
username-as-common-name
client-cert-not-required
--script-security 3
via-file会生成一个临时文件,临时文件会和ldap的权限进行认证,默认在当前目录生成,也可以通过--tmp-dir指定目录,官方说为了安全可以放在/dev/shm内存中。
重启服务
[root@why-1 openvpn]# service openvpn restart
正在关闭openvpn:                                          [确定]
正在启动 openvpn:                                         [确定]
Client端测试
client端文件还和本地验证一样
检验
我通过ldap用户wanghongyu登录可以,通过ldap用户mabiao登录就不行,这个权限就是在users-allowed.conf中定义的,python脚本先检测用户名密码是否正确,然后在这里检验是否有登录权限。
ldap用户mabiao登录报错
Sat Feb 25 03:42:58 2017 Control Channel: TLSv1, cipher TLSv1/SSLv3 DHE-RSA-AES256-SHA, 1024 bit RSA
Sat Feb 25 03:42:58 2017 [server] Peer Connection Initiated with 192.168.0.201:54321
Sat Feb 25 03:43:00 2017 SENT CONTROL [server]: 'PUSH_REQUEST' (status=1)
Sat Feb 25 03:43:00 2017 AUTH: Received AUTH_FAILED control message
Sat Feb 25 03:43:00 2017 TCP/UDP: Closing socket
Sat Feb 25 03:43:00 2017 SIGTERM[soft,auth-failure] received, process exiting
Sat Feb 25 03:43:00 2017 OpenVPN 2.2.2 Win32-MSVC++ [SSL] [LZO2] [PKCS11] built on Dec 15 2011
那个user.conf只是用来测试python脚本,可以删除掉。这样我们的OpenVPN+LDAP就安装完了

