

<服务>LDAP
目录:
目录服务
目录服务是一类为了浏览和搜索数据而设计的特殊数据库,目录的更新操作是原子操作,要么全部更新,要么不操作,例如微软的活动目录,是按照树状形式存储信息,目录包含基于属性的描述性信息,并支持高级的过滤。LDAP就是Linux上的活动目录的开源实现。
具备主从服务器同步目录数据信息的能力,DNS就是一个典型的大范围分布式目录服务。
目录服务有两个国际标准,分别为X.500和LDAP。X.500是ITU定义的目录标准,而LDAP是基于TCP/IP的目录访问协议,是Interner上所有目录服务的通用协议。
X.500介绍
X.500由ITU-T和ISO定义,和TCP/IP协议一样,是一个协议族。
LDAP介绍
LDAP是轻量级目录访问协议,基于X.500的简化版本,运行TCP/IP协议或其他面向连接的传输服务之上。
LDAP和X.500的区别
LDAP是X.500标准的目录访问协议DAP的一个子集,包含常用的操作,相同点包括
- 通用的平台架构,可以与多平台和应用程序交互
- 信息模型上使用了项,对象类,属性等概念和模式来描述信息
- 命名空间上使用了目录信息树结构和层次命名模型
- 相似的操作命令
- 都可以使用用户名密码或基于安全加密方式认证
- 扩展性强
- 分布性,并且每台主机又可以各自管理组织结构,满足分级管理 不同点包括
- LDAP基于TCP/IP协议,X.500基于OSI协议,建立在应用层,在会话层表示层之间建立连接和包处理
- LDAP继承了X.500的良好特性,省去了X.500中很少使用又很复杂的服务控制和安全特性
- LDAP通过引用实现分布式,通过对客户端进行操作,X.500通过链操作实现,查询服务服务端压力很大
- LDAP实现成本,运维成本较小,性能相对更高
常用名称
| 关键字 | 含义 |
|---|---|
| dc | 域名组件,将完整域名分为几部分,例如why.com分为dc=why,dc=com |
| uid | 用户ID,如why |
| ou | 组织单元,类似Linux系统的子目录,是一个容器对象,组织单元可以包含其他组织单元 |
| cn | 姓名 |
| sn | 姓氏 |
| dn | 唯一辨别名,可以理解为绝对路径,例如dn:uid=why,ou=redoop,dc=why,dc=com,通常用于检索 |
| rdn | 相对辨别名,相对路径,例如uid=why,dc=why,dc=com |
| c | 国家,例如CN和US |
| o | 组织 |
LDAP目录服务的特点
- 跨平台的标准协议
- 采用树形结构表示
- 提供静态数据的快速查询方式,但是不适合更新数据
- 可以基于推送和拉取的复制信息技术
- 支持安全协议,例如SSL和TLS,确保事务安全
- 支持异类数据存储
- C/S架构,Server端用于存储目录结构,Client端提供操作目录信息树等工具
LDAP目录结构
通过目录数据库来存储网络信息提供目录服务,目录信息树简称DIT。
DIT由条目组成,就是数据库的一条记录,每个条目是分辨名dn属性和值的键值对集合。
LDAP通过ou在逻辑上把数据分开,ou下才是用户条目。
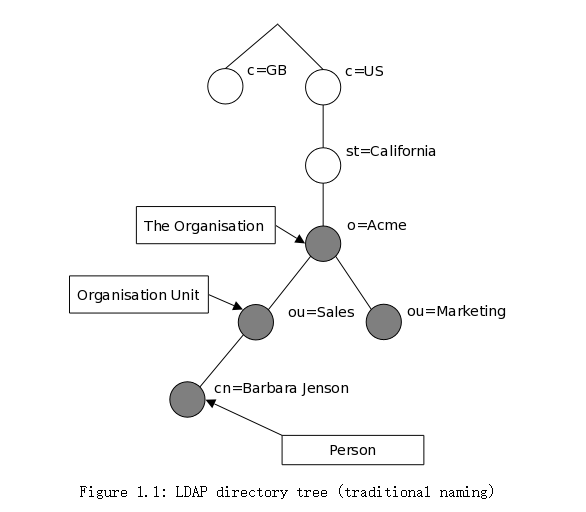
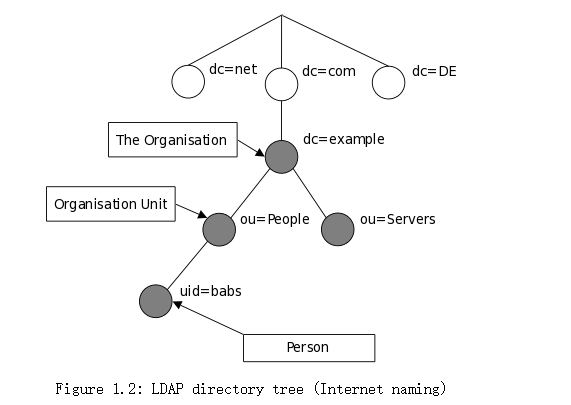
这两种目录结构都可以,一般第二种比较容易理解。
一个条目是通过其标识名来引用,标识名由相对标识名和它的父条目名连在一起构成。
LDAP文件格式
LDAP文件为LDIF格式,是一种ASCii文件格式
- 通过空行来分割一个条目或定义
- 以#开始为注释
- 所有属性赋值方法为"属性:属性值",例如:dn:dc=whysdomain,dc=com
- 属性可以被重复赋值,例如objectclass就可以有多个。
- 每个属性及属性值独立一行
- 每行结尾不允许有空格
LDAP的几个重要配置模式
- 基本的目录查询服务
- 目录查询代理
- 异机复制数据
基本的目录查询服务
本地查询
目录查询代理
我向Server端请求,但是Server端访问压力过大,返回给Client一个代理Server端地址,使用的是referral <URL>
异机复制数据
- Client向Server slave库写入数据
- Server slave库拒绝写入并返回Server master库位置
- Client向Server master库写入,如果直接就是写入matser库,没有上述过程
- Server master库返回写入成功
- Server master库产生Replication Log
- Server master库推送到Server slave库
- Server slave库的slurpd进程写入slave
但是一般只需要rsync或inotify进行同步master的数据文件到salve库即可
LDAP应用领域
适合那些需要从不同的地点读取信息,但是不需要经常更新的业务信息。 信息安全类:数字证书管理,授权管理,单点管理 网络资源类:mail系统,DNS系统,网络用户管理,电话簿 电子政务类:内网组织信息服务,电子政务目录体系,人口基础库,法人基础库
最基本的就是为公司入职后的所有员工账号等基础服务信息库,例如邮件账号,电脑登录账号,办公平台账号,共享服务账号,SVN账号,VPN账号,服务器账号,无线网登录账号等。
LDAP环境搭建
环境准备
[root@why-1 ~]# echo "192.168.0.201 whysdomain.com" >> /etc/hosts
[root@why-1 ~]# tail -1 /etc/hosts
192.168.0.201 whysdomain.com
[root@why-1 ~]# ping whysdomain.com
PING whysdomain.com (192.168.0.201) 56(84) bytes of data.
64 bytes from whysdomain.com (192.168.0.201): icmp_seq=1 ttl=64 time=0.038 ms
64 bytes from whysdomain.com (192.168.0.201): icmp_seq=2 ttl=64 time=0.032 ms
^C
--- whysdomain.com ping statistics ---
2 packets transmitted, 2 received, 0% packet loss, time 1334ms
rtt min/avg/max/mdev = 0.032/0.035/0.038/0.003 ms
当然可以选择example.com,这样很多默认就是这个,不需要修改,容易成功。
安装软件包及其依赖
http://www.openldap.org/doc/admin24/install.html可以看到依赖
[root@why-1 ~]# yum install -y openldap openldap-*
[root@why-1 ~]# yum install -y openldap openldap-
拷贝配置文件模板
[root@why-1 ~]# cd /etc/openldap/
[root@why-1 openldap]# cp /usr/share/openldap-servers/slapd.conf.obsolete slapd.conf
生成管理员密码
[root@why-1 openldap]# slappasswd --help
slappasswd: invalid option -- '-'
Usage: slappasswd [options]
  -c format crypt(3) salt format
  -g        generate random password
  -h hash   password scheme
  -n        omit trailing newline
  -o <opt>[=val] specify an option with a(n optional) value
    module-path=<pathspec>
    module-load=<filename>
  -s secret new password
  -u        generate RFC2307 values (default)
  -v        increase verbosity
  -T file   read file for new password
[root@why-1 openldap]# slappasswd -s why123456  #生成密码为why123456
{SSHA}hlLNntYm1uNvfk4wq/yKMe8GtU4e9CBx
修改配置文件
[root@why-1 openldap]# vi slapd.conf
database        bdb
suffix          "dc=my-domain,dc=com"
checkpoint      1024 15
rootdn          "cn=Manager,dc=my-domain,dc=com"
修改为我们自定义的
database        bdb
suffix          "dc=whysdomain,dc=com"              #指定搜索后缀
rootdn          "cn=admin,dc=whysdomain,dc=com"     #指定管理员dn路径,使用该dn可以登录openldap服务器
rootpw  {SSHA}hlLNntYm1uNvfk4wq/yKMe8GtU4e9CBx      #指定管理员密码,为我们生成的
loglevel        296                                 #日志级别,296 代表256(日志连接/操作/结果)32(搜索过滤器处理)8(连接结果累加)
cachesize       1000                                #缓存记录数量
checkpoint      2048 10                             #内存中数据写入到数据文件的操作,每2048KB或10分钟一次

为了方便测试修改一下访问权限
database config
access to *
        by dn.exact="gidNumber=0+uidNumber=0,cn=peercred,cn=external,cn=auth" manage
        by * none

# enable server status monitoring (cn=monitor)
database monitor
access to *
        by dn.exact="gidNumber=0+uidNumber=0,cn=peercred,cn=external,cn=auth" read
        by dn.exact="cn=Manager,dc=my-domain,dc=com" read
        by * none
替换为
    access to *
        by self write
        by anonymous auth
        by * read
关于用户权限管理
| 用户 | 含义 |
|---|---|
| * | 全部,包含匿名用户和认证用户 |
| anonymous | 匿名用户 |
| users | 认证用户 |
| self | 用户自身 |
| dn[. |
授权正则表达式 |
| dn. |
授权正则表达式 |
| 级别 | 权限 | 描述 |
|---|---|---|
| none | 0 | 禁止访问 |
| disclose | d | 在必要的情况下公开 |
| auth | dx | 需要验证 |
| compare | cdx | 比较 |
| search | scdx | 搜索 |
| read | rscdx | 读取和搜索 |
| write | wrscdx | 修改和重命名 |
| manage | mwrscdx | 管理权限 |
    access to *
        by self write
        by anonymous auth
        by * read
实例代表允许自己具有write权限,匿名用户需要进行验证,其他用户,即认证用户有读的权限。
更多的示例描述等参考文档http://www.openldap.org/doc/admin24/access-control.html
配置rsyslog记录LDAP
[root@why-1 ~]# cp /etc/rsyslog.conf /etc/rsyslog.conf.old
[root@why-1 ~]# echo '#record ladp.log by why 2017.2.21' >> /etc/rsyslog.conf
[root@why-1 ~]# echo 'local4.* /var/log/ldap.log'>> /etc/rsyslog.conf
[root@why-1 ~]# tail -2 /etc/rsyslog.conf
#record ladp.log by why 2017.2.21
local4.* /var/log/ldap.log
[root@why-1 ~]# service rsyslog restart
关闭系统日志记录器:                                       [确定]
启动系统日志记录器:                                       [确定]
配置LDAP数据库
[root@why-1 ~]# egrep '^database|^directory' /etc/openldap/slapd.conf
database    bdb
directory   /var/lib/ldap
[root@why-1 ~]# ll /var/lib/ldap/
总用量 0
[root@why-1 ~]# cp /usr/share/openldap-servers/DB_CONFIG.example /var/lib/ldap/DB_CONFIG    #拷贝数据库配置
[root@why-1 ~]# chown ldap.ldap /var/lib/ldap/DB_CONFIG
[root@why-1 ~]# chmod 700 /var/lib/ldap     #ldap目录为ldap.ldap
[root@why-1 ~]# slaptest -u                 #测试配置
config file testing succeeded
LDAP测试
[root@why-1 ~]# service slapd start
正在启动 slapd:                                           [确定]
[root@why-1 ~]# lsof -i:389
COMMAND  PID USER   FD   TYPE DEVICE SIZE/OFF NODE NAME
slapd   6435 ldap    7u  IPv4  32675      0t0  TCP *:ldap (LISTEN)
slapd   6435 ldap    8u  IPv6  32676      0t0  TCP *:ldap (LISTEN)
[root@why-1 ~]# cat /var/log/ldap.log
Feb 21 23:38:54 why-1 slapd[6434]: @(#) $OpenLDAP: slapd 2.4.40 (May 10 2016 23:30:49) $#012#011mockbuild@worker1.bsys.centos.org:/builddir/build/BUILD/openldap-2.4.40/openldap-2.4.40/build-servers/servers/slapd4


[root@why-1 ~]# ldapsearch -LLL -W -x -H ldap://whysdomain.com -D "cn=admin,dc=whysdomain,dc=com" -b "dc=whysdomain,dc=com" "(uid=*)"       #查询数据
Enter LDAP Password:
ldap_bind: Invalid credentials (49)
#出现49密码错误是因为配置不兼容导致的,我上述配置为2.3配置方式,适合的5.x版本,正常应该读取/etc/openldap/slapd.d/下文件
[root@why-1 ~]# rm -rf /etc/openldap/slapd.d/*                                      #删除配置
[root@why-1 ~]# slaptest -f /etc/openldap/slapd.conf -F /etc/openldap/slapd.d       #根据配置文件生成新的配置
58ac641c bdb_monitor_db_open: monitoring disabled; configure monitor database to enable
config file testing succeeded

[root@why-1 ~]# service slapd restart
停止 slapd:                                               [确定]
正在检查 slapd 的配置文件:                                [失败]
58ac6435 ldif_read_file: Permission denied for "/etc/openldap/slapd.d/cn=config.ldif"
slaptest: bad configuration file!
[root@why-1 ~]# chown -R ldap.ldap /etc/openldap/slapd.d/                           #处理权限问题
[root@why-1 ~]# service slapd start
正在启动 slapd:                                           [确定]
[root@why-1 ~]# lsof -i:389
COMMAND  PID USER   FD   TYPE DEVICE SIZE/OFF NODE NAME
slapd   6632 ldap    7u  IPv4  35069      0t0  TCP *:ldap (LISTEN)
slapd   6632 ldap    8u  IPv6  35070      0t0  TCP *:ldap (LISTEN)
[root@why-1 ~]# ldapsearch -LLL -W -x -H ldap://whysdomain.com -D "cn=admin,dc=whysdomain,dc=com" -b "dc=whysdomain,dc=com" "(uid=*)"
Enter LDAP Password:        #输出生成是-s指定的密码
No such object (32)         #测试通过,只是没有数据
LDAP数据导入
- 根据LDAP数据文件格式导入数据
- 根据系统用户及LDAP自带脚本初始化数据
- 通过LDAP客户端来解决
- 通过web管理
ldapadd -x -H ldap://whysdomain.com -D "cn=admin,dc=whysdomain,dc=com" -W -f
-H 连接的server -D是管理员用户 -f base.ldif导入备份文件,备份也只需要查询并重定向到一个文件
通过LDAP web程序管理
[root@why-1 ~]# yum install -y httpd php php-ldap php-gd            #PHP版本要求5.2
[root@why-1 ~]# wget https://jaist.dl.sourceforge.net/project/lam/LAM/3.7/ldap-account-manager-3.7.tar.gz
[root@why-1 ~]# tar xf ldap-account-manager-3.7.tar.gz
[root@why-1 ~]# mv ldap-account-manager-3.7 ldap
[root@why-1 ~]# cd ldap/config
[root@why-1 config]# cp config.cfg_sample config.cfg
[root@why-1 config]# cp lam.conf_sample lam.conf
[root@why-1 config]# sed -i "s/cn=Manager/cn=admin/g" lam.conf              #修改默认配置为我们的管理员admin
[root@why-1 config]# sed -i "s/dc=my-domain/dc=whysdomain/g" lam.conf       #修改域
[root@why-1 config]# sed -i "s/dc=com/dc=net/g" lam.conf                    #这一步我没有执行,只是提示一下,如果不是com也需要修改一下
[root@why-1 config]# diff lam.conf lam.conf_sample
13c13
< admins: cn=admin,dc=whysdomain,dc=com
---
> admins: cn=Manager,dc=my-domain,dc=com
55c55
< types: suffix_user: ou=People,dc=whysdomain,dc=com
---
> types: suffix_user: ou=People,dc=my-domain,dc=com
59c59
< types: suffix_group: ou=group,dc=whysdomain,dc=com
---
> types: suffix_group: ou=group,dc=my-domain,dc=com
63c63
< types: suffix_host: ou=machines,dc=whysdomain,dc=com
---
> types: suffix_host: ou=machines,dc=my-domain,dc=com
67c67
< types: suffix_smbDomain: dc=whysdomain,dc=com
---
> types: suffix_smbDomain: dc=my-domain,dc=com
[root@why-1 config]# cp -r ~/ldap /var/www/html/
[root@why-1 config]# ll /var/www/html/
总用量 4
drwxr-xr-x 12 root root 4096 2月  22 01:06 ldap
[root@why-1 config]# chown -R apache.apache /var/www/html/ldap/
[root@why-1 config]# service httpd start
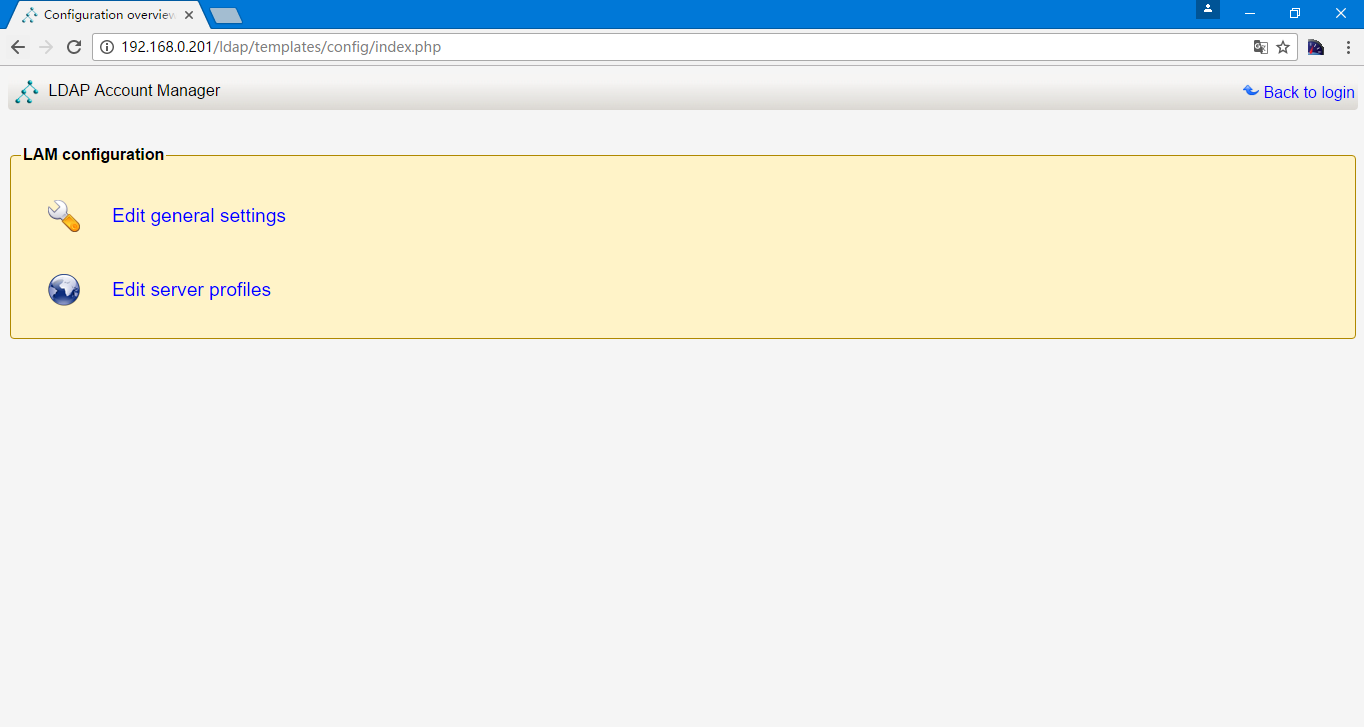
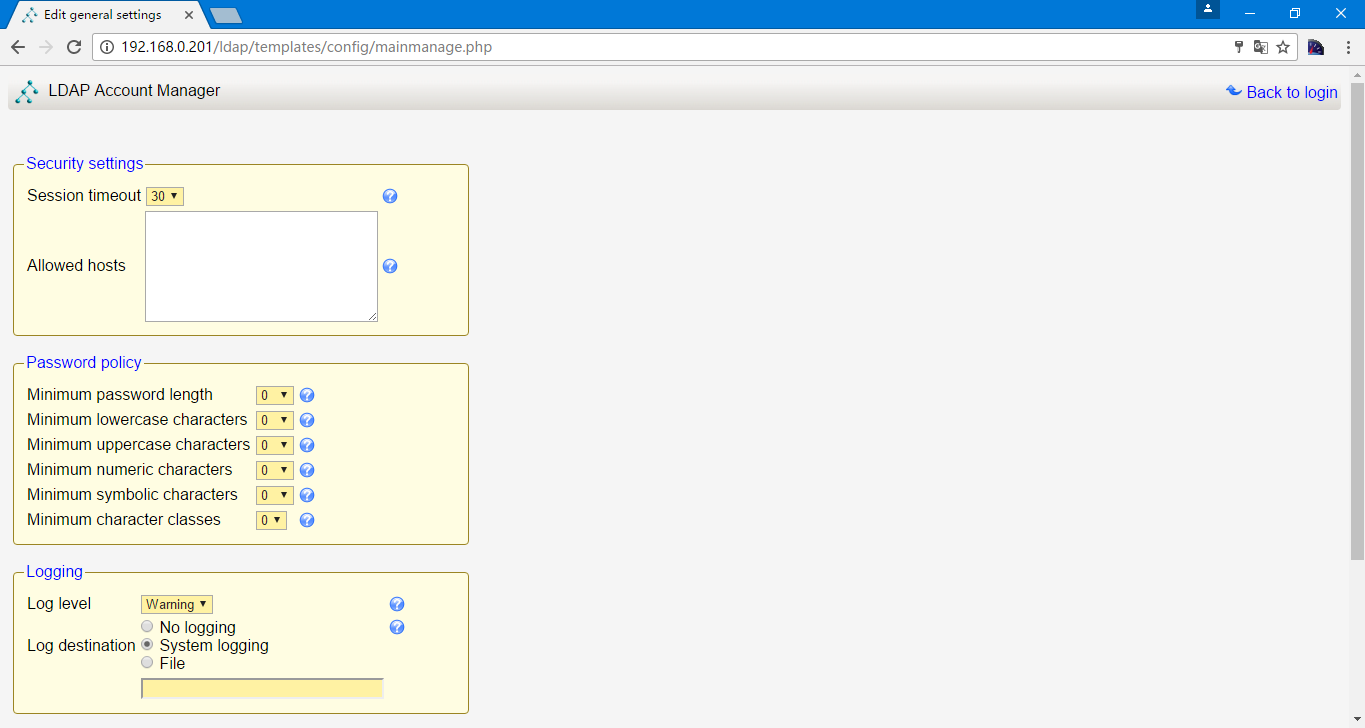
然后访问对应IP/ldap即可,一般先进行初始化设置,选着右上方的LAM configuration

选择Edit general settings
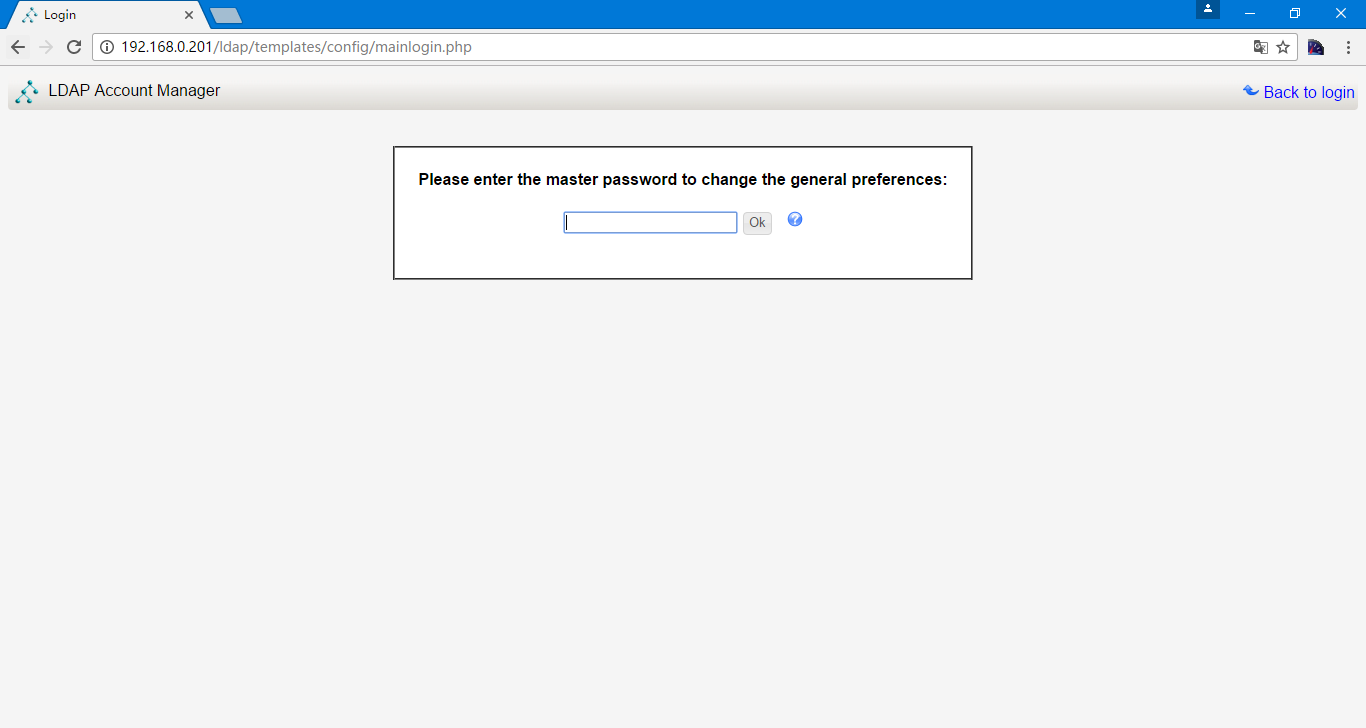
输入管理密码,默认密码为lam,该密码用于web端管理使用
这里配置包含session超时时间,允许主机等,最下边是修改管理,更多的可以看问号内的内容

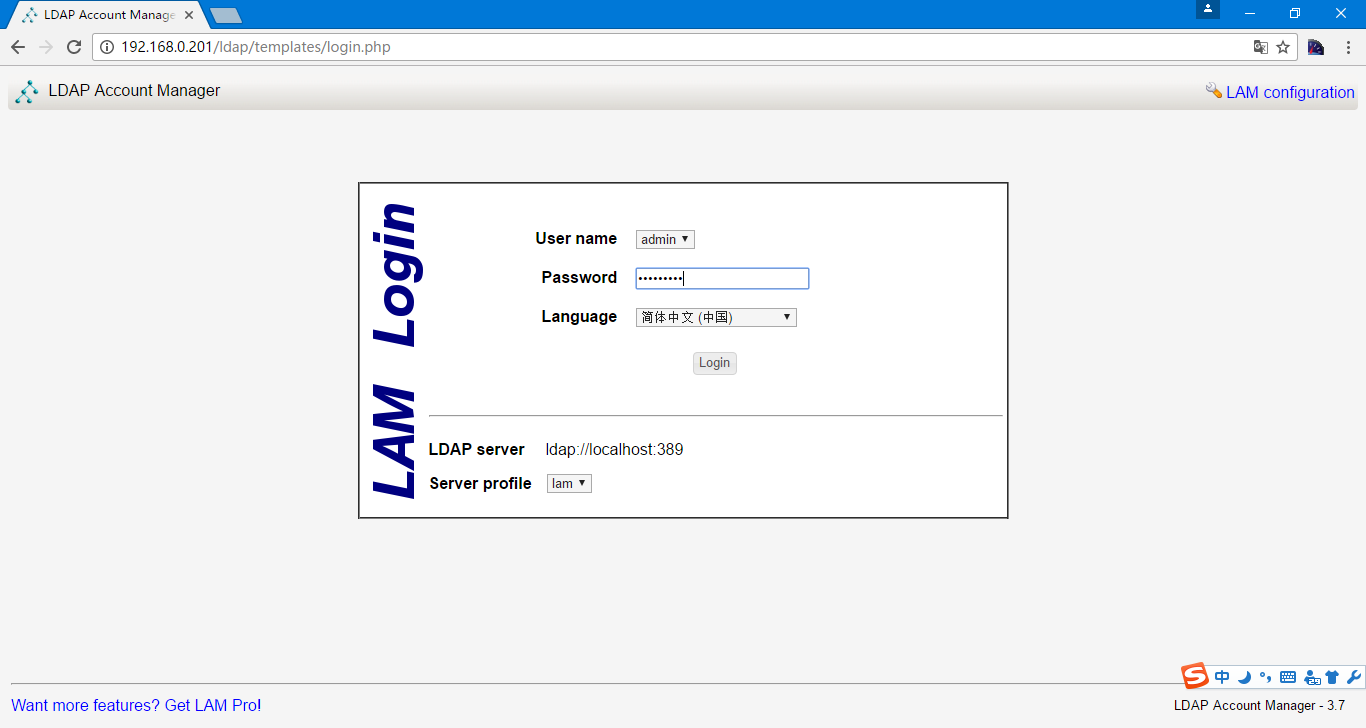
选择简体中文,并且输入ldap的密码,就是我们通过-s指定的密码
这边选建立即可
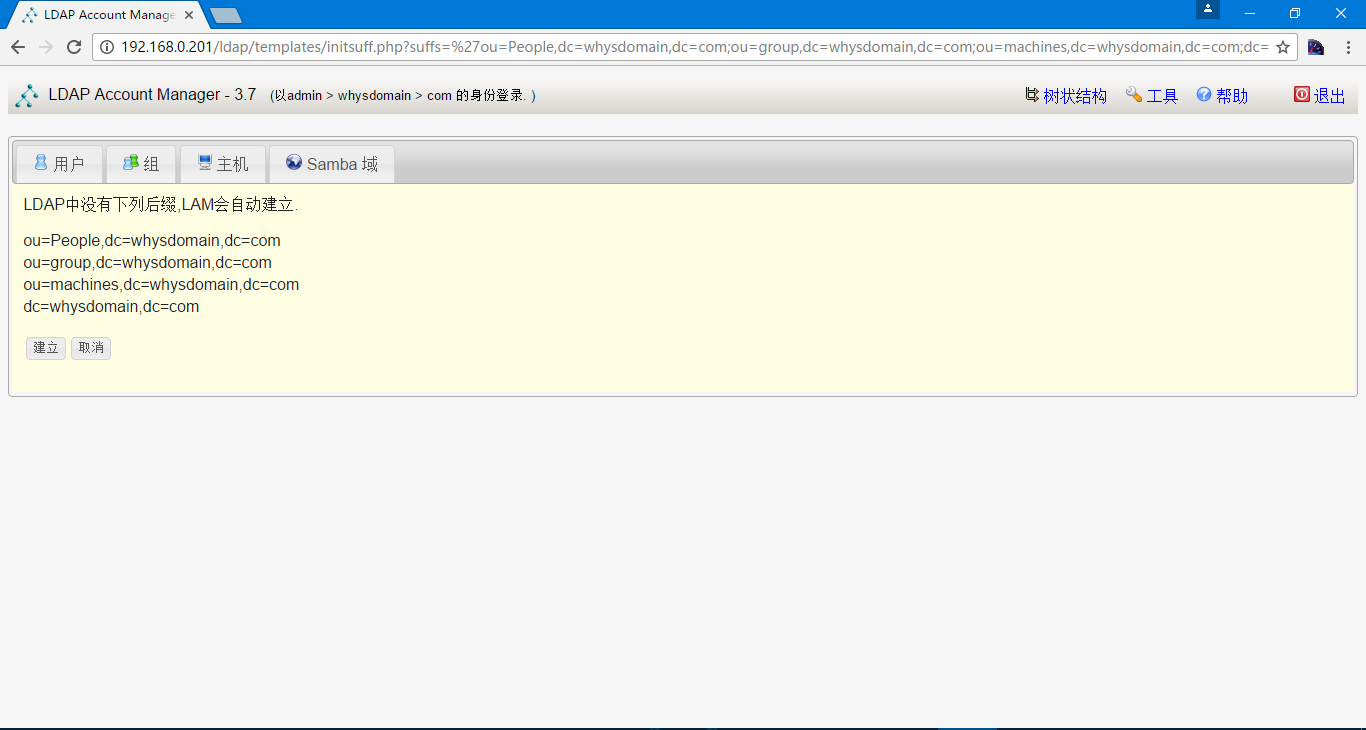
进入页面
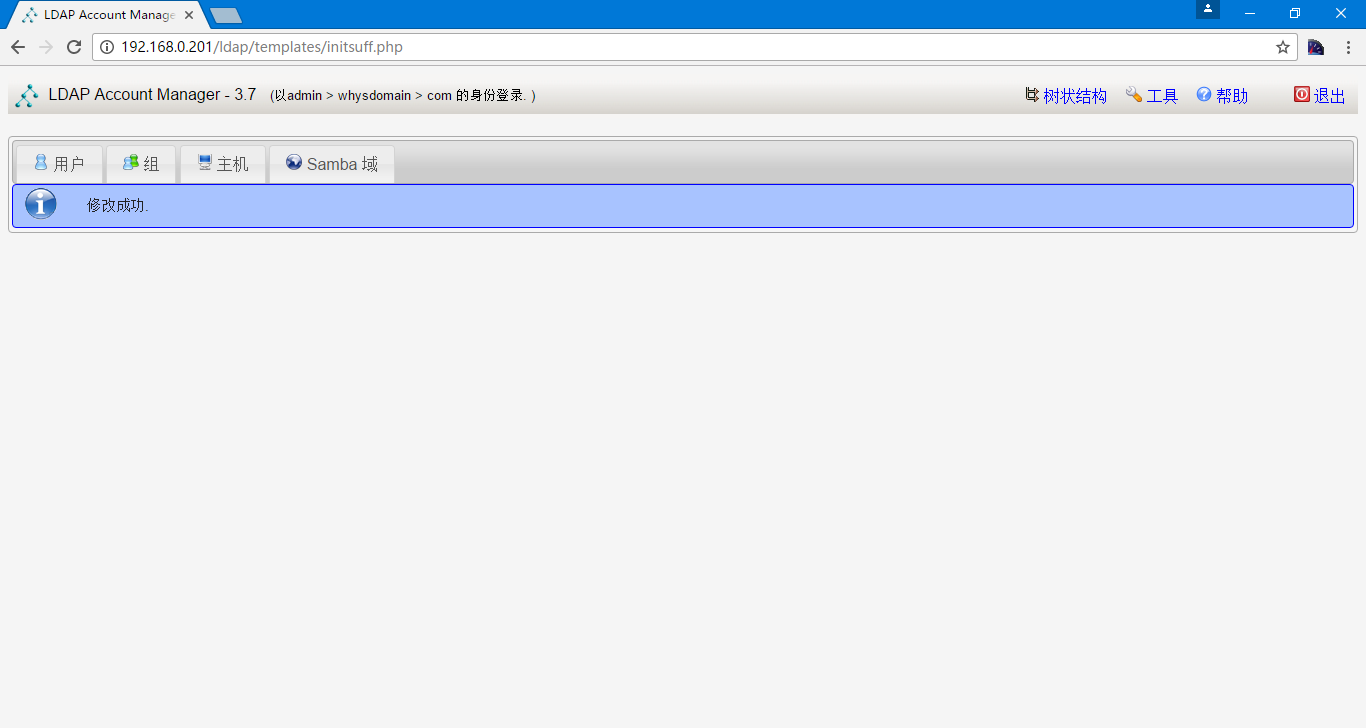
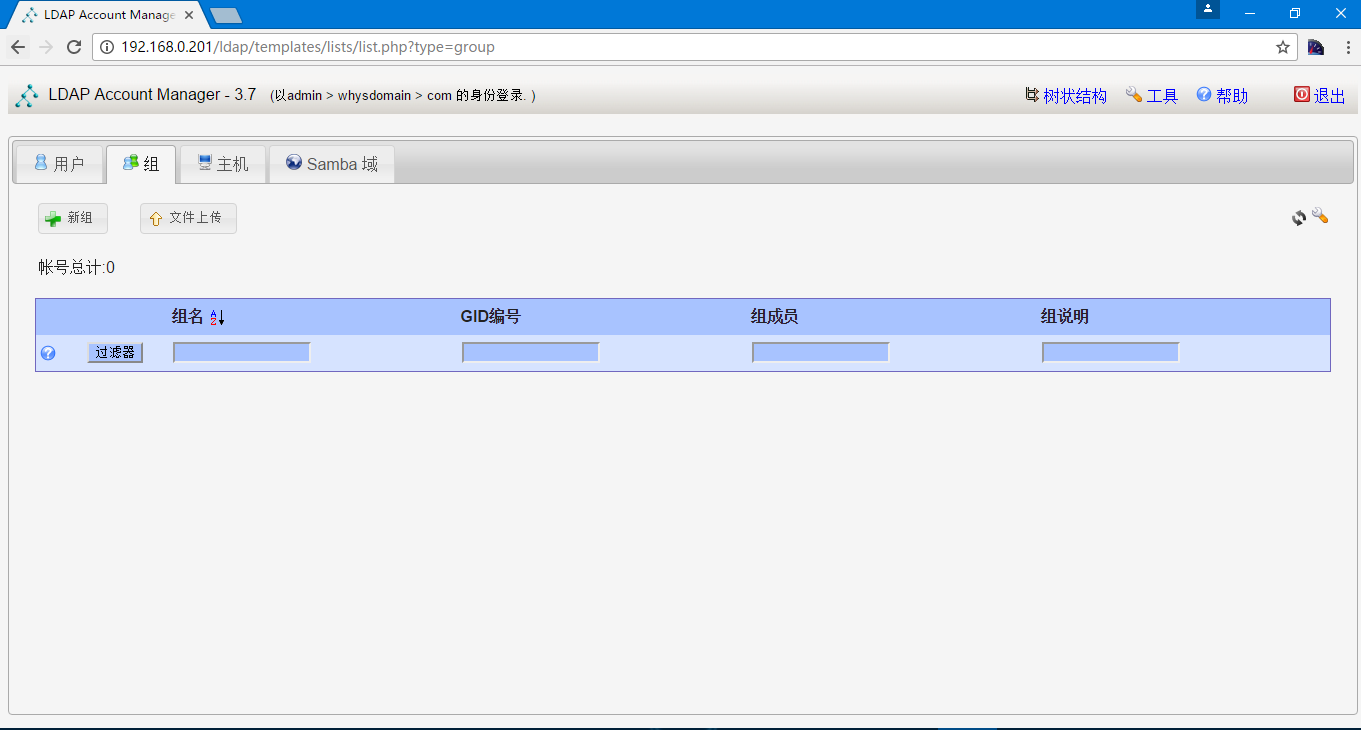
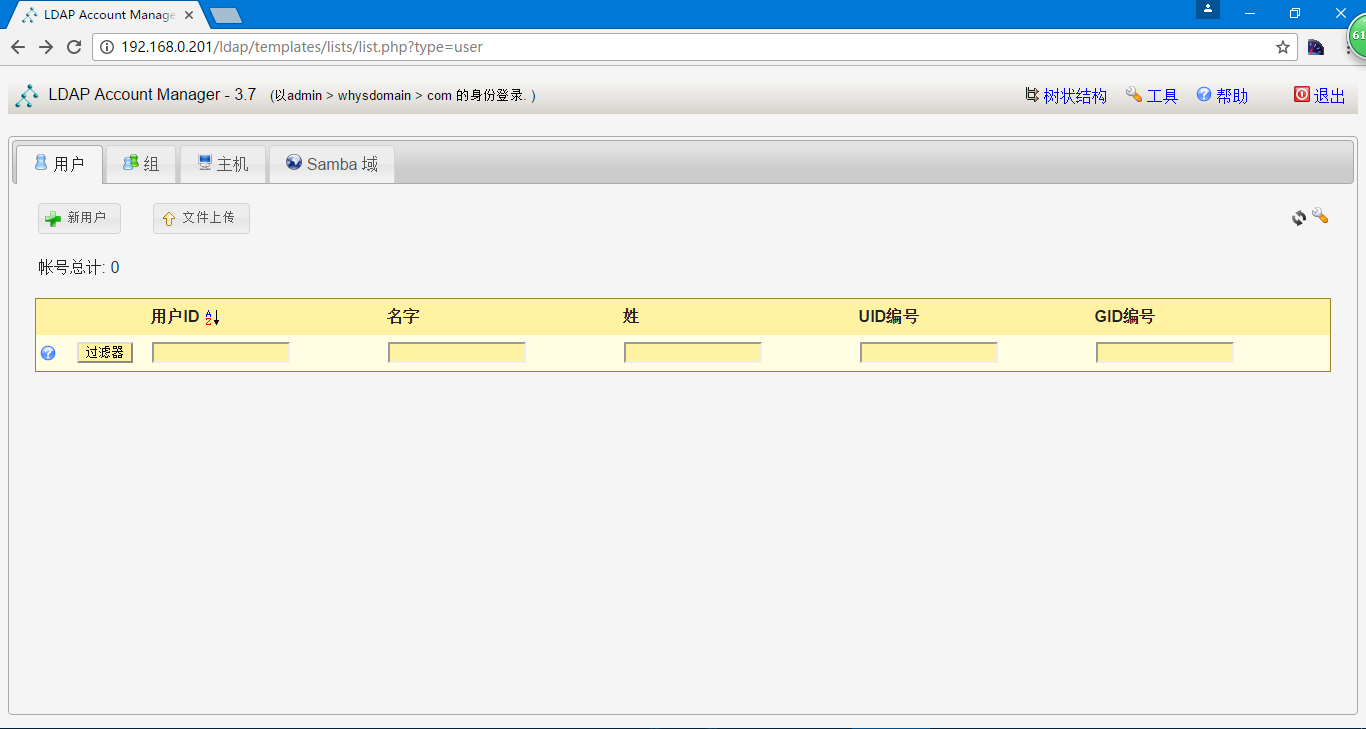
我们看一下用户,一个都没有

组也是
添加组
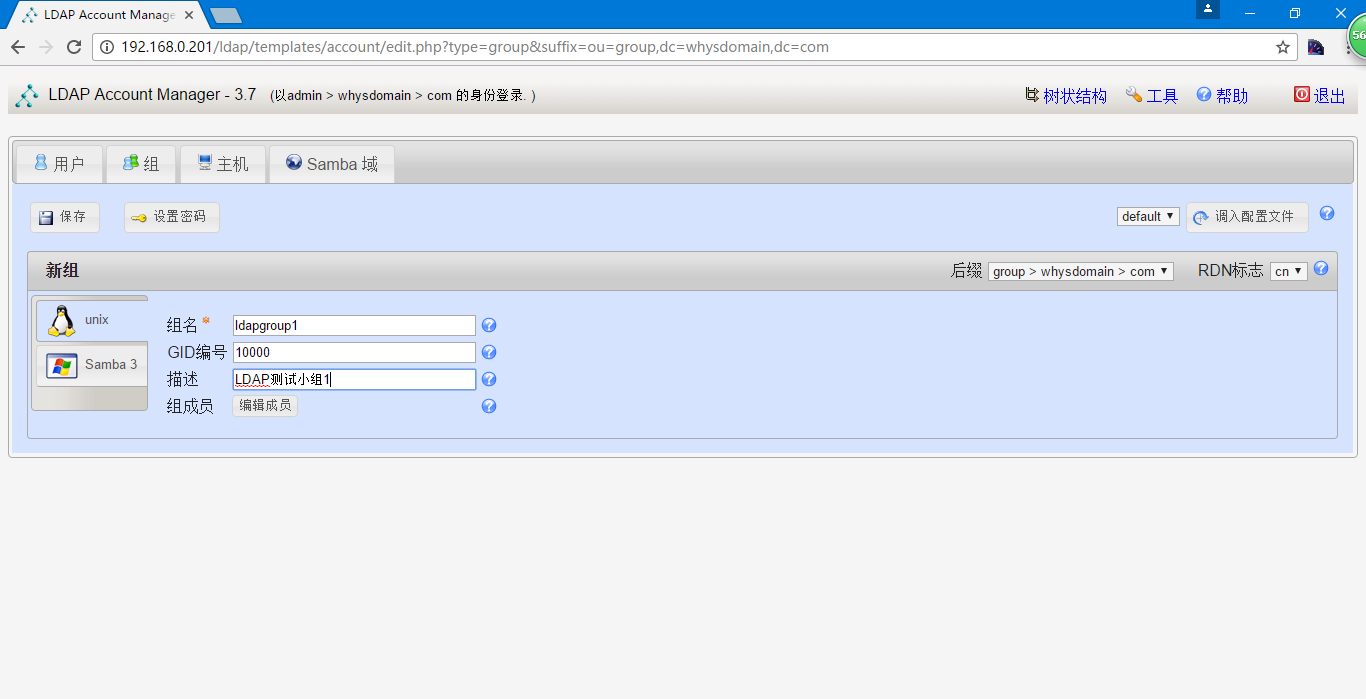
进行保存
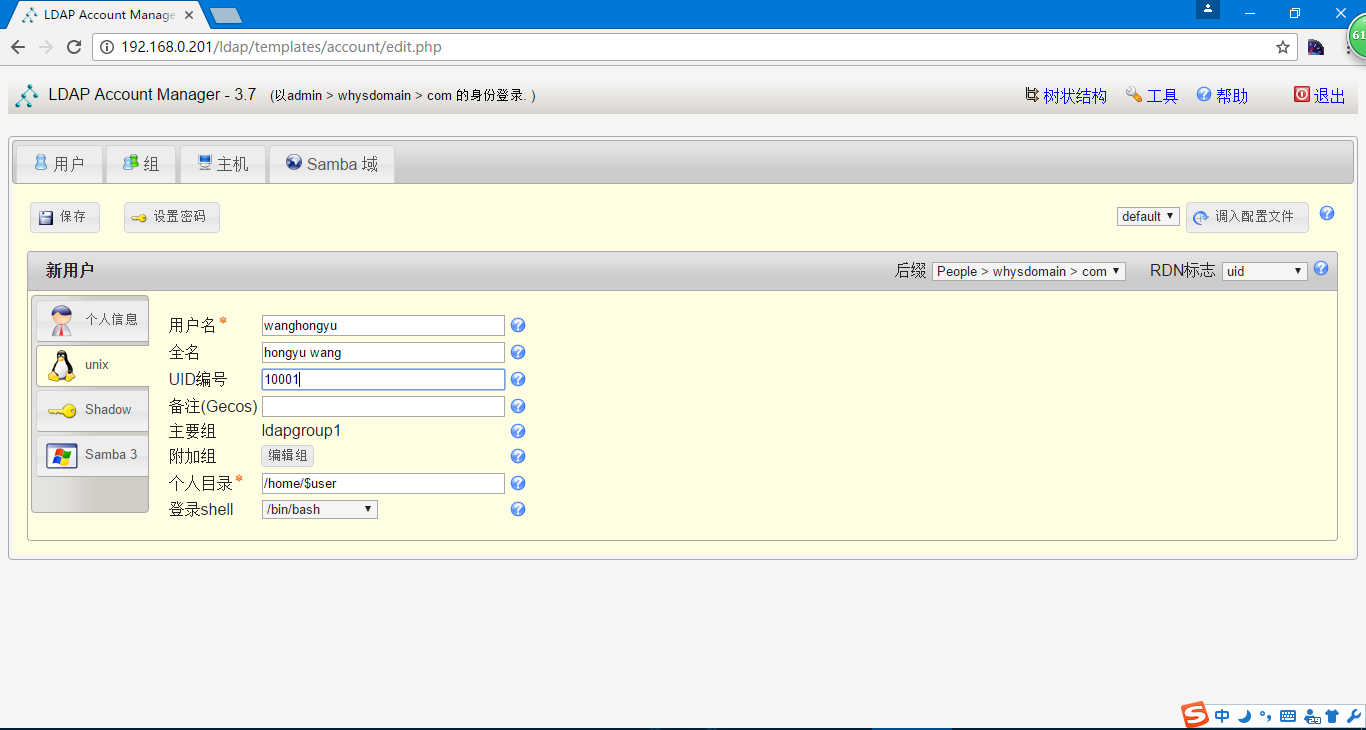
选择用户,选择新用户
在个人信息填写名字和姓

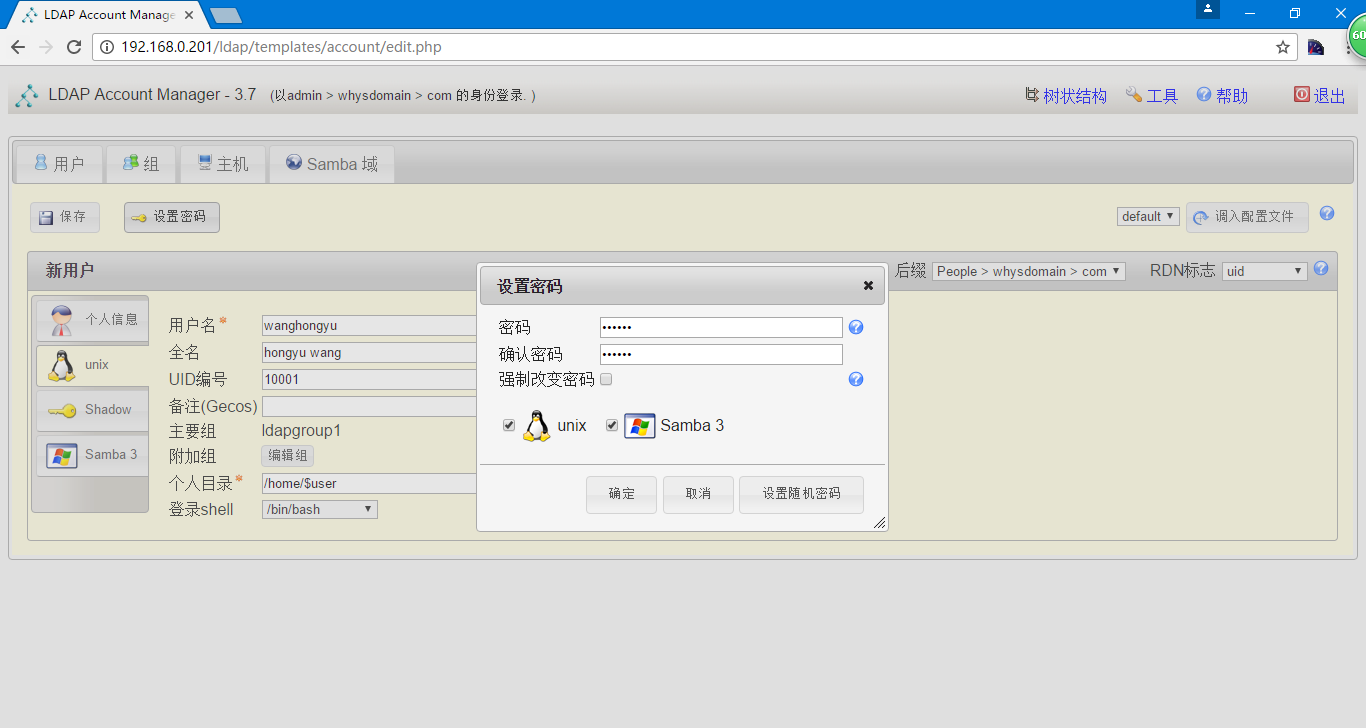
填写用户名,进行密码设置
填写密码并保存
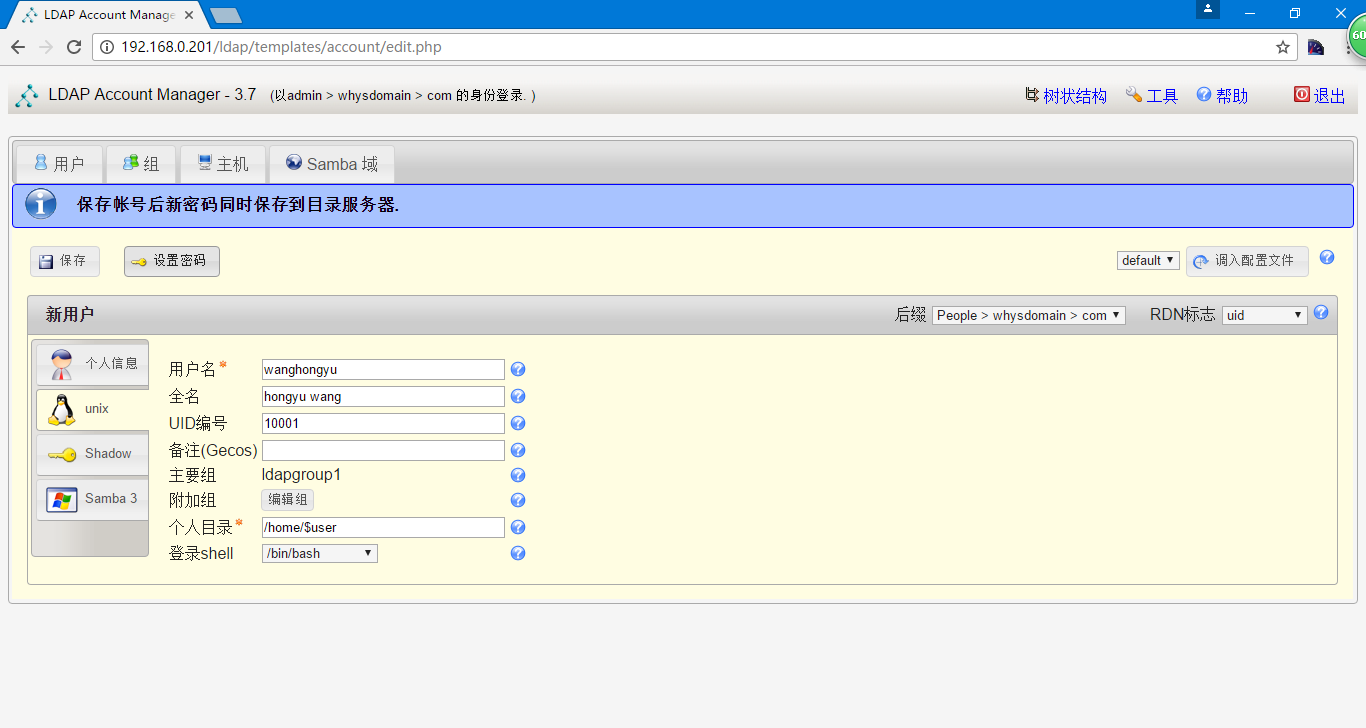
进行保存
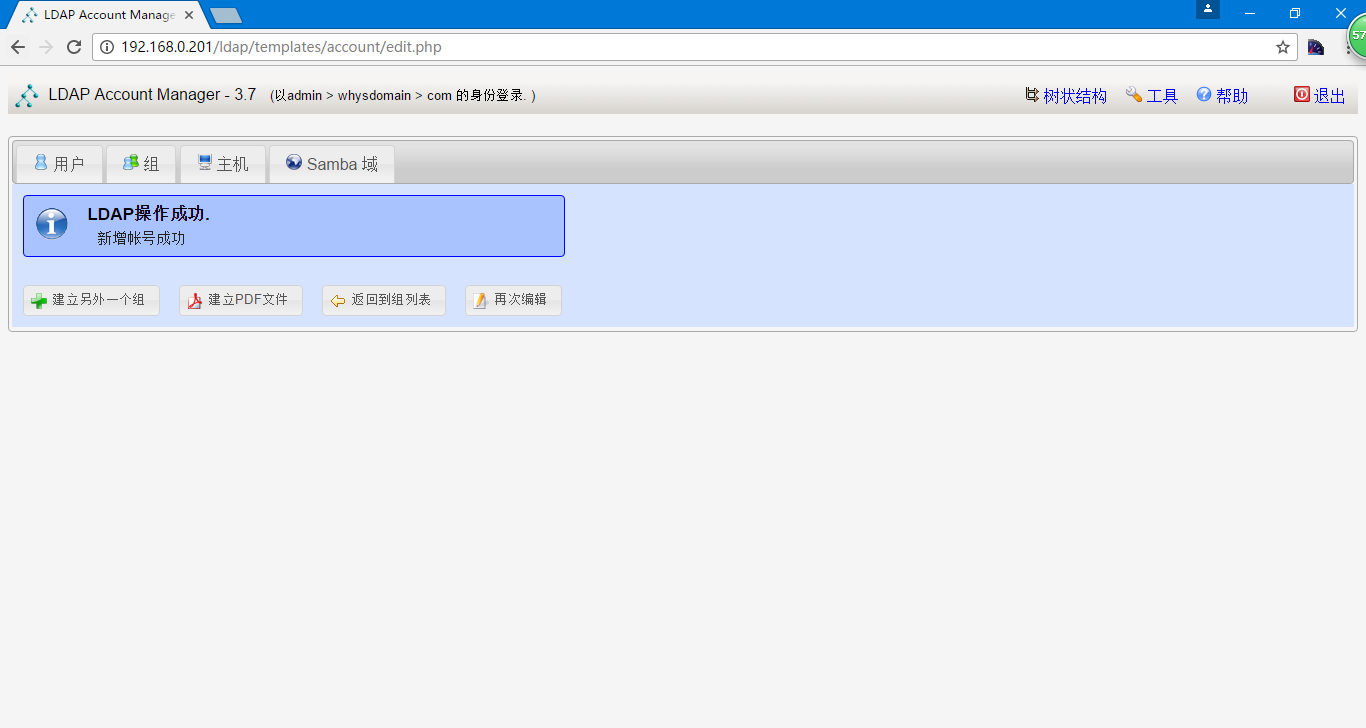
提示操作成功
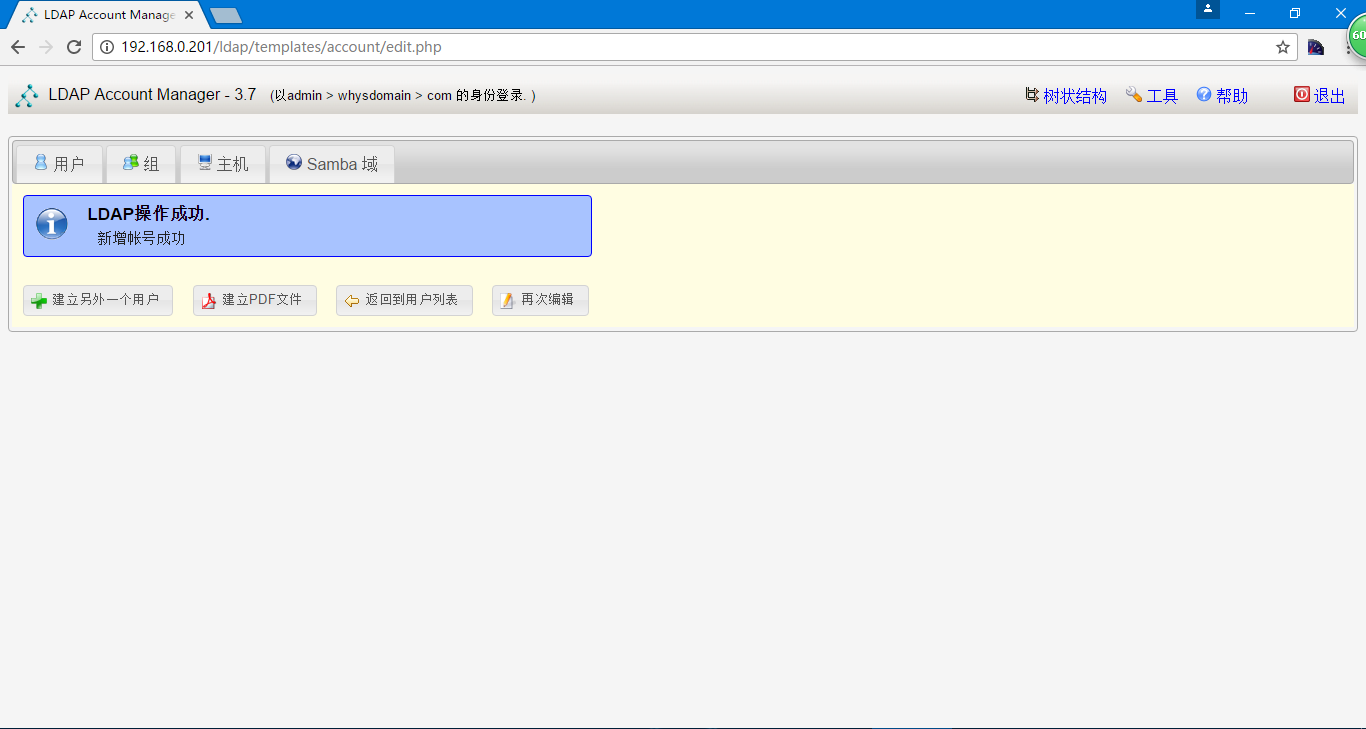
再创建一个mabiao的用户,然后查看用户
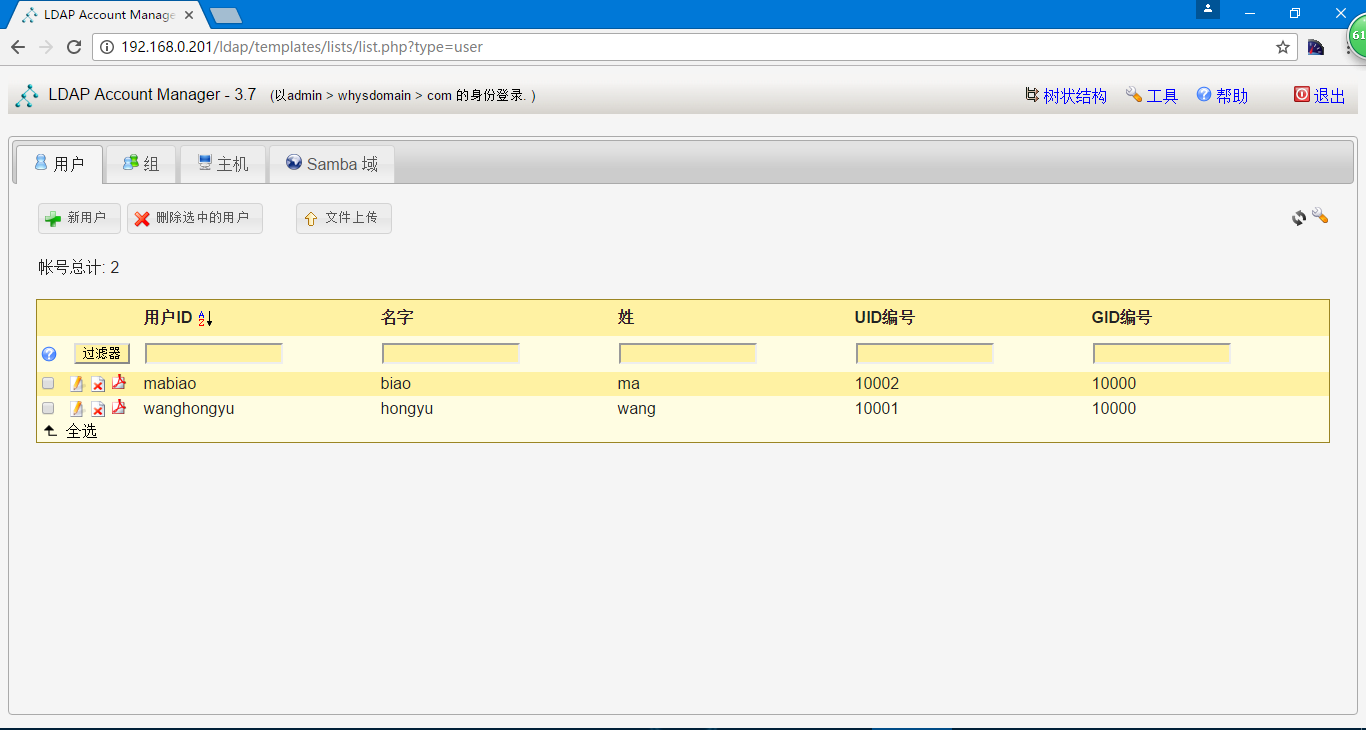
[root@why-1 ~]# ldapsearch -LLL -W -x -H ldap://whysdomain.com -D "cn=admin,dc=whysdomain,dc=com" -b "dc=whysdomain,dc=com" "(uid=wanghongyu)"
Enter LDAP Password:
dn: uid=wanghongyu,ou=People,dc=whysdomain,dc=com
objectClass: posixAccount
objectClass: inetOrgPerson
objectClass: organizationalPerson
objectClass: person
homeDirectory: /home/wanghongyu
loginShell: /bin/bash
uid: wanghongyu
cn: hongyu wang
userPassword:: e1NTSEF9dG1URURkNEJlYjRBYVArbmhGVkhpMzhRd0xuQXNFRUw=
uidNumber: 10001
gidNumber: 10000
sn: wang
givenName: hongyu
记录:wanghongyu密码为123456,mabiao密码为456789
注意生成的虽然也带uid和gid,但是并非linux用户
[root@why-1 conf]# egrep '10001|10002' /etc/passwd
[root@why-1 conf]# grep 10000 /etc/group
SASL+SVN通过LDAP进行验证
首先要准备SVN环境,没有环境的可以参考<服务>SVN
SASL是一个库,可以把应用层和认证系统整合到一起
[root@why-1 ~]# yum install -y *sasl*
[root@why-1 ~]# rpm -qa | grep sasl
cyrus-sasl-ldap-2.1.23-15.el6_6.2.x86_64
cyrus-sasl-2.1.23-15.el6_6.2.x86_64
cyrus-sasl-ntlm-2.1.23-15.el6_6.2.x86_64
cyrus-sasl-devel-2.1.23-15.el6_6.2.x86_64
cyrus-sasl-md5-2.1.23-15.el6_6.2.x86_64
cyrus-sasl-sql-2.1.23-15.el6_6.2.x86_64
cyrus-sasl-lib-2.1.23-15.el6_6.2.x86_64
saslwrapper-devel-0.14-1.el6.x86_64
cyrus-sasl-gssapi-2.1.23-15.el6_6.2.x86_64
saslwrapper-0.14-1.el6.x86_64
python-saslwrapper-0.14-1.el6.x86_64
ruby-saslwrapper-0.14-1.el6.x86_64
cyrus-sasl-plain-2.1.23-15.el6_6.2.x86_64
[root@why-1 ~]# saslauthd -v                                #查看sasl支持的认证方式
saslauthd 2.1.23
authentication mechanisms: getpwent kerberos5 pam rimap shadow ldap

[root@why-1 ~]# grep -i mech /etc/sysconfig/saslauthd       #查看验证机制并修改
# Mechanism to use when checking passwords.  Run "saslauthd -v" to get a list
# of which mechanism your installation was compiled with the ablity to use.
MECH=pam
# Options sent to the saslauthd. If the MECH is other than "pam" uncomment the next line.
[root@why-1 ~]# sed -i 's/MECH=pam/MECH=shadow/g' /etc/sysconfig/saslauthd
[root@why-1 ~]# grep -i mech /etc/sysconfig/saslauthd
# Mechanism to use when checking passwords.  Run "saslauthd -v" to get a list
# of which mechanism your installation was compiled with the ablity to use.
MECH=shadow
# Options sent to the saslauthd. If the MECH is other than "pam" uncomment the next line.
[root@why-1 ~]# /etc/init.d/saslauthd restart
停止 saslauthd:                                           [失败]
正在启动 saslauthd:                                       [确定]
[root@why-1 ~]# ps -ef | grep sasl
root      7245     1  0 19:12 ?        00:00:00 /usr/sbin/saslauthd -m /var/run/saslauthd -a shadow
root      7246  7245  0 19:12 ?        00:00:00 /usr/sbin/saslauthd -m /var/run/saslauthd -a shadow
root      7247  7245  0 19:12 ?        00:00:00 /usr/sbin/saslauthd -m /var/run/saslauthd -a shadow
root      7248  7245  0 19:12 ?        00:00:00 /usr/sbin/saslauthd -m /var/run/saslauthd -a shadow
root      7249  7245  0 19:12 ?        00:00:00 /usr/sbin/saslauthd -m /var/run/saslauthd -a shadow
root      7254  7080  0 19:12 pts/0    00:00:00 grep sasl
[root@why-1 ~]# testsaslauthd -uroot -p123456
0: OK "Success."
配置saslauthd支持LDAP权限认证
[root@why-1 ~]# man saslauthd
查找ldap
     ldap       (All platforms that support OpenLDAP 2.0 or higher)

                Authenticate against an ldap server.  The ldap configuration parameters are read from /etc/saslauthd.conf.  The location of this file can be changed with
                the -O parameter. See the LDAP_SASLAUTHD file included with the distribution for the list of available parameters.
[root@why-1 ~]# man saslauthd
[root@why-1 ~]# ll /etc/saslauthd
ls: 无法访问/etc/saslauthd: 没有那个文件或目录
[root@why-1 ~]# sed -i 's/MECH=shadow/MECH=ldap/g' /etc/sysconfig/saslauthd
[root@why-1 ~]# grep -i mech /etc/sysconfig/saslauthd
# Mechanism to use when checking passwords.  Run "saslauthd -v" to get a list
# of which mechanism your installation was compiled with the ablity to use.
MECH=ldap
# Options sent to the saslauthd. If the MECH is other than "pam" uncomment the next line.
[root@why-1 ~]# vi /etc/saslauthd.conf
[root@why-1 ~]# cat !$
cat /etc/saslauthd.conf
ldap_servers:ldap://whysdomain.com/                     #地址
ldap_bind_dn:cn=admin,dc=whysdomain,dc=com              #管理员dn
ldap_bind_pw:why123456                                  #管理员密码
ldap_search_base:ou=People,dc=whysdomain,dc=com
ldap_filter:uid=%U
ldap_passwoed_attr:userPassword
[root@why-1 ~]# testsaslauthd -uwanghongyu -p123456
0: NO "authentication failed"
[root@why-1 ~]# service saslauthd restart
停止 saslauthd:                                           [确定]
正在启动 saslauthd:                                       [确定]
[root@why-1 ~]# testsaslauthd -uwanghongyu -p123456
0: OK "Success."
[root@why-1 ~]# testsaslauthd -umabiao -p456789
0: OK "Success."
[root@why-1 svndata]# svn co svn://192.168.0.201/whysite /svndata/ --username=wanghongyu --password=123456
认证领域: <svn://192.168.0.201:3690> 81071893-52d7-4118-9722-886b2e7ea6a0
用户名: wanghongyu
“wanghongyu”的密码:
认证领域: <svn://192.168.0.201:3690> 81071893-52d7-4118-9722-886b2e7ea6a0
用户名: ^Csvn: 捕捉到信号
这代表认证失败
[root@why-1 svndata]# vi /etc/sasl2/svn.conf                #配置SVN由SASL认证
[root@why-1 svndata]# cat /etc/sasl2/svn.conf
pwcheck_method:saslauthd
mech_list:PLAIN LOGIN
[root@why-1 svndata]# cd /usr/local/svndata/whysite/conf/
[root@why-1 conf]# cp svnserve.conf svnserve.conf.bywhy2.22
[root@why-1 conf]# sed -i "s@# use-sasl = true@use-sasl = true@g" svnserve.conf
[root@why-1 conf]# grep use-sasl svnserve.conf
use-sasl = true
[root@why-1 conf]# pkill serve
[root@why-1 conf]# /etc/init.d/svnserve start
正在启动 svnserve:                                        [确定]
[root@why-1 conf]# pkill serve
[root@why-1 conf]# svnserve -d -r /usr/local/svndata
[root@why-1 conf]# svn co svn://192.168.0.201/whysite /svndata/ --username=wanghongyu --password=123456

-----------------------------------------------------------------------
注意!  你的密码,对于认证域:

   <svn://192.168.0.201:3690> 81071893-52d7-4118-9722-886b2e7ea6a0

只能明文保存在磁盘上!  如果可能的话,请考虑配置你的系统,让 Subversion
可以保存加密后的密码。请参阅文档以获得详细信息。

你可以通过在“/root/.subversion/servers”中设置选项“store-plaintext-passwords”为“yes”或“no”,
来避免再次出现此警告。
-----------------------------------------------------------------------
保存未加密的密码(yes/no)?yes
svn: 认证失败
认证失败是因为只是用户在svn中有,但是该用户在svn中没有对应的权限导致的
[root@why-1 conf]# vi /usr/local/svnpasswd/authz
[root@why-1 conf]# tail -5  /usr/local/svnpasswd/authz
readgroup = mabiao,pqt
[whysite:/]
why = rw
@readgroup = r
wanghongyu = rw
[root@why-1 conf]# pkill serve
[root@why-1 conf]# svnserve -d -r /usr/local/svndata
[root@why-1 conf]# svn co svn://192.168.0.201/whysite /svndata/ --username=wanghongyu --password=123456
取出版本 9。
另外ldap可以认证的还有很多,例如vsftp,samba,openvpn,git,http和nginx等。
samba进行ldap认证
安装samba并配置ldap
[root@why-1 conf]# yum install -y samba
ldap默认是不支持samba的,但是samba提供ldap的支持,不过我发现在openLDAP还是有samba的,在目标下添加支持
[root@why-1 conf]# cp /usr/share/doc/samba-3.6.23/LDAP/samba.schema /etc/openldap/schema
[root@why-1 conf]# vi /etc/openldap/slapd.conf
# See slapd.conf(5) for details on configuration options.
# This file should NOT be world readable.
include         /etc/openldap/schema/samba.schema
[root@why-1 conf]# rm -rf slapd.d/*
[root@why-1 conf]# /etc/init.d/slapd restart
配置samba
[root@why-1 conf]# cd /etc/samba/
[root@why-1 samba]# cp smb.conf smb.conf.old
[root@why-1 samba]# vi smb.conf
        security = user
        passdb backend = ldapsam:ldap://127.0.0.1/
        ldap suffix = dc=whysdomain,dc=com
        ldap user suffix = ou=users
        ldap group suffix = ou=groups
        ldap admin dn = cn=admin,dc=whysdomain,dc=com
        ldap ssl = no
        ldap passwd sync = yes
        ldap delete dn = no
[sambashare]
writeable = yes
browseable = yes
path = /data/sambashare
[root@why-1 samba]# mkdir -p /data/sambashare
[root@why-1 samba]# chown -R 777 /data/sambashare       #为了测试方便,samba是基于配置文件和操作系统双重判定权限
设置系统如果没有从/etc/passwd中找到用户就去openldap中验证
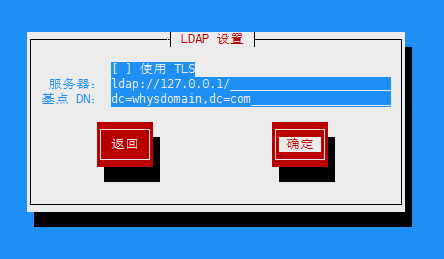
[root@why-1 samba]# authconfig-tui
选择LDAP
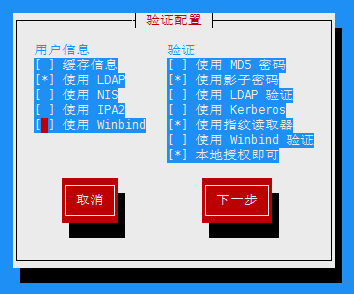
输入正确的dn
如果提示no such /lib64/security/pam_fprintd.so,说明指纹读取器的包支持没有安装,需要yum install fprintd-pam 完成后会自动开启nslcd
[root@why-1 samba]# authconfig-tui
正在启动 nslcd:  [确定]
[root@why-1 samba]# grep ldap /etc/nsswitch.conf
passwd:     files ldap
shadow:     files ldap
group:      files ldap
netgroup:   files ldap
automount:  files ldap
可以看到我们刚才实际的操作就是在修改这里添加了ldap
[root@why-1 samba]# cat /etc/openldap/ldap.conf
#
# LDAP Defaults
#

# See ldap.conf(5) for details
# This file should be world readable but not world writable.

#BASE   dc=example,dc=com
#URI    ldap://ldap.example.com ldap://ldap-master.example.com:666

#SIZELIMIT  12
#TIMELIMIT  15
#DEREF      never

TLS_CACERTDIR /etc/openldap/cacerts
URI ldap://127.0.0.1/
BASE dc=whysdomain,dc=com
openldap中也生成了认证信息,当然还有其他文件/etc/nslcd.conf,/etc/pam_ldap.conf
我们可以在系统中通过id查看
[root@why-1 samba]# id wanghongyu
uid=10001(wanghongyu) gid=10000(ldapgroup1) 组=10000(ldapgroup1)
[root@why-1 samba]# grep wanghongyu /etc/passwd
我们可以发现在系统是没有这个用户的,来源于LDAP
添加samba用户并认证
[root@why-1 openldap]# smbpasswd -a wanghongyu
New SMB password:       #123456
Retype new SMB password:
Added user wanghongyu.
[root@why-1 openldap]# smbclient -U wanghongyu //127.0.0.1/sambashare
Enter wanghongyu's password:
Domain=[MYGROUP] OS=[Unix] Server=[Samba 3.6.23-33.el6]
smb: \> ls
  .                                   D        0  Wed Feb 22 22:58:28 2017
  ..                                  D        0  Wed Feb 22 22:58:28 2017

        39371 blocks of size 524288. 24414 blocks available
smb: \> quit
和上边比也可以看到一些samba的记录
[root@why-1 openldap]# ldapsearch -LLL -W -x -H ldap://whysdomain.com -D "cn=admin,dc=whysdomain,dc=com" -b "dc=whysdomain,dc=com" "(uid=wanghongyu)"
Enter LDAP Password:
dn: uid=wanghongyu,ou=People,dc=whysdomain,dc=com
objectClass: posixAccount
objectClass: inetOrgPerson
objectClass: organizationalPerson
objectClass: person
objectClass: sambaSamAccount
homeDirectory: /home/wanghongyu
loginShell: /bin/bash
uid: wanghongyu
cn: hongyu wang
uidNumber: 10001
gidNumber: 10000
sn: wang
givenName: hongyu
sambaSID: S-1-5-21-3484419852-1015321094-3452380376-1001
displayName: hongyu wang
userPassword:: e1NTSEF9ejBpU3REYUgwZC9EZDlCQW9DZng3bkxrbS83ZlFFQkY=
sambaNTPassword: 32ED87BDB5FDC5E9CBA88547376818D4
sambaPasswordHistory: 00000000000000000000000000000000000000000000000000000000
 00000000
sambaPwdLastSet: 1487778082
sambaAcctFlags: [U          ]
OpenVPN进行ldap认证
[root@why-1 openldap]# yum install -y gcc*
re2c-0.13.6.tar.gz和openvpn-auth-ldap-master.zip 前者是在csdn下载的,后者是wget http://pkgs.fedoraproject.org/repo/pkgs/openvpn-auth-ldap/auth-ldap-2.0.3.tar.gz/03dedc57efc8d4fc2ffe2c014121299d/auth-ldap-2.0.3.tar.gz下载 编译re2c
[root@why-1 ~]# tar xf re2c-0.13.6.tar.gz
[root@why-1 ~]# cd re2c-0.13.6
[root@why-1 re2c-0.13.6]# ./configure
[root@why-1 re2c-0.13.6]# make
[root@why-1 re2c-0.13.6]# make install
编译auth-ldap
[root@why-1 ~]# tar xf auth-ldap-2.0.3.tar.gz
[root@why-1 ~]# cd auth-ldap-2.0.3
[root@why-1 auth-ldap-2.0.3]# ./configure --prefix=/usr/local --with-openldap=/usr/local --with-openvpn=/root/openvpn-2.2.2
[root@why-1 auth-ldap-2.0.3]# make                  #编译可能会遇到问题
[root@why-1 auth-ldap-2.0.3]# make install
编译中可能会遇到的问题,暂时还没好的解决办法
gcc -o tests tests.o mockpf.o LFString.o LFAuthLDAPConfig.o LFLDAPConnection.o TRLDAPEntry.o TRArray.o TRHash.o TRObject.o TRPacketFilter.o TRPFAddress.o TRConfigToken.o TRConfigLexer.o TRConfig.o TRLDAPGroupConfig.o -export-dynamic -L..src -lauth-ldap-testing -lobjc -lldap -llber -L/usr/local/lib -lcheck
[color=red]/usr/bin/ld: cannot find -lauth-ldap-testing
[/color]collect2: ld returned 1 exit status
make[1]: *** [tests] Error 1
make[1]: Leaving directory `/ROOT/openvpn/sourcecode/ldap/auth-ldap-2.0.3/tests'
make: *** [all] Error 1
修改openvpn server配置
[root@why-1 ~]# vi /etc/openvpn/server.conf
plugin /usr/local/lib/openvpn-auth-ldap.so /etc/openvpn/auth/ldap.conf
修改openvpn client配置
[root@why-1 ~]# vi /etc/openvpn/client.conf
auth-user-pass                      #使用ldap认证
配置ldap认证
[root@why-1 4.4.4]# mkdir /etc/openvpn/auth
[root@why-1 4.4.4]# vi /etc/openvpn/auth/ldap.conf
<LDAP>
URL ldap://whysdomain.com           #连接域的url和相应的端口
BindDN "admin@whysdomain.com"       #做连接的用户名
Password why123456                  #相应的密码
Timeout 15                          #设置网络超时时间
TLSEnable no                        #是否使用TSL
FollowReferrals no                  #
</LDAP>
<Authorization>
BaseDN "ou=People,dc=whysdomain,dc=com" #登录用户的基础dn
SearchFilter "(uid=%u)"                 #查找输入的域用户是否存在
RequireGroup false
</Authorization>

