<服务>route添加路由
目录:
添加默认网关
查看路由表
[root@why-1 ~]# route -n
Kernel IP routing table
Destination     Gateway         Genmask         Flags Metric Ref    Use Iface
192.168.1.0     0.0.0.0         255.255.255.0   U     0      0        0 eth0
169.254.0.0     0.0.0.0         255.255.0.0     U     1002   0        0 eth0
0.0.0.0         192.168.1.1     0.0.0.0         UG    0      0        0 eth0
这里就是系统的默认网关信息,表示去任何地方(0.0.0.0),都发给192.168.1.1,因为是默认网关,所以,放在了最后一条。路由也是有顺序的,如果不符合任何一条规则就交给默认网关处理
确定是否能上网
[root@why-1 ~]# ping baidu.com
PING baidu.com (220.181.57.217) 56(84) bytes of data.
64 bytes from 220.181.57.217: icmp_seq=1 ttl=54 time=24.7 ms
64 bytes from 220.181.57.217: icmp_seq=2 ttl=54 time=25.2 ms
^C
--- baidu.com ping statistics ---
2 packets transmitted, 2 received, 0% packet loss, time 1359ms
rtt min/avg/max/mdev = 24.787/25.005/25.224/0.269 ms
删除默认的网关
[root@why-1 ~]# route del default gw 192.168.1.1
查看路由表
[root@why-1 ~]# netstat -nr
Kernel IP routing table
Destination     Gateway         Genmask         Flags   MSS Window  irtt Iface
192.168.1.0     0.0.0.0         255.255.255.0   U         0 0          0 eth0
169.254.0.0     0.0.0.0         255.255.0.0     U         0 0          0 eth0
测试网络
[root@why-1 ~]# ping baidu.com
ping: unknown host baidu.com
添加默认的网关
[root@why-1 ~]# route add default gw 192.168.1.1
查看路由表
[root@why-1 ~]# netstat -nr
Kernel IP routing table
Destination     Gateway         Genmask         Flags   MSS Window  irtt Iface
192.168.1.0     0.0.0.0         255.255.255.0   U         0 0          0 eth0
169.254.0.0     0.0.0.0         255.255.0.0     U         0 0          0 eth0
0.0.0.0         192.168.1.1   0.0.0.0         UG        0 0          0 eth0
测试网络
[root@why-1 ~]# ping baidu.com
PING baidu.com (180.149.132.47) 56(84) bytes of data.
64 bytes from 180.149.132.47: icmp_seq=1 ttl=55 time=37.7 ms
64 bytes from 180.149.132.47: icmp_seq=2 ttl=55 time=25.1 ms
64 bytes from 180.149.132.47: icmp_seq=3 ttl=55 time=24.6 ms
^C
--- baidu.com ping statistics ---
3 packets transmitted, 3 received, 0% packet loss, time 2179ms
rtt min/avg/max/mdev = 24.691/29.218/37.772/6.052 ms
不过这么做只是临时生效,我们需要通过在网卡配置文件中添加这个默认路由GATEWAY
添加网络路由
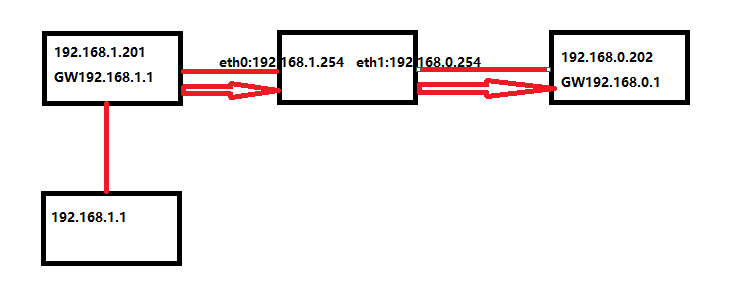
用于内部网络之间互相访问,而并非出网情况
情况1

route add -nat 192.168.0.0 netmask 255.255.255.0 gw 192.168.1.254
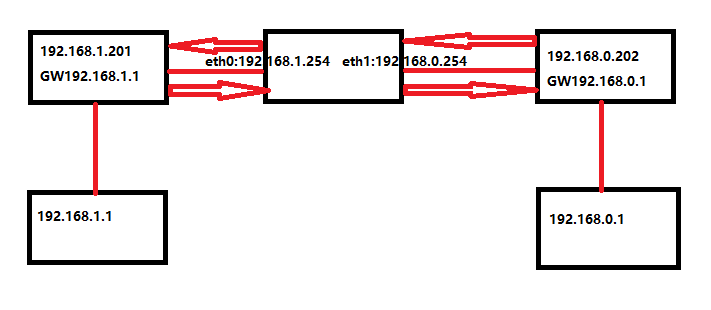
情况2

192.168.1.201配置
route add -nat 192.168.0.0/24 gw 192.168.1.254
192.168.0.202配置
route add -nat 192.168.1.0/24 gw 192.168.0.254
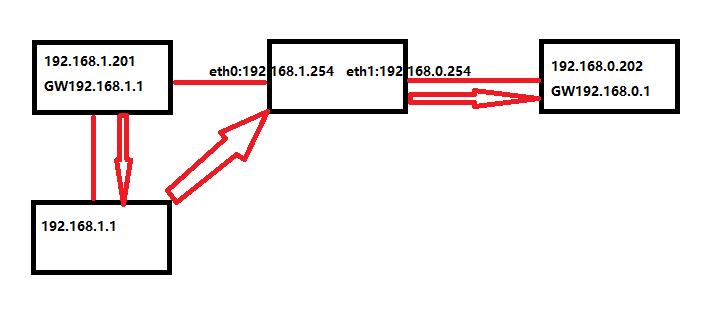
情况1另一种实现方式

route add -nat 192.168.0.0/24 gw 192.168.1.254
添加主机路由
route add -host 192.168.2.13 dev eth2
route add -host 202.81.11.91 dev lo
例如:keepalived或heartbeat高可用服务器对之间的使用单独网卡接心跳线通信就会用到以上主机路由
路由永久生效的方法
route-eth0配置
vi /etc/sysconfig/network-scripts/route-eth0  #默认不存在此文件
加入如下内容:
192.168.1.0/24 via 192.168.1.1
提示:写到配置里,重启网络服务和重启系统都会生效!推荐生产环境使用
static-routes配置
[root@why-1 ~]# vi /etc/sysconfig/static-routes  #默认不存在此文件
加入如下内容:
any net 192.168.1.0/24 gw 192.168.1.1
提示:写到配置里,重启网络服务和重启系统都会生效!
开机启动项配置
[root@why-1 ~]# vi /etc/rc.local
加入如下内容:
route add -net 192.168.1.0/24 gw 192.168.1.1
提示:写到/etc/rc.local里只在开机时加载,当手工重启网络后会失效,但是重启系统后会生效!
默认网关配置
[root@why-1 ~]# grep GATEWAY /etc/sysconfig/network-scripts/ifcfg-eth0
GATEWAY=192.168.1.1

