

<服务优化>Nginx优化一
目录:
隐藏版本号
Nginx
查看版本号
[root@why-1 ~]# curl -I 192.168.0.201
HTTP/1.1 200 OK
Server: nginx/1.6.3
Date: Mon, 05 Dec 2016 02:37:13 GMT
Content-Type: text/html
Connection: keep-alive
X-Powered-By: PHP/5.3.27
隐藏版本号 主配置文件中添加
http{
    ···
    service_tokens off;
    ···
}
验证
[root@why-1 ~]# /usr/local/nginx/sbin/nginx -t
nginx: the configuration file /usr/local/nginx1.6.3/conf/nginx.conf syntax is ok
nginx: configuration file /usr/local/nginx1.6.3/conf/nginx.conf test is successful
[root@why-1 ~]# /usr/local/nginx/sbin/nginx -s reload
[root@why-1 ~]# curl -I 192.168.0.201
HTTP/1.1 200 OK
Server: nginx
Date: Mon, 05 Dec 2016 02:39:37 GMT
Content-Type: text/html
Connection: keep-alive
X-Powered-By: PHP/5.3.27
Apache
- 在主配置文件中取消Include conf/extra/httpd-default.conf注释
- httpd-default.conf中
ServerSignature On改为off
ServerTokens Full改为Prod
修改默认用户
Nginx
默认用户
[root@why-1 ~]# grep '#user' /usr/local/nginx/conf/nginx.conf
#user  nobody;
我是通过编译参数指定了用户为nginx
[root@why-1 ~]# ps -ef | grep nginx
nginx     7097  7084  0 00:48 ?        00:00:00 php-fpm: pool www
nginx     7098  7084  0 00:48 ?        00:00:00 php-fpm: pool www
nginx     7099  7084  0 00:48 ?        00:00:00 php-fpm: pool www
nginx     7100  7084  0 00:48 ?        00:00:00 php-fpm: pool www
root      7122     1  0 00:57 ?        00:00:00 nginx: master process /usr/local/nginx/sbin/nginx
nginx     8636  7122  0 10:39 ?        00:00:00 nginx: worker process
root      8674  8583  0 10:57 pts/2    00:00:00 grep nginx
修改用户后主进程依然是root用户,这个就需要修改端口号。这样即使被攻击进来的也只能通过普通用户权限进行操作。
Nginx worker 进程个数
worker_processes 默认为1 Nginx需要开启的进程数,一般为cpu核数相等,或者是cpu核数的二倍,当然也和磁盘,内存有关,不过一般服务器的配置都是成套。 当然,这只是一个初始的值,可能会根据业务需要或者集群负载进行调整。
根据cpu核数进行nginx进程优化
默认情况下,进程不会绑定到cpu的进程上,需要配置到main模块中
- 2核cpu的情况下 worker_cpu_affinity 0101 1010;
- 4核cpu的情况下 worker_cpu_affinity 0001 0010 0100 1000;
- 8核cpu的情况下 worker_cpu_affinity 00000001 00000010 00000100 00001000 00010000 00100000 01000000 10000000;
- 或 worker_cpu_affinity 0001 0010 0100 1000 0001 0010 0100 1000;
一般服务也可以指定cpu,有taskset命令。
eg:
taskset -c 1,2,3 /etc/init.d/mysql start
nginx事件处理模型
nginx可以根据自己不同的操作系统采用不同的模型,在linux下一般使用索引的epoll模型,即IO多路复用模型,在windows使用icop,当然博主没用过0.0 默认为无,需要制定到events标签下。通常情况下nginx会自己选择。
events{
    ···
    use epoll;
    ···
}
nginx单进程的最大连接数
events {
    worker_connections  1024;
}
默认为1024,一般1024或2048即可。超出过多,就会导致进程死掉,并非说越大越好。
nginx单进程最大文件打开数
这个数值一般配置为ulimit -HSn的结果,配置在main标签中
worker_rlimit_nofile 65536
优化服务器名字的hash表大小
nginx中确切的名字都是存储在hash表中,hash表跟监听的端口关联,每个端口关联三张表,确切名字的hash表,以*起始的通配符名字的hash表和以*结尾的通配符名字的hash表,调大hash表的大小可以降低cpu缓存命中失败来找到名字,nginx先搜索确切名字的hash表,然后是以*起始的通配符名字的hash表,最后是以*结尾的通配符名字的hash表。一般在配置的时候最好指定确切的域名,然后才是通配符的域名,因为通配符匹配的时候通过正则表达式的方式串行匹配,效率极低。
server_names_hash_max_size和server_names_hash_bucket_size的值默认为32或者64,配置在http模块,取决于cpu的缓存行长度,超过这个长度的域名就会报错。 报错信息:
could not build the server_names_hash
you should increase server_names_hash_bucket_size:32
这时候就需要把域名的设置值调大一倍。
server_names_hash_max_size 512; 一般默认为cpu缓存行长度的10倍,单位为kb
开启高效的文件传输模式
sendfile on;
这个参数可以配置到任意的http,server或location模块。
当开启这个参数后,需要同时将tcp_nopush和tcp_nodelay两个参数设置为on,防止网络的堵塞。
- tcp_nopush需要配置在http, server, location标签,默认为on
- tcp_nodelay需要配置在http, server, location标签,默认为off nginx文档
详细解释可以参考 nginx sendfile tcp_nopush tcp_nodelay参数解释
设置连接的超时时间
keepalive_timeout 65;
这个超时时间是是回话的保持时间,在这个时间内默认会执行php解析和数据库的调用再返回给nginx。
设置时间长会减少产生连接会消耗时间。不过会造成并发降低,空连接占用资源。看业务需要进行优化了,一般php的服务时间会低一些,java的服务就会相对高一些。
tcp_nopush on
设置这个为on,keepalive的参数才会生效。
client_header_timeout 15
client_body_timeout 15
设置客户端请求头或body的读取时间,超过这个时间客户端还没有发送数据,Nginx将返回408错误
上传文件大小的限制
client_max_body_size 10m;
设置客户端请求的最大内容大小,默认为1MB,可以配置到http, server, location标签。
这个可以根据自己的业务进行调整。
fastcgi调优
fastcgi_connect_timeout 300;连接后端fastcgi的超时时间fastcgi_send_timeout 300;向后端发送请求的超时时间fastcgi_read_timeout 300;获取后端反馈的超时时间fastcgi_buffer_size 64k;指定读取应答的第一部分需要多大的缓冲区fastcgi_buffers 4 64k;指定本地需要多少和多大的缓冲区来缓存fastcgi的应答请求,如果超过这个大小就会缓存到fastcgi_temp的指定目录下,但是这样效率会很低,所以一般我们都设置为16 64kfastcgi_busy_buffers_size 128k;繁忙时fastcgi的缓冲区大小fastcgi_temp_file_write_size 128k;写入fastcgi_temp_path时使用多大的数据块,默认为fastcgi_buffers的两倍,如果该值过大会可能会在业务繁忙的时候报502错误fastcgi_cache why开启fastcgi的缓存并指定名称,开启缓存可以降低cpu的负载,不过也可能引起其他的问题。fastcgi_cache_valid 200 302 1h;缓存的响应代码以及缓存时间,这个可以配置多个,一般我们需要缓存301一天,其他缓存1分钟fastcgi_cache_min_uses 1;缓存fastcgi_cache_path指令inactive参数值时间内的最少使用次数
隐藏服务器名称
隐藏服务器版本需要在编译前修改源码
[root@why-1 ~]# tar xf nginx-1.6.3.tar.gz
[root@why-1 ~]# cd nginx-1.6.3
[root@why-1 nginx-1.6.3]# vi src/http/ngx_http_header_filter_module.c
static char ngx_http_server_string[] = "Server: nginx" CRLF;
static char ngx_http_server_full_string[] = "Server: " NGINX_VER CRLF;
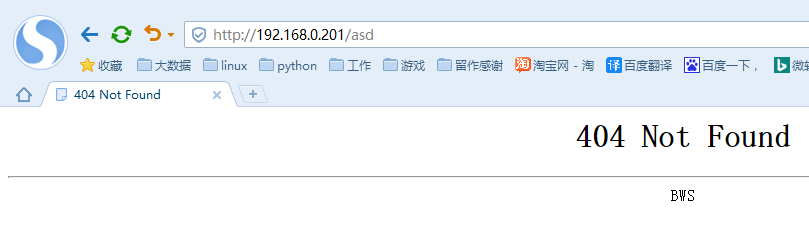
修改Server: nginx为其他服务器,例如BWS
src/http/ngx_http_header_filter_module.c
static char ngx_http_server_string[] = "Server: BWS" CRLF;
static char ngx_http_server_full_string[] = "Server: BWS" CRLF;
[root@why-1 nginx-1.6.3]# vi src/http/ngx_http_special_response.c
static u_char ngx_http_error_tail[] =
"<hr><center>nginx</center>" CRLF
"</body>" CRLF
"</html>" CRLF
;
标签中的nginx改为BWS
static u_char ngx_http_error_full_tail[] =
"<hr><center>BWS</center>" CRLF
"</body>" CRLF
"</html>" CRLF
;
static u_char ngx_http_error_tail[] =
"<hr><center>BWS</center>" CRLF
"</body>" CRLF
"</html>" CRLF
;
进行编译
[root@why-1 nginx-1.6.3]# ./configure --user=nginx --group=nginx --prefix=/usr/local/nginx-1.6.3.2 --with-http_stub_status_module --with-http_ssl_module
[root@why-1 nginx-1.6.3]# make && make install
验证
在/usr/local/nginx-1.6.3.2/sbin/下启动nginx
[root@why-1 nginx-1.6.3]# curl -I 192.168.0.201
HTTP/1.1 200 OK
Server: BWS
Date: Mon, 05 Dec 2016 06:40:51 GMT
Content-Type: text/html
Content-Length: 612
Last-Modified: Mon, 05 Dec 2016 06:19:36 GMT
Connection: keep-alive
ETag: "584506f8-264"
Accept-Ranges: bytes
404错误页面
nginx开启压缩功能
压缩可以降低带宽的消耗,但是会占用cpu,所以在开启压缩的时候,要尽量避免压缩和不压缩大小相差不大的文件,以及一些附件,视频等
- gzip on gzip;压缩功能是否开启
- gzip_min_length 1k;需要进行压缩的最低文件大小
- gzip_buffers 4 16k;压缩缓冲区
- gzip_http_vision 1.1;压缩版本
- gzip_comp_level 2;压缩级别,从1到9
- gzip_types text/plain application/x-javascript text/css application/xml;压缩文件类型,默认就会压缩text/html,不同的版本配置可以不相同,可以参考config目录下mime.types
- gzip_vary on;vary header是否支持压缩,如果支持,就不解压压缩文件,直接发送给客户端
修改配置文件
gzip on;
gzip_min_length 1k;
gzip_buffers 4 16k;
gzip_http_vision 1.1;
gzip_comp_level 2;
gzip_types text/plain application/x-javascript text/css
gzip_vary on;
创建测试页面
[root@why-1 html]# cat deflate.html
<SCRIPT src="why/jquery.js" type=application/javascript></SCRIPT>
<SCRIPT src="why/modernizr.js" type=application/javascript></SCRIPT>
调用why下的jquery.js文件
然后通过浏览器的YSlow插件进行测试。
 重启后,可以看到gzip已经进行了,但是还是原来的大小
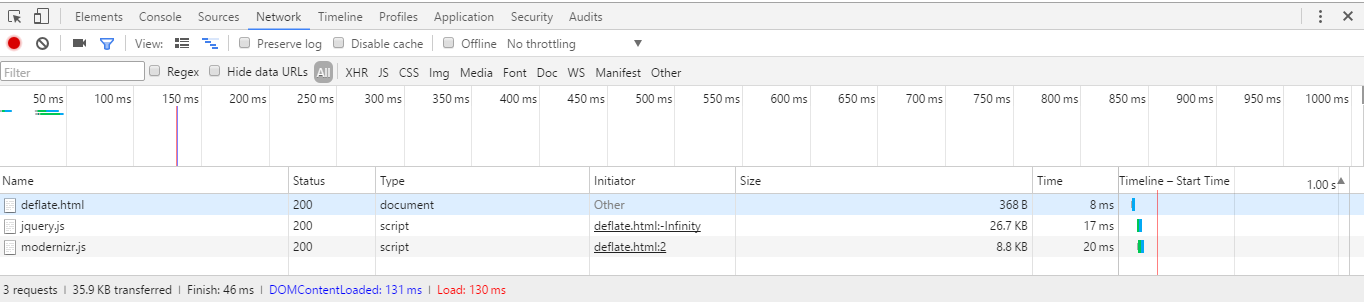
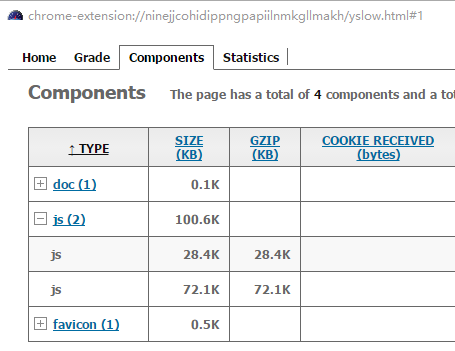 经过查证确实是压缩了,但是YSlow显示的问题,使用开发者工具就可以看到。
apache
deflate模块检查
[root@why-2 ~]# /usr/local/apache/bin/apachectl -l | grep mod_deflate
  mod_deflate.c
如果没装,可以通过apxs安装
[root@why-2 filters]# pwd
/root/httpd-2.2.31/modules/filters
[root@why-2 filters]# /usr/local/apache/bin/apxs -i -a -c mod_deflate.c
/usr/local/apache-2.2.31/build/libtool --silent --mode=compile gcc -prefer-pic   -DLINUX -D_REENTRANT -D_GNU_SOURCE -g -O2 -pthread -I/usr/local/apache-2.2.31/include  -I/usr/local/apache-2.2.31/include   -I/usr/local/apache-2.2.31/include   -c -o mod_deflate.lo mod_deflate.c && touch mod_deflate.slo
/usr/local/apache-2.2.31/build/libtool --silent --mode=link gcc -o mod_deflate.la  -rpath /usr/local/apache-2.2.31/modules -module -avoid-version    mod_deflate.lo
/usr/local/apache-2.2.31/build/instdso.sh SH_LIBTOOL='/usr/local/apache-2.2.31/build/libtool' mod_deflate.la /usr/local/apache-2.2.31/modules
/usr/local/apache-2.2.31/build/libtool --mode=install cp mod_deflate.la /usr/local/apache-2.2.31/modules/
cp .libs/mod_deflate.so /usr/local/apache-2.2.31/modules/mod_deflate.so
cp .libs/mod_deflate.lai /usr/local/apache-2.2.31/modules/mod_deflate.la
cp .libs/mod_deflate.a /usr/local/apache-2.2.31/modules/mod_deflate.a
chmod 644 /usr/local/apache-2.2.31/modules/mod_deflate.a
ranlib /usr/local/apache-2.2.31/modules/mod_deflate.a
PATH="$PATH:/sbin" ldconfig -n /usr/local/apache-2.2.31/modules
----------------------------------------------------------------------
Libraries have been installed in:
   /usr/local/apache-2.2.31/modules

If you ever happen to want to link against installed libraries
in a given directory, LIBDIR, you must either use libtool, and
specify the full pathname of the library, or use the `-LLIBDIR'
flag during linking and do at least one of the following:
   - add LIBDIR to the `LD_LIBRARY_PATH' environment variable
     during execution
   - add LIBDIR to the `LD_RUN_PATH' environment variable
     during linking
   - use the `-Wl,--rpath -Wl,LIBDIR' linker flag
   - have your system administrator add LIBDIR to `/etc/ld.so.conf'

See any operating system documentation about shared libraries for
more information, such as the ld(1) and ld.so(8) manual pages.
----------------------------------------------------------------------
chmod 755 /usr/local/apache-2.2.31/modules/mod_deflate.so
[activating module `deflate' in /usr/local/apache-2.2.31/conf/httpd.conf]
如果出现
[root@why-2 ~]# /usr/local/apache/bin/httpd
httpd: Syntax error on line 55 of /usr/local/apache-2.2.31/conf/httpd.conf: module deflate_module is built-in and can't be loaded
说明模块在build的时候就已经存在了,在配置文件中删除该项即可。
配置文件
<ifmodule mod_deflate.c>
    DeflateCompressionLevel 9
    SetOutputFilter DEFLATE
    AddOutputFilterByType DEFLATE text/html text/plain text/xml
    AddOutputFilterByType DEFLATE application/javascript
    AddOutputFilterByType DEFLATE text/css
</ifmodule mod_deflate.c>
与Nginx相比,apache压缩功能更强

