

kubernetes CSI
目录:
CSI
存储插件开发有两种方式,分别是FlexVolume和CSI
FlexVolume
示例一个FlexVolume的yaml
apiVersion: v1
kind: PersistentVolume
metadata:
  name: pv-flex-nfs
spec:
  capacity:
    storage: 10Gi
  accessModes:
    - ReadWriteMany
  flexVolume:
    driver: "k8s/nfs"
    fsType: "nfs"
    options:
      server: "10.10.0.25" # 改成你自己的NFS服务器地址
      share: "export"
这里指定了
- driver为k8s/nfs
- fsType为nfs
一个pv被创建了之后,在被pvc绑定之后,就会进入两阶段处理Attach和Mount
示例Mount通过SetUpAt()方法完成
// SetUpAt creates new directory.
func (f *flexVolumeMounter) SetUpAt(dir string, fsGroup *int64) error {
  ...
  call := f.plugin.NewDriverCall(mountCmd)

  // Interface parameters
  call.Append(dir)

  extraOptions := make(map[string]string)

  // pod metadata
  extraOptions[optionKeyPodName] = f.podName
  extraOptions[optionKeyPodNamespace] = f.podNamespace

  ...

  call.AppendSpec(f.spec, f.plugin.host, extraOptions)

  _, err = call.Run()

  ...

  return nil
}
以上配置就会调用以下命令
/usr/libexec/kubernetes/kubelet-plugins/volume/exec/k8s~nfs/nfs mount <mount dir> <json param>
- k8s~nfs为driver的k8s/nfs转义
- nfs为fsType
- mount为固定的操作参数,有init、mount、unmount、attach和dettach等
为传递过来的参数,为Volume在宿主机上的目录,默认在 /var/lib/kubelet/pods/<Pod ID>/volumes/k8s~nfs/test是一个jsonmap的参数列表,在pv的options定义的值都会被追加到这个参数,并包含一个PodName和PodNamespace等数据
这个nfs命令可以通过脚本的方式完成
domount() {
 MNTPATH=$1

 NFS_SERVER=$(echo $2 | jq -r '.server')
 SHARE=$(echo $2 | jq -r '.share')

 ...

 mkdir -p ${MNTPATH} &> /dev/null

 mount -t nfs ${NFS_SERVER}:/${SHARE} ${MNTPATH} &> /dev/null
 if [ $? -ne 0 ]; then
  err "{ \"status\": \"Failure\", \"message\": \"Failed to mount ${NFS_SERVER}:${SHARE} at ${MNTPATH}\"}"
  exit 1
 fi
 log '{"status": "Success"}'
 exit 0
}
这个返回的结果需要返给kubelet来判断是否完成的标准
详细例子
在FlexVolume架构下,存储插件为volume的Attach阶段和Mount阶段的执行者,而没有管理管理的功能
CSI
对于nfs这种文件系统,并不需要在宿主机上挂载磁盘或者块设备,就不需要attach和dettach的操作了,而且FlexVolume也不支持Dynamic Provisioning,除非再单独写一个External Provisioner
CSI是将Dynamic Provision和部分管理功能拆出来,作为一个External Components,需要的功能有Driver Registrar、External Provisioner和External Attacher
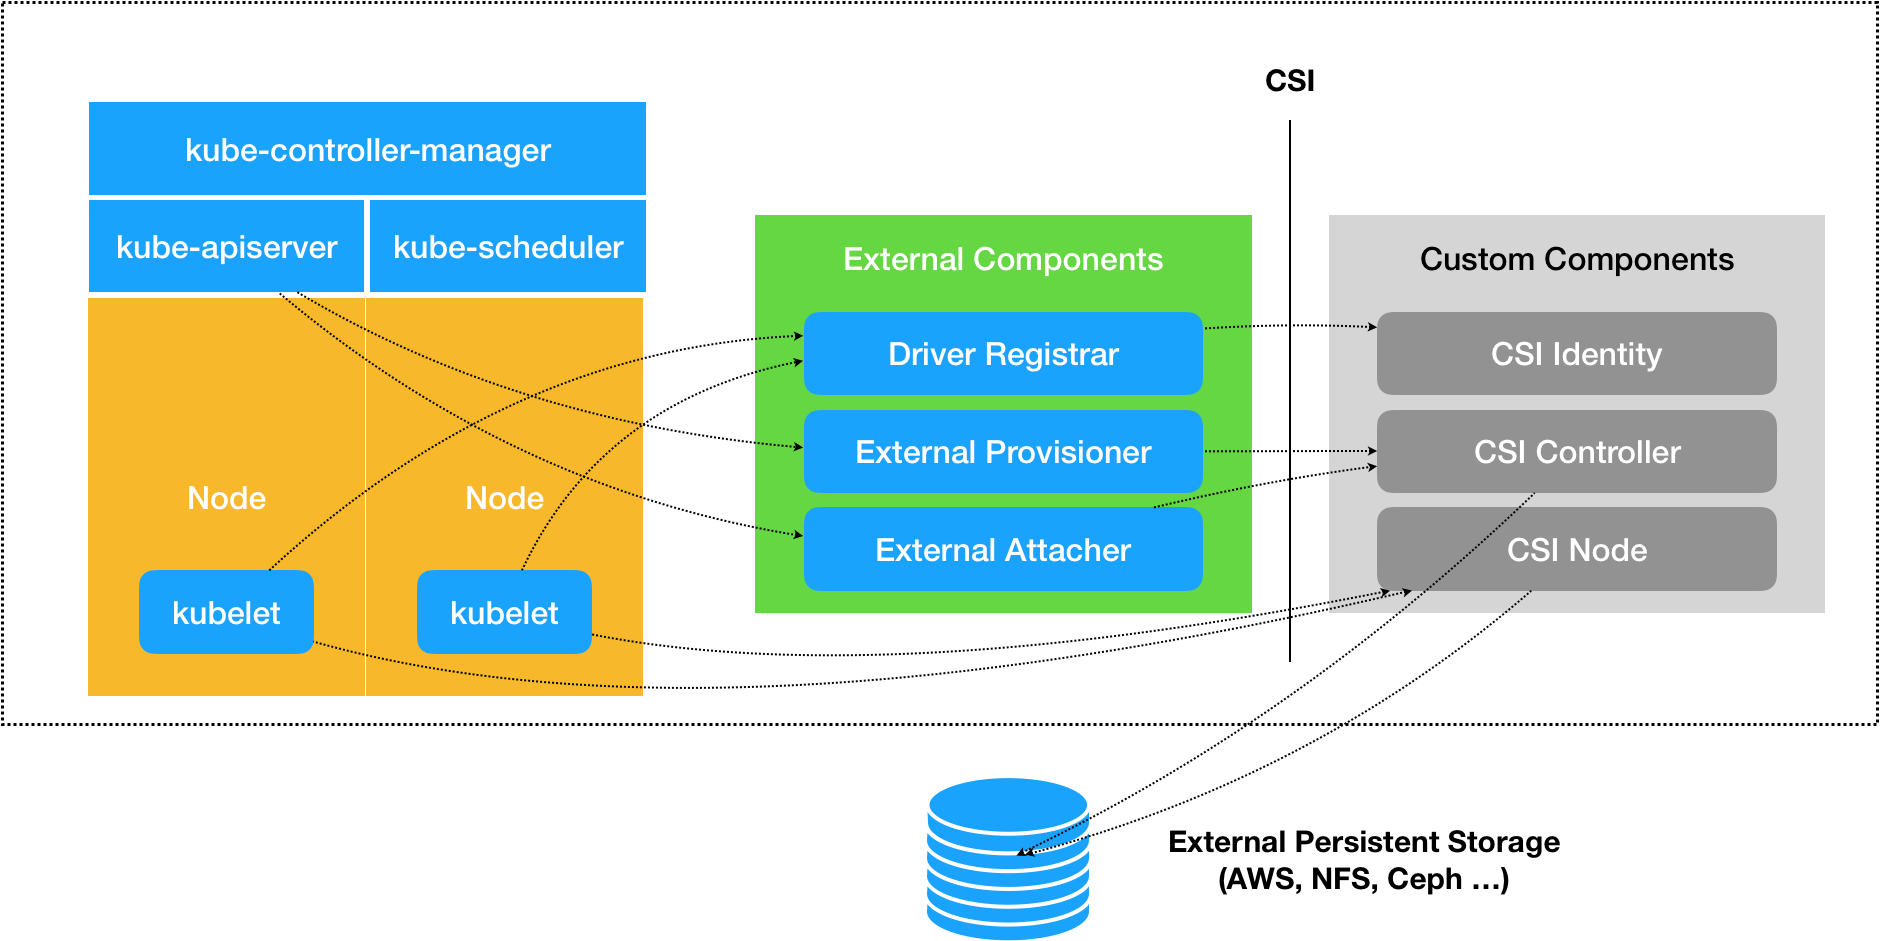
一个CSI的插件需要提供这三个grpc服务
- Driver Registrar负责将插件注册到kubelet,所以需要请求CSI的Identity服务
- External Provisioner负责Provision,watch了APIServer的PVC对象,当PVC创建的时候会调用CSI Controller的CreateVolume方法去创建PV,不过不会使用kubernetes的PV类型,而是单独定义一个Volume类型
- External Attacher负责Attach阶段,watch了APIServer的VolumeAttachment变化,一旦有新增的VolumeAttachment,就会调用ControllerPublish方法来指定对应的Attach
volume的Mount阶段是在kubelet的VolumeManagerReconciler循环检测到需要执行Mount操作的时候,通过pkg/volume/csi包调用CSI Node服务完成Mount阶段
CSI Identity服务,用于暴露插件本身的信息,接口如下:(以下参考CSI接口代码)
service Identity {
  // return the version and name of the plugin
  rpc GetPluginInfo(GetPluginInfoRequest)
    returns (GetPluginInfoResponse) {}
  // reports whether the plugin has the ability of serving the Controller interface
  rpc GetPluginCapabilities(GetPluginCapabilitiesRequest)
    returns (GetPluginCapabilitiesResponse) {}
  // called by the CO just to check whether the plugin is running or not
  rpc Probe (ProbeRequest)
    returns (ProbeResponse) {}
}
CSI Controller服务
- 创建和删除CSI Volume
- 对CSI Volume进行Attach/Dettach(在CSI里,这个操作被叫作Publish/Unpublish),以及对CSI Volume进行Snapshot
接口如下
service Controller {
  // provisions a volume
  rpc CreateVolume (CreateVolumeRequest)
    returns (CreateVolumeResponse) {}

  // deletes a previously provisioned volume
  rpc DeleteVolume (DeleteVolumeRequest)
    returns (DeleteVolumeResponse) {}

  // make a volume available on some required node
  rpc ControllerPublishVolume (ControllerPublishVolumeRequest)
    returns (ControllerPublishVolumeResponse) {}

  // make a volume un-available on some required node
  rpc ControllerUnpublishVolume (ControllerUnpublishVolumeRequest)
    returns (ControllerUnpublishVolumeResponse) {}

  ...

  // make a snapshot
  rpc CreateSnapshot (CreateSnapshotRequest)
    returns (CreateSnapshotResponse) {}

  // Delete a given snapshot
  rpc DeleteSnapshot (DeleteSnapshotRequest)
    returns (DeleteSnapshotResponse) {}
  ...
}
这些逻辑都不需要在宿主机完成
CSI Node服务用于宿主机执行对应操作,接口如下
service Node {
  // temporarily mount the volume to a staging path
  rpc NodeStageVolume (NodeStageVolumeRequest)
    returns (NodeStageVolumeResponse) {}

  // unmount the volume from staging path
  rpc NodeUnstageVolume (NodeUnstageVolumeRequest)
    returns (NodeUnstageVolumeResponse) {}

  // mount the volume from staging to target path
  rpc NodePublishVolume (NodePublishVolumeRequest)
    returns (NodePublishVolumeResponse) {}

  // unmount the volume from staging path
  rpc NodeUnpublishVolume (NodeUnpublishVolumeRequest)
    returns (NodeUnpublishVolumeResponse) {}

  // stats for the volume
  rpc NodeGetVolumeStats (NodeGetVolumeStatsRequest)
    returns (NodeGetVolumeStatsResponse) {}

  ...

  // Similar to NodeGetId
  rpc NodeGetInfo (NodeGetInfoRequest)
    returns (NodeGetInfoResponse) {}
}
FlexVolume和CSI的区别
FlexVolume只有两个阶段
- Mount
- Attach
而CSI有三个阶段
- Provision
- Attach
- Mount
Provision阶段将会watch apiserver中PVC资源的创建,如果PVC所指定的storageClass的provisioner是自身。将会调用插件的controller.createVolume()创建PV
Attach阶段将会watch apiserver中VolumeAttachment对象变化, 会调用插件的controller.ControllerPublish(),把相应的磁盘attach到声明使用此PVC/PV的pod所调度到的node上,挂载的目录为/var/lib/kubelet/pods/
Mount阶段,kubelet的VolumeManagerReconciler控制循环,检测到需要执行Mount操作的时候,通过调用pkg/volume/csi包,调用CSI Node服务,调用CRI启动带有volume参数的container,把上阶段准备好的磁盘 mount到container指定的目录
CSI编写指南
示例StorageClass
kind: StorageClass
apiVersion: storage.k8s.io/v1
metadata:
  name: do-block-storage
  namespace: kube-system
  annotations:
    storageclass.kubernetes.io/is-default-class: "true"
provisioner: com.digitalocean.csi.dobs
这里指定的provisioner=com.digitalocean.csi.dobs,就是指定的CSI插件
CSI插件代码结构
$ tree $GOPATH/src/github.com/digitalocean/csi-digitalocean/driver
    ├── controller.go
    ├── driver.go
    ├── identity.go
    ├── mounter.go
    └── node.go
在driver.go中定义标准的grpc服务
// Run starts the CSI plugin by communication over the given endpoint
func (d *Driver) Run() error {
 ...

 listener, err := net.Listen(u.Scheme, addr)
 ...

 d.srv = grpc.NewServer(grpc.UnaryInterceptor(errHandler))
 csi.RegisterIdentityServer(d.srv, d)
 csi.RegisterControllerServer(d.srv, d)
 csi.RegisterNodeServer(d.srv, d)

 d.ready = true // we're now ready to go!
 ...
 return d.srv.Serve(listener)
}
将接口注册到grpc服务上即可
示例用于注册到k8s的GetPluginInfo
func (d *Driver) GetPluginInfo(ctx context.Context, req *csi.GetPluginInfoRequest) (*csi.GetPluginInfoResponse, error) {
 resp := &csi.GetPluginInfoResponse{
  Name:          driverName,
  VendorVersion: version,
 }
 ...
}
这个driver就是com.digitalocean.csi.dobs,要满足反向dns格式
GetPluginCapabilities返回的CSI的能力,例如NFS不需要Provision和Attach阶段,因为直接挂载到container的目录即可
还有一个Probe接口,用来检查CSI是否正常工作,一般建议在编写插件的时候设置一个Ready标志,当gRPC服务停止的时候,将其设置为false
Provision阶段对应的接口为CreateVolume和DeleteVolume,调用者为External Provisoner
示例
func (d *Driver) CreateVolume(ctx context.Context, req *csi.CreateVolumeRequest) (*csi.CreateVolumeResponse, error) {
 ...

 volumeReq := &godo.VolumeCreateRequest{
  Region:        d.region,
  Name:          volumeName,
  Description:   createdByDO,
  SizeGigaBytes: size / GB,
 }

 ...

 vol, _, err := d.doClient.Storage.CreateVolume(ctx, volumeReq)

 ...

 resp := &csi.CreateVolumeResponse{
  Volume: &csi.Volume{
   Id:            vol.ID,
   CapacityBytes: size,
   AccessibleTopology: []*csi.Topology{
    {
     Segments: map[string]string{
      "region": d.region,
     },
    },
   },
  },
 }

 return resp, nil
}
对于DigitalOcean这样的公有云,就是调用DigitalOcean的API来创建一个存储卷
Attach阶段对应的接口为ControllerPublishVolume和ControllerUnpublishVolume,调用者为External Attacher
示例ControllerPublishVolume
func (d *Driver) ControllerPublishVolume(ctx context.Context, req *csi.ControllerPublishVolumeRequest) (*csi.ControllerPublishVolumeResponse, error) {
 ...

  dropletID, err := strconv.Atoi(req.NodeId)

  // check if volume exist before trying to attach it
  _, resp, err := d.doClient.Storage.GetVolume(ctx, req.VolumeId)

 ...

  // check if droplet exist before trying to attach the volume to the droplet
  _, resp, err = d.doClient.Droplets.Get(ctx, dropletID)

 ...

  action, resp, err := d.doClient.StorageActions.Attach(ctx, req.VolumeId, dropletID)

 ...

 if action != nil {
  ll.Info("waiting until volume is attached")
 if err := d.waitAction(ctx, req.VolumeId, action.ID); err != nil {
  return nil, err
  }
  }

  ll.Info("volume is attached")
 return &csi.ControllerPublishVolumeResponse{}, nil
}
对于DigitalOcean来说,就是调用DigitalOcean的API,将之前创建的存储卷挂载到指定的虚拟机上,存储卷为之前创建的时候指定的VolumeId,虚拟机就是NodeId
External Attacher进行VolumeAttachment对象的watch
// VolumeAttachmentSpec is the specification of a VolumeAttachment request.
type VolumeAttachmentSpec struct {
 // Attacher indicates the name of the volume driver that MUST handle this
 // request. This is the name returned by GetPluginName().
 Attacher string

 // Source represents the volume that should be attached.
 Source VolumeAttachmentSource

 // The node that the volume should be attached to.
 NodeName string
}
分别是
- 存储插件的名字(Attacher)
- PV的名字(Source)
- 宿主机的名字(NodeName)
这个对象的声明周期是由AttachDetachController负责,不断检测Pod所对应的PV在宿主机上的挂载情况,来决定是否需要Attach或Dettach
Mount阶段是在CSI Node服务,代码在node.go
细分就两个接口NodeStageVolume和NodePublishVolume
在kubelet的VolumeManagerReconciler中,这两步对应着MountDevice和Setup
MountDevice(NodeStageVolume)格式化Volume在宿主机的存储设备,然后挂载到一个临时目录(Staging目录)
func (d *Driver) NodeStageVolume(ctx context.Context, req *csi.NodeStageVolumeRequest) (*csi.NodeStageVolumeResponse, error) {
 ...

 vol, resp, err := d.doClient.Storage.GetVolume(ctx, req.VolumeId)

 ...

 source := getDiskSource(vol.Name)
 target := req.StagingTargetPath

 ...

 if !formatted {
  ll.Info("formatting the volume for staging")
  if err := d.mounter.Format(source, fsType); err != nil {
   return nil, status.Error(codes.Internal, err.Error())
  }
 } else {
  ll.Info("source device is already formatted")
 }

...

 if !mounted {
  if err := d.mounter.Mount(source, target, fsType, options...); err != nil {
   return nil, status.Error(codes.Internal, err.Error())
  }
 } else {
  ll.Info("source device is already mounted to the target path")
 }

 ...
 return &csi.NodeStageVolumeResponse{}, nil
}
流程就是找到对应设备挂载路径getDiskSource,格式化为d.mounter.Format格式,然后挂载到临时目录StagingTargetPath下
SetUp(NodePublishVolume)的实现
func (d *Driver) NodePublishVolume(ctx context.Context, req *csi.NodePublishVolumeRequest) (*csi.NodePublishVolumeResponse, error) {
 ...
 source := req.StagingTargetPath
 target := req.TargetPath

 mnt := req.VolumeCapability.GetMount()
 options := mnt.MountFlag
    ...

 if !mounted {
  ll.Info("mounting the volume")
  if err := d.mounter.Mount(source, target, fsType, options...); err != nil {
   return nil, status.Error(codes.Internal, err.Error())
  }
 } else {
  ll.Info("volume is already mounted")
 }

 return &csi.NodePublishVolumeResponse{}, nil
}
将Volume挂载到宿主机目录
对于NFS和GlusterFS没有对应的磁盘设备在宿主机,就在VolumeManagerReconciler循环中,跳过MountDevice直接执行SetUp
这个服务的部署yaml
kind: DaemonSet
apiVersion: apps/v1beta2
metadata:
  name: csi-do-node
  namespace: kube-system
spec:
  selector:
    matchLabels:
      app: csi-do-node
  template:
    metadata:
      labels:
        app: csi-do-node
        role: csi-do
    spec:
      serviceAccount: csi-do-node-sa
      hostNetwork: true
      containers:
        - name: driver-registrar
          image: quay.io/k8scsi/driver-registrar:v0.3.0
          ...
        - name: csi-do-plugin
          image: digitalocean/do-csi-plugin:v0.2.0
          args :
            - "--endpoint=$(CSI_ENDPOINT)"
            - "--token=$(DIGITALOCEAN_ACCESS_TOKEN)"
            - "--url=$(DIGITALOCEAN_API_URL)"
          env:
            - name: CSI_ENDPOINT
              value: unix:///csi/csi.sock
            - name: DIGITALOCEAN_API_URL
              value: https://api.digitalocean.com/
            - name: DIGITALOCEAN_ACCESS_TOKEN
              valueFrom:
                secretKeyRef:
                  name: digitalocean
                  key: access-token
          imagePullPolicy: "Always"
          securityContext:
            privileged: true
            capabilities:
              add: ["SYS_ADMIN"]
            allowPrivilegeEscalation: true
          volumeMounts:
            - name: plugin-dir
              mountPath: /csi
            - name: pods-mount-dir
              mountPath: /var/lib/kubelet
              mountPropagation: "Bidirectional"
            - name: device-dir
              mountPath: /dev
      volumes:
        - name: plugin-dir
          hostPath:
            path: /var/lib/kubelet/plugins/com.digitalocean.csi.dobs
            type: DirectoryOrCreate
        - name: pods-mount-dir
          hostPath:
            path: /var/lib/kubelet
            type: Directory
        - name: device-dir
          hostPath:
            path: /dev
---
kind: StatefulSet
apiVersion: apps/v1beta1
metadata:
  name: csi-do-controller
  namespace: kube-system
spec:
  serviceName: "csi-do"
  replicas: 1
  template:
    metadata:
      labels:
        app: csi-do-controller
        role: csi-do
    spec:
      serviceAccount: csi-do-controller-sa
      containers:
        - name: csi-provisioner
          image: quay.io/k8scsi/csi-provisioner:v0.3.0
          ...
        - name: csi-attacher
          image: quay.io/k8scsi/csi-attacher:v0.3.0
          ...
        - name: csi-do-plugin
          image: digitalocean/do-csi-plugin:v0.2.0
          args :
            - "--endpoint=$(CSI_ENDPOINT)"
            - "--token=$(DIGITALOCEAN_ACCESS_TOKEN)"
            - "--url=$(DIGITALOCEAN_API_URL)"
          env:
            - name: CSI_ENDPOINT
              value: unix:///var/lib/csi/sockets/pluginproxy/csi.sock
            - name: DIGITALOCEAN_API_URL
              value: https://api.digitalocean.com/
            - name: DIGITALOCEAN_ACCESS_TOKEN
              valueFrom:
                secretKeyRef:
                  name: digitalocean
                  key: access-token
          imagePullPolicy: "Always"
          volumeMounts:
            - name: socket-dir
              mountPath: /var/lib/csi/sockets/pluginproxy/
      volumes:
        - name: socket-dir
          emptyDir: {}
DaemonSet部署的是每个节点都启动的
- csi-do-plugin: 为kubelet提供CSI的Node和Identity服务,由于Mount阶段都是使用的MountNamespace,对于kubelet都是/var/lib/kubelet下的目录,需要挂载这个目录
- driver-registrar:用于向kubelet注册CSI插件,数据是访问csi-do-plugin的Identity服务得到的
需要注意的是mountPropagation=Bidirectional,即开启双向挂载传播,从而将容器在这个目录下进行的挂载操作传播给宿主机
StatefulSet部署的是CSI Controller,提供External Provisioner和External Attacher,这里StatefulSet是为了保证Pod删除之后才会创建和启动
创建的PVC指定storageClass即可
apiVersion: v1
kind: PersistentVolumeClaim
metadata:
  name: csi-pvc
spec:
  accessModes:
  - ReadWriteOnce
  resources:
    requests:
      storage: 5Gi
  storageClassName: do-block-storage
总结一下流程
- 当创建了一个PVC之后,StatefulSet里的External Provisioner容器,就会监听到这个PVC的诞生,然后调用同一个Pod里的CSI插件的CSI Controller服务的CreateVolume方法,创建出对应的PV
- Volume Controller,就会通过PersistentVolumeController控制循环,发现这对新创建出来的PV和PVC,并且看到它们声明的是同一个StorageClass。会把这一对PV和PVC绑定起来,使PVC进入Bound 状态
- 当创建了一个声明使用上述PVC的Pod,并且这个Pod被调度器调度到了宿主机A上。这时候,Volume Controller的AttachDetachController控制循环就会发现,上述 PVC对应的Volume,需要被Attach到宿主机 A 上。AttachDetachController会创建一个VolumeAttachment对象,这个对象携带了宿主机A和待处理的Volume的名字
- StatefulSet里的External Attacher容器,就会监听到这个VolumeAttachment对象的诞生,使用这个对象里的宿主机和Volume名字,调用同一个Pod里的CSI插件的CSI Controller 服务的 ControllerPublishVolume方法,完成Attach
- 宿主机 A 上的 kubelet,就会通过VolumeManagerReconciler控制循环,发现当前宿主机上有一个Volume对应的存储设备(比如磁盘)已经被Attach到了某个设备目录下,就会调用同一台宿主机上的CSI插件的CSI Node服务的NodeStageVolume和NodePublishVolume方法,完成这个Volume的Mount阶段
需要注意的点是
- PVC不会限制PV的使用,只是用于绑定PV,用于Pod使用
- PV也不会限制存储的使用,只要后端存储能写就可以
- 对于StorageClass,在申请Pv的时候是能获取到申请的大小,提供存储的服务支持划分大小就可以做到限制,例如ceph等,不能的例如nfs

