

极客时间-Service Mesh实战(概念部分)
目录:
极客时间-Service Mesh实战
01 课程介绍
微服务在带来便利的时候也会存在缺点,其中核心的问题就是服务间的网络通信,随着规模变大就会越来越突出,Service Mesh就是为了解决这个问题而生的,可以让开发从通信问题中解脱出来,省去了开发和维护控制逻辑的工作,让开发人员只关注业务。
Service Mesh被称为第二代微服务也并无道理。云原生是未来软件架构的方向,kubernetes(操作系统)和Service Mesh(应用层网络),serviceless(不用关注机器与实例),Service Mesh让服务与通讯解耦,只关注业务,而不用在业务逻辑中夹杂大量超时重试的控制逻辑,也不用集成各种流量控制的类库工具包,代码中只有业务本身。
Service Mesh经历了
- 16年概念的提出
- 17年几个重量级产品的发布
时至今日才经历了4年的时间
02 内容综述
略
03 Service Mesh的起源:为什么出现Service Mesh技术?
微服务的特性
围绕业务构建团队
期初开发的团队根据职能划分为了不同的团队,开发的团队根据功能划分为了不同的团队。
后者是
- 团队层面:内聚,独立开发业务,没有依赖
- 产品层面:服务彼此独立,没有依赖,可以根据服务的请求量决定服务的部署数量
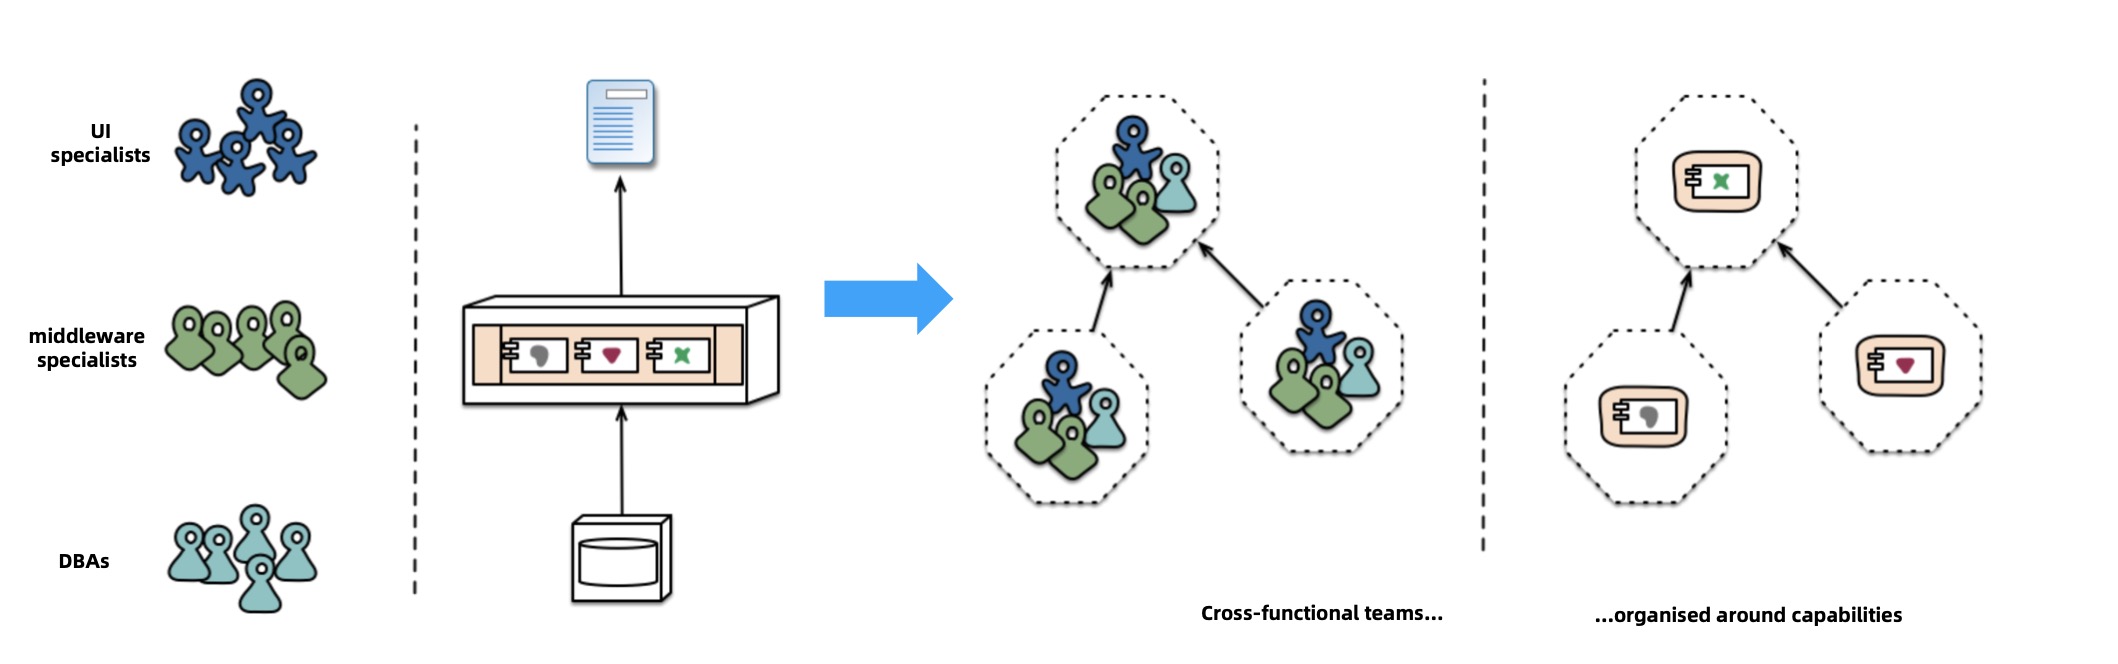
康威理论里也讲,一个团队的结构会决定开发产品的结构
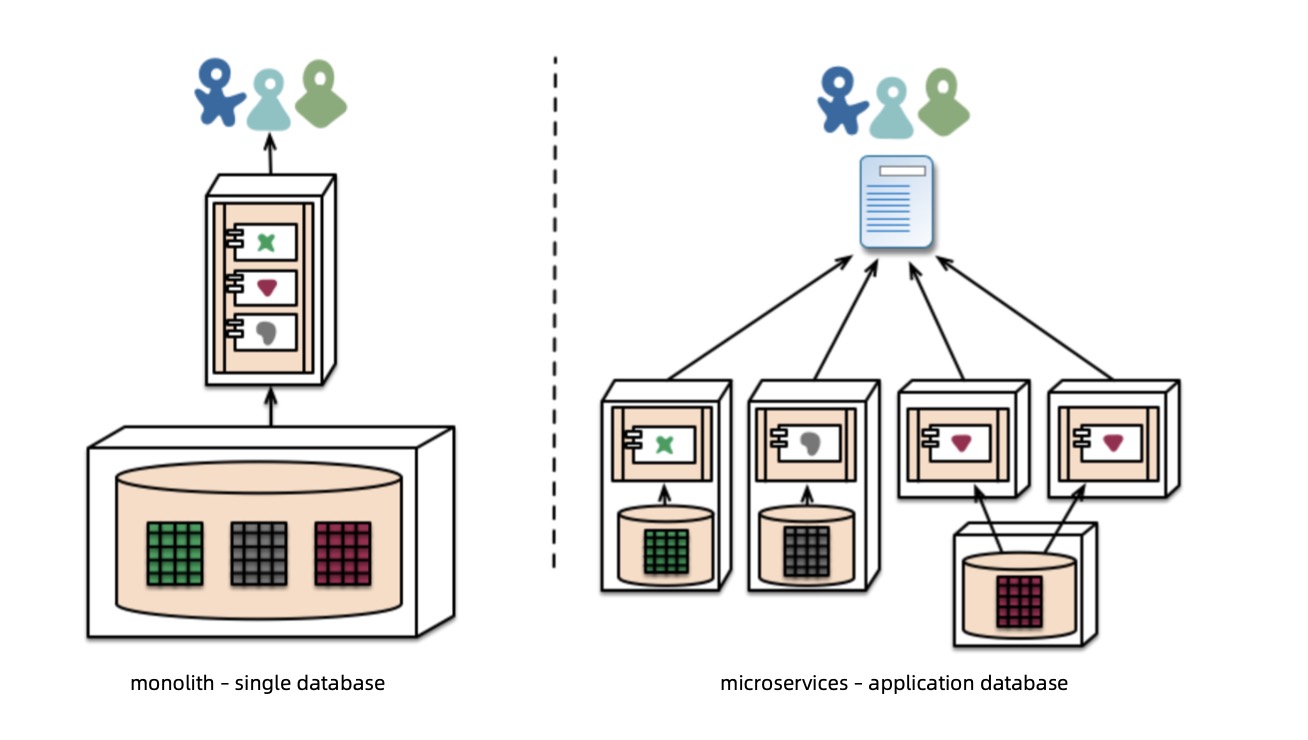
去中心化的数据管理
数据库和业务会绑定在一起
微服务也会带来缺点,就是服务间网络通信问题的排查
网络通信会成为痛点,主要就是因为分布式的8个谬论
- 网络是可靠的
- 网络延迟是0
- 网络带宽是无限的
- 网络是安全的
- 网络拓扑是不变的
- 只有一个管理员
- 传输成本为0
- 网络是同构的
开发业务系统的时候,潜意识会忽略这个网络的问题,会导致这8个谬论的产生
在分布式系统中,微服务架构服务会越来越多,变的更离散,交互也会越来越多,就会造成这个网络的痛点,所以才引入了管理和控制服务间的通信
在管理过程中
- 服务注册和发现
- 路由,流量转移
- 弹性能力(熔断,超时,重试)
- 安全
- 可观测性
04 Service Mesh发展:Service Mesh技术是如何演进的?
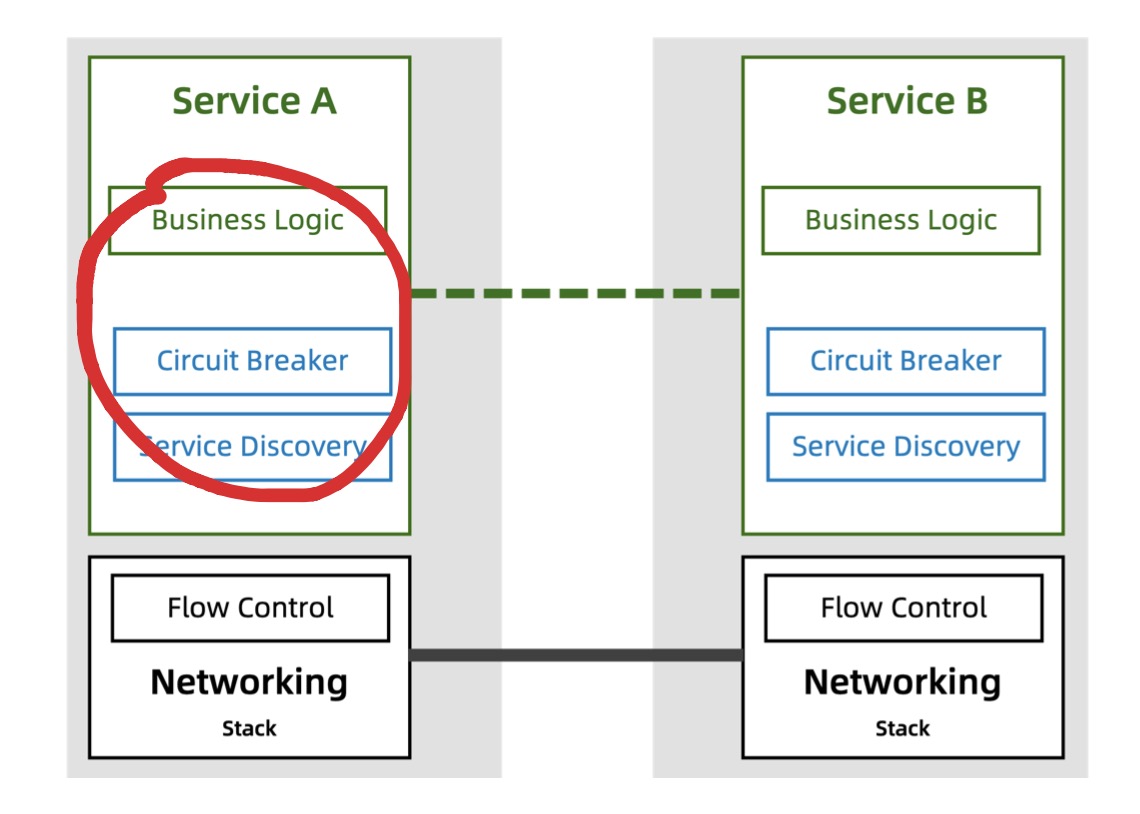
第一阶段:控制逻辑和业务逻辑耦合
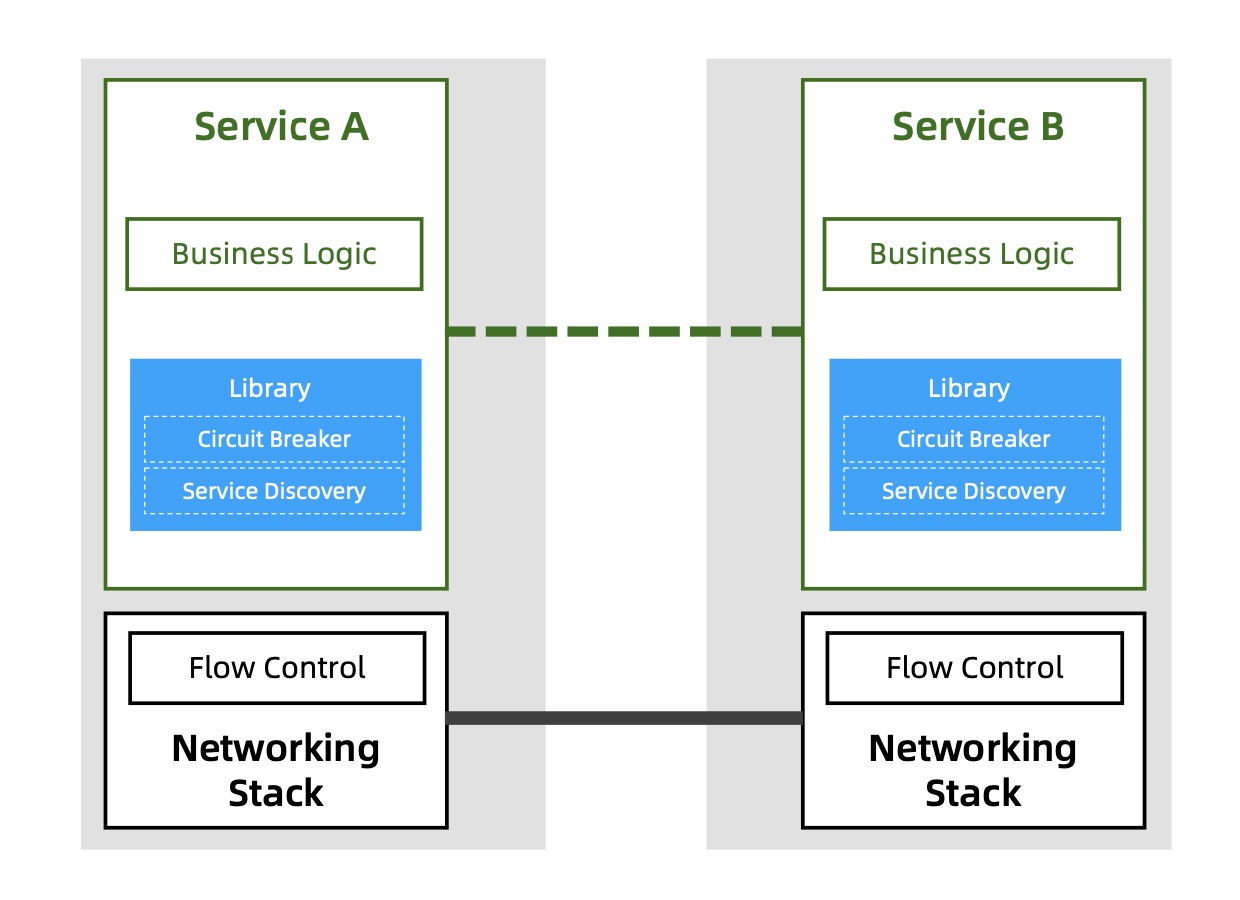
第二阶段:公共库(把控制逻辑集中在一起,会有人力的学习成本和维护成本,语言绑定和侵入性的问题)
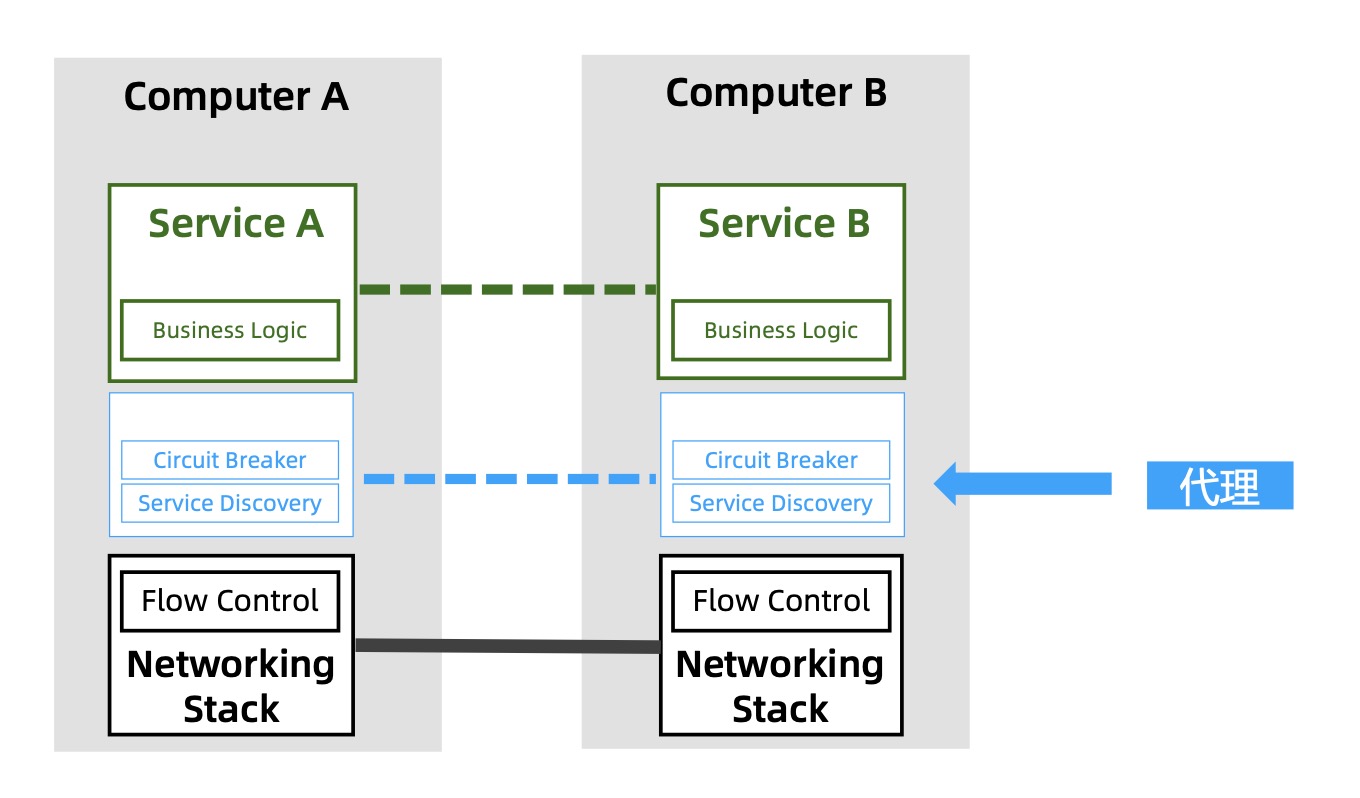
第三阶段:代理模式(配置简陋)
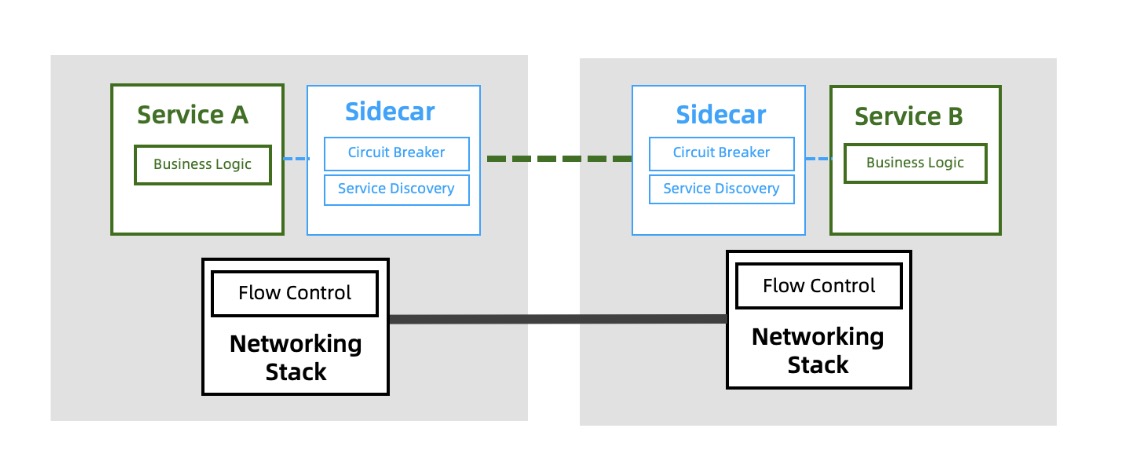
第四阶段:Sidecar(边车模式,通过Sidecar来接收和转发请求)
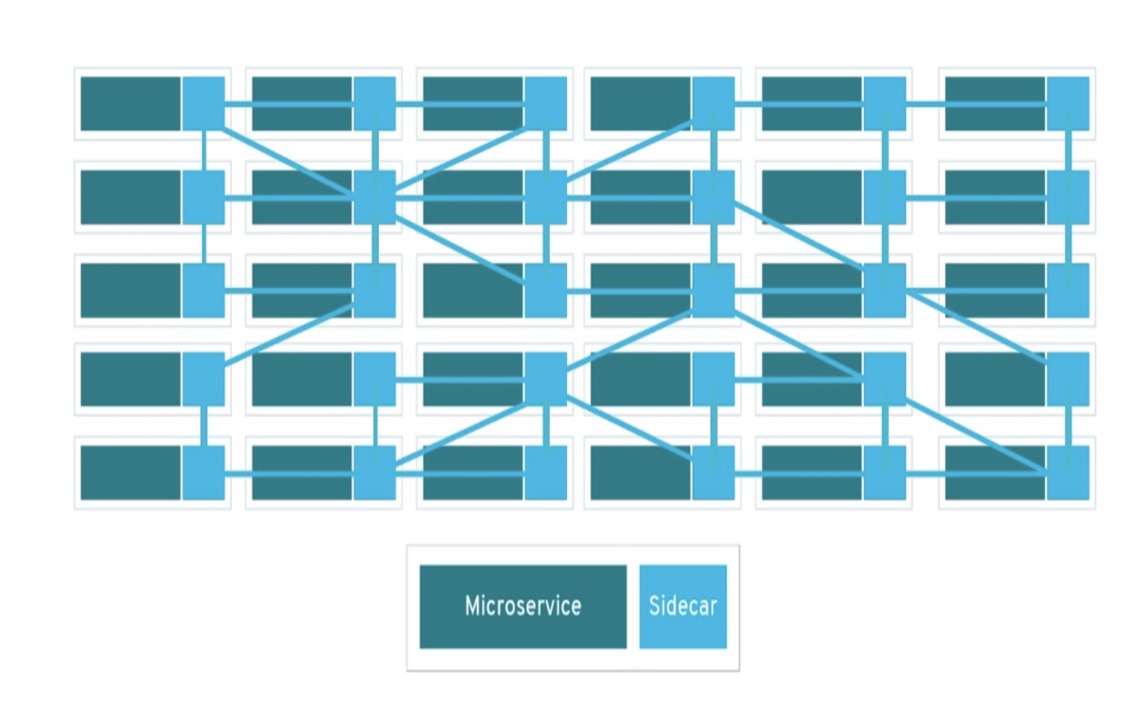
第五阶段:Service Mesh
05 微服务通信的救市良方:什么是Service Mesh?它能帮助你做什么?
Service Mesh是一个基础设施层,用于处理服务与服务的通信,它主要的功能是在云原生应用这种复杂的服务拓扑进行请求分发,一般是一组轻量化的网络代理,部署在应用代码旁边,和应用是完全透明的
06 列王的纷争:史上有那些主流的Service Mesh
Service Mesh产品的发展史
2016年
- Linkerd
- 9月Envoy1.0版本发布
2017年
- Linkerd加入cncf
- 4月Linkerd 1.0发布
- 9月Istio 0.1发布
- 9月Envoy加入cncf
- 12月Conduit发布
2018年
- 7月Istio 1.0发布
- Envoy稳定发布
- Conduit并入了Linkerd2.0
- 国内大厂参与
2019年
- 3月Istio 1.1发布
- 4月AWS App Mesh GA
- 5月Google Taffic Director beta发布
- 9月Kong发布Kuma
- 蚂蚁金服Mosh支持双十一
2020年
- 3月Istio 1.5发布
详细的介绍
Linkerd作为一个数据平面
- 对比Envoy没有优势
- 选择了Rust的小种语言,得不到社区支持
- 产品独立,没有云厂商支持
Envoy
- 性能稳定可靠
- Istio的默认数据平面
- xDS协议是数据平面的标准
Istio
- 收编Envoy,直接有高水准的数据平面
07 王者的诞生:为什么Istio有如此高的呼声
Istio数据平面的基础上,增加了控制平面
- 出击及时:17年发布狙击Linkerd
- 光环加持:Google,IBM和Lyft
- 第二代Service Mesh
- Envoy加入
- 功能强大
为什么要使用Istio
- 可以很轻松构建服务网格
- 应用代码无需修改
功能分四个方面
- 流量控制:路由,流量转移,弹性(超时,重试,熔断),测试(故障注入,流量镜像)
- 安全:授权,认证
- 可观测性:指标,日志,可追踪
- 策略:限流,黑白名单
在1.5版本,去掉了策略相关,是因为去掉了Mixer模块,将功能转移到Envoy中
Istio版本迭代历程
- 17.05 发布了v0.1
- 18.07 发布了v1.0,可应用于生产
- 19.03 发布了v1.1 架构重构,企业级可用
- 19.06 发布了v1.2
- 19.09 发布了v1.3
- 19.11 发布了v1.4
- 20.03 发布了v1.5 架构再次重构
云原生的战略
- 微服务Istio
- 通讯gRPC
- 容器kubernetes
08 Istio的自我救赎:为什么Istio发生了两次重大的架构变更
架构1.0版本
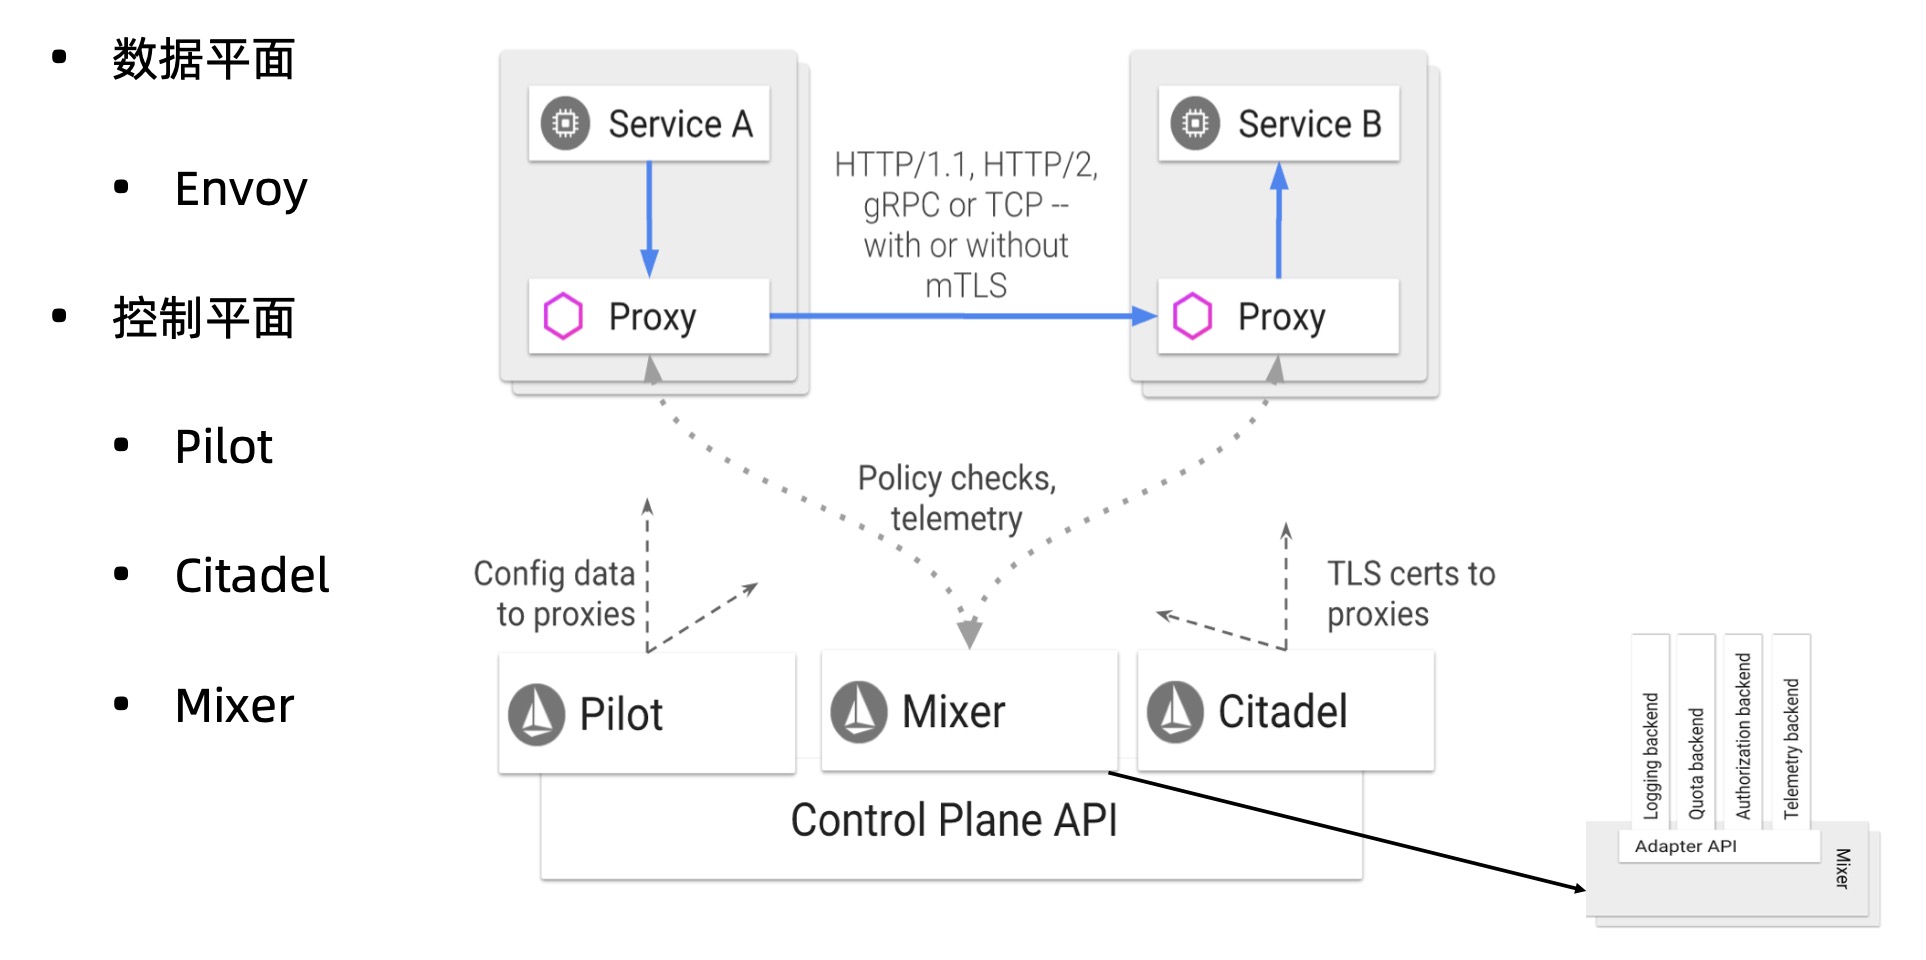
数据平面
- envoy
控制平面
- pilot 配置管理和分发
- citadel 安全相关
- mixer 收集数据指标,设置策略
mixer带来的问题
- 需要和数据平面进行两次通讯,降低了效率
- 在进行扩展修改的时候,需要重新部署
架构1.1版本

- Adapter 提供了mixer的扩展功能
- Galley 配置验证,提取处理和分发的组件,pilot进行了解耦
但是造成了mixer的性能更差了,解耦本身并没有错误
架构1.5版本
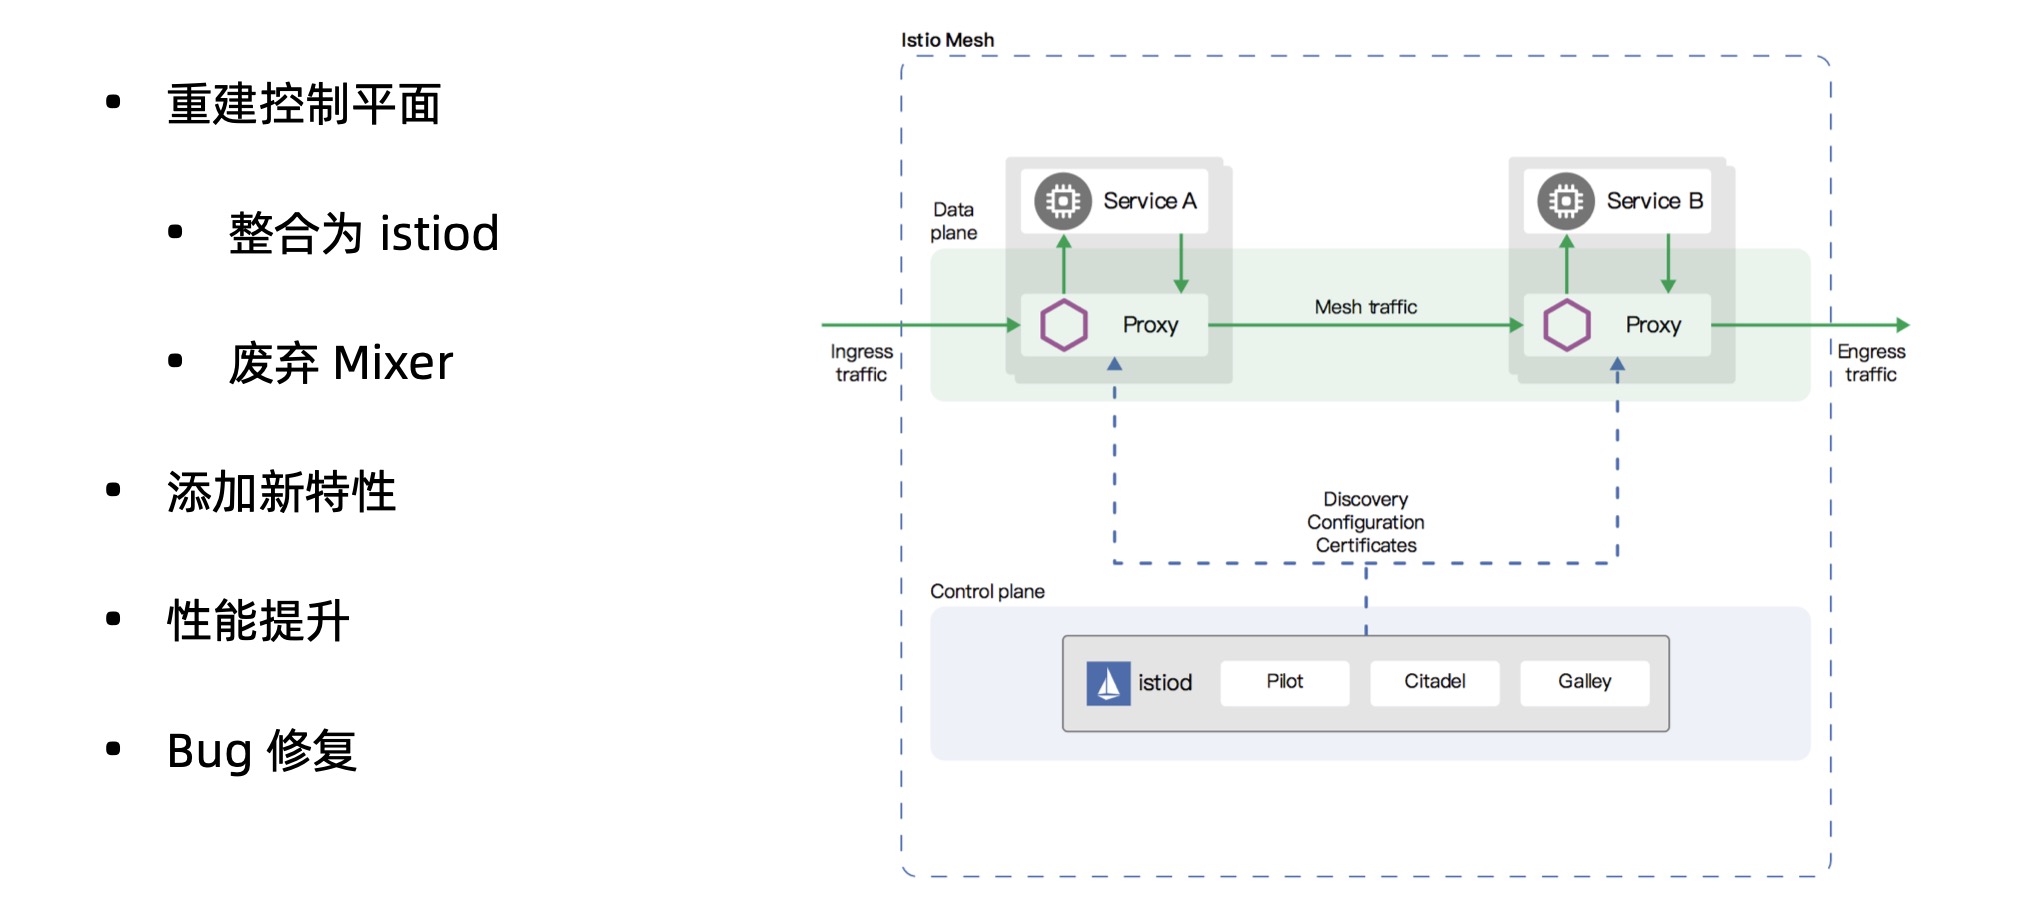
重建了控制平面
- 整合为istiod
- 废弃mixer
09 核心功能之流量控制:Istio是如何实现流量控制
核心资源CRD包括
虚拟服务(Virtual Service)
- 将流量路由到给定的目标地址
- 将请求地址和真实工作负载解耦
- 包含一组路由规则
- 和目标规则经常是成对出现
目标规则
- 目标地址的子集
- 设置负载均衡策略
网关
管理进出网格的流量
服务入口
将外部服务注册到网格内
功能
- 为外部目标转发请求
- 添加超时重试等策略
- 扩展网格
sidecar
对流量进行一个全局的控制
功能
- 调整envoy代理的端口和协议
- 限制envoy代理可以访问的服务
10 服务可观察性:如何理解服务可视化的重要性
指标
- 代理级别:sidecar代理的数据
- 服务级别:有延迟,流量,饱和和错误等
- 控制平面级别:自身组件行为监控和网格健康状况
日志
服务可视化
11 保卫你的网格:Istio是如何设计安全架构的?
Istio的安全架构
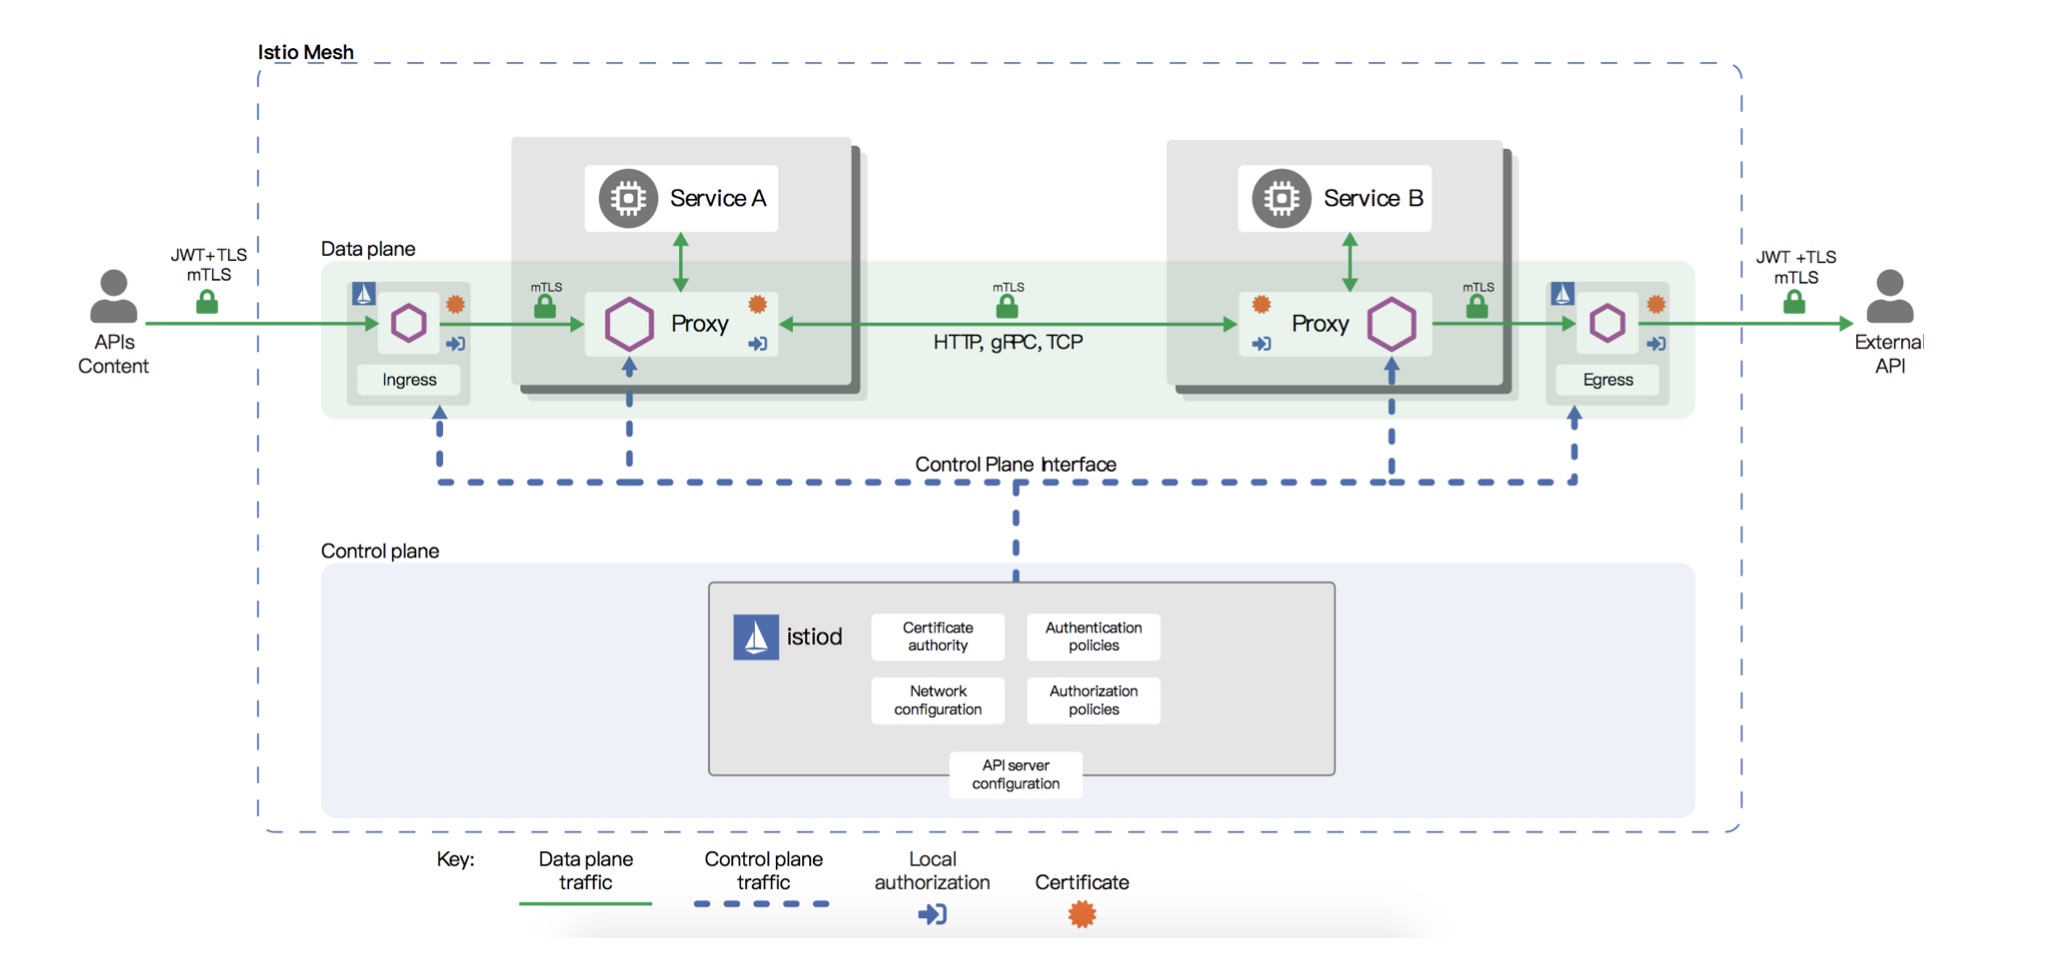
- 网格外服务通过JWT方式调用网格内服务
- 网格内部可以通过双向TLS认证
认证提供了兼容模式,可以支持加密和不加密方式同时进行请求传输
认证包括两种
- 对等认证 用于服务间认证,Mutual TLS
- 请求认证 用于终端用户身份认证,Json Web Token
授权包括
- 范围设置:metadata/namespace, selector,
- 值匹配:rule/from和to,可以配置为空
- 允许和拒绝:action
- 自定义条件:when
12 安装与部署:如何部署Istio?他都支持那些环境和部署方式
安装istioctl
curl -L https://istio.io/downloadIstio | sh -
使用istioctl安装istio
- 默认安装
istio manifest apply - 选择profile
istio manifest apply --set profile=demo - 自定义安装选项
istio manifest apply --set addonComponents.grafana.enabled=true - 自定义安装清单
istio manifest apply --set installPackagePath=<发布路径>/install/kubernetes/operator/charts
查看crd资源
kubectl get crd | grep istio
kubectl api-resources | grep istio
可以通过生成清单的方式安装
istioctl manifest generate > $HOME/generated-manifest.yaml
kubectl apply -f $HOME/generated-manifest.yaml
验证安装
istioctl verify-install -f $HOME/generated-manifest.yaml
启动dashboard
istioctl dashboard kiali
注入sidecar
kubectl label namespace dafault istio-injection=enabled -overwrite=true
工作的原理是利用了admission controller,结合webhook进行注入,会改写创建的pod
部署demo应用
demo应用架构
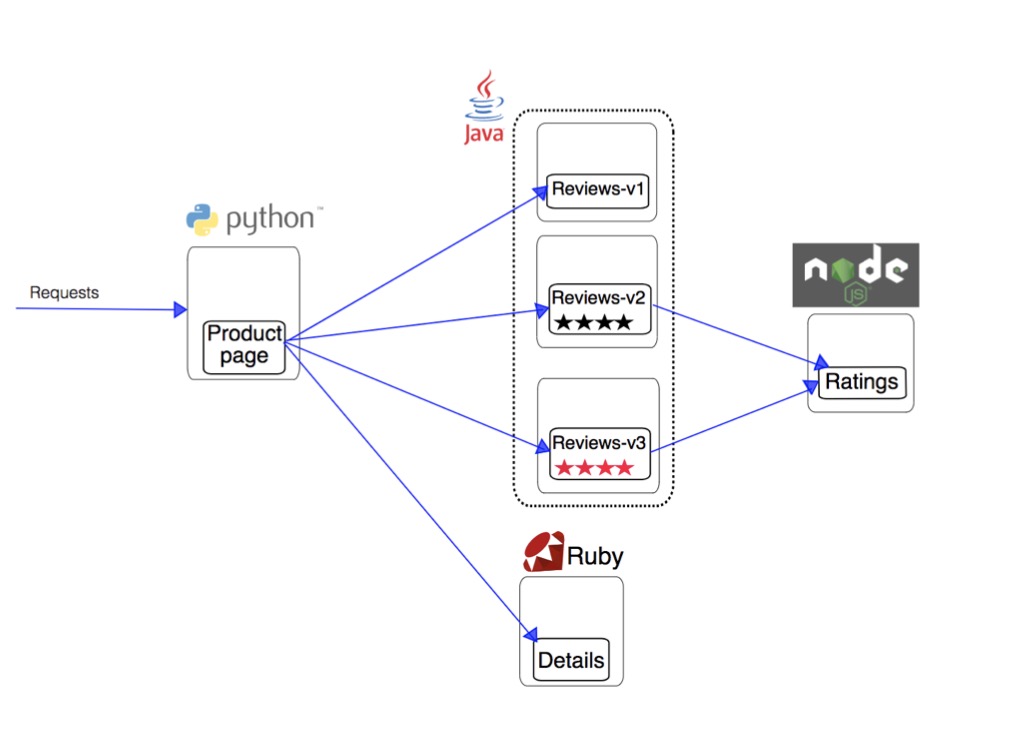
- productpage 主页
- reviews 评论内容(reviews有三个不同的版本)
- details 详细内容
- ratings 评分服务
kubectl apply -f samples/bookinfo/platform/kube/bookinfo.yaml
启动的pod内会有istio-proxy的容器
创建ingress网关
kubectl apply -f samples/bookinfo/networking/bookinfo-gateway.yaml
通过访问对应的/productpage验证是否部署成功
13 动态路由:用Virtula Service和Destination Rule设置路由策略
kubectl apply -f samples/bookinfo/networking/virtual-service-all-v1.yaml
kubectl apply -f samples/bookinfo/networking/destination-rule-all.yaml
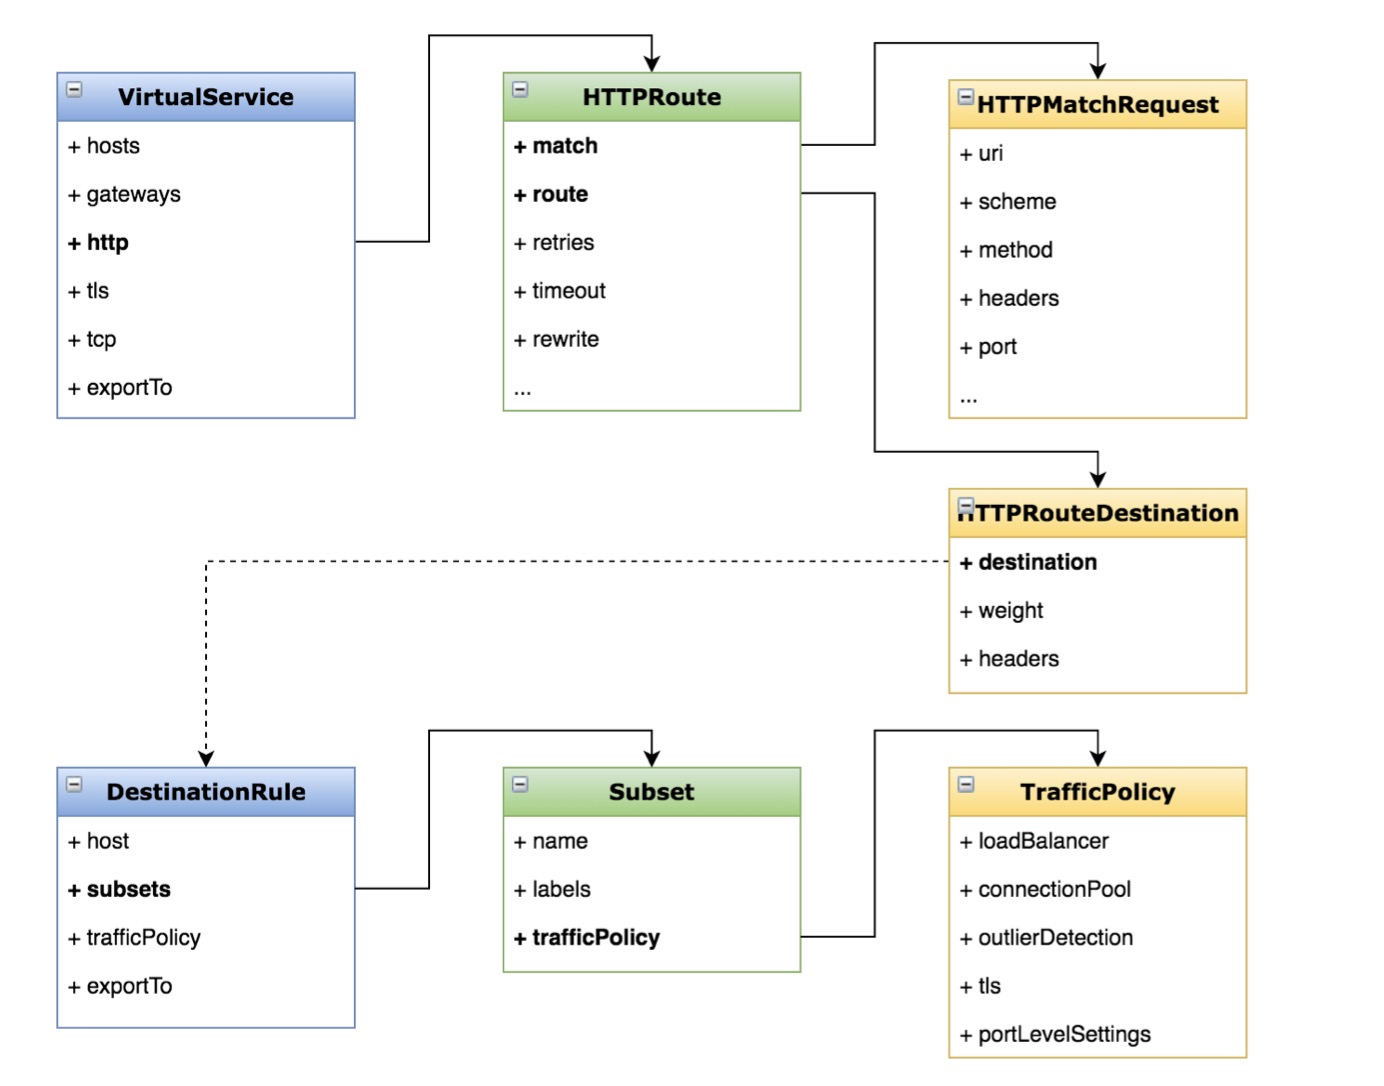
VirtualService
- hosts
- gateways 对于外部访问需要,内部服务就直接省略
- http
- tcp
- tls
- exportTo 可见性,可以在本ns或者所有ns
http对应的HTTPRoute
- match 对应HTTPMatchRequest,有uri、scheme、method、headers和post等
- route 对应HTTPRouteDestination,有destination(包括host和subset)、weight和headers
- retries
- timeout
- rewrite
destination对应的DestinationRule
- host 目标地址
- subsets 子集,一般对应多个版本
- trafficPolicy 对应TrafficPolicy,有loadBalancer、connectionPool、tls、outtilerDetection和portLevelSettings
- exportTo
Virtula Service和Destination Rule使用场景
- 按照服务版本路由
- 按照比例切分流量
- 根据路由规则进行路由
- 定义负载均衡和连接池等策略
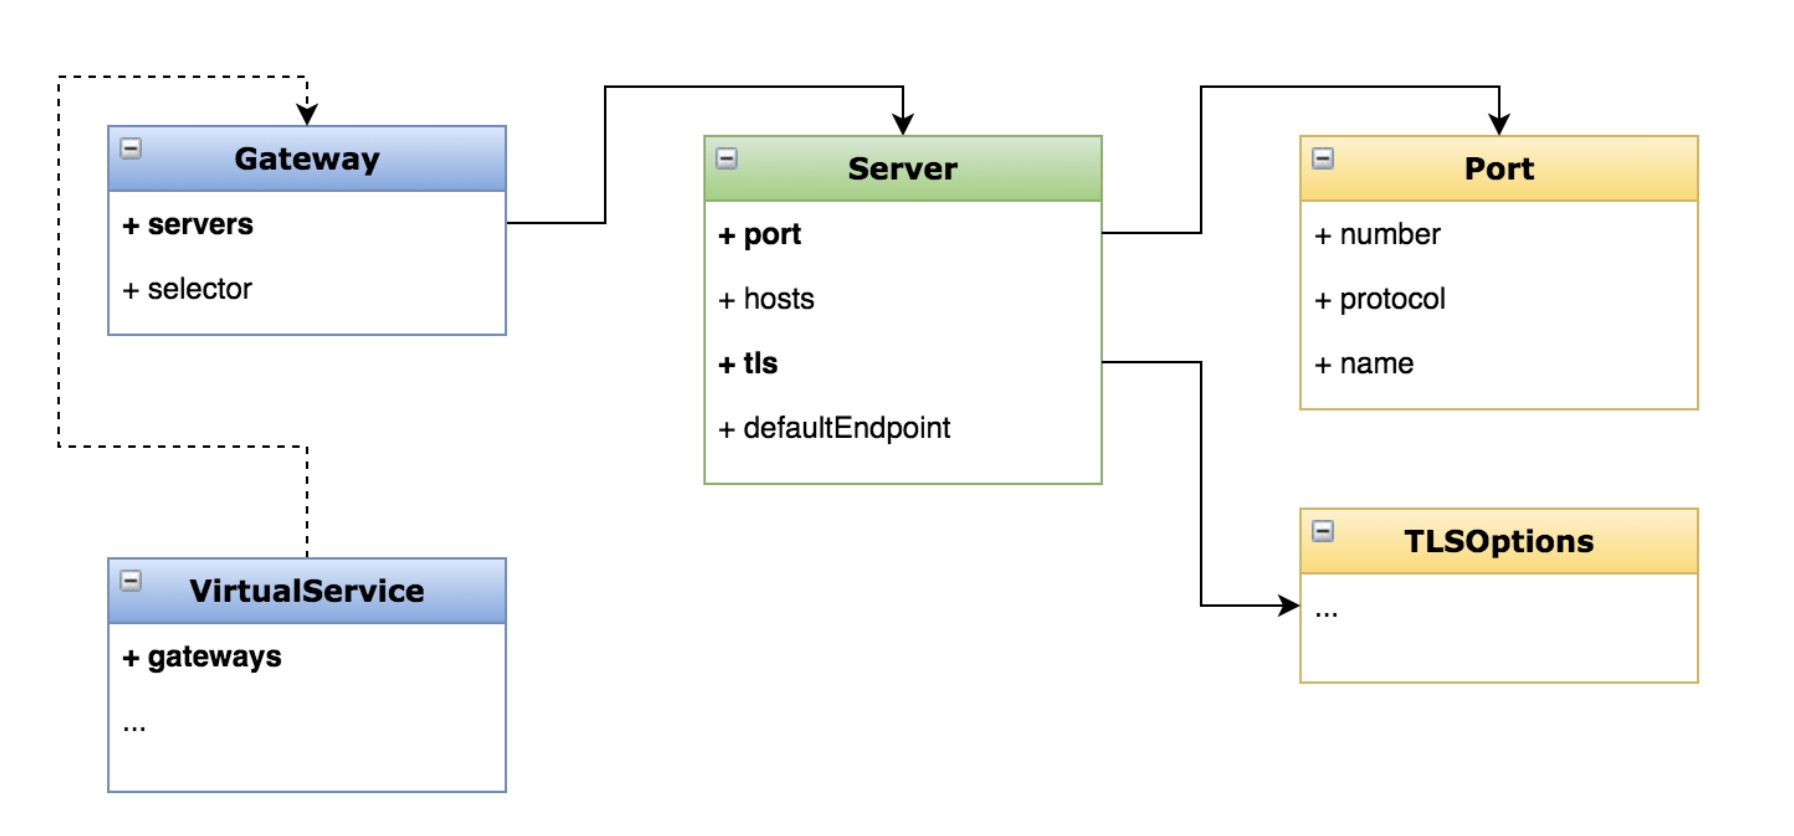
14 网关:用Gateway管理进入网格的流量
什么是Gateway?
- 一个运行在网格边缘的负载均衡器
- 接收外部请求,转发给网格内的服务
- 配置对外的端口、协议与内部服务的映射关系
设置网关
apiVersion: networking.istio.io/v1alpha3
kind: Gateway
metadata:
  name: test-gateway
spec:
  selector:
    istio: ingressgateway
  servers:
  - port:
      number: 80
      name: http
      protocol: HTTP
    hosts:
    - "*"
---
apiVersion: networking.istio.io/v1alpha3
kind: VirtualService
metadata:
  name: test-gateway
spec:
  hosts:
  - "*"
  gateways:
  - test-gateway
  http:
  - match:
    - uri:
        prefix: /details
    - uri:
        exact: /health
    route:
    - destination:
        host: details
        port:
          number: 9080
请求url为/details/0和/health进行验证
Gateway的应用场景
- 暴露网格内服务给外界
- 访问安全(对外使用https协议内部使用http)
- 统一应用入口,API聚合
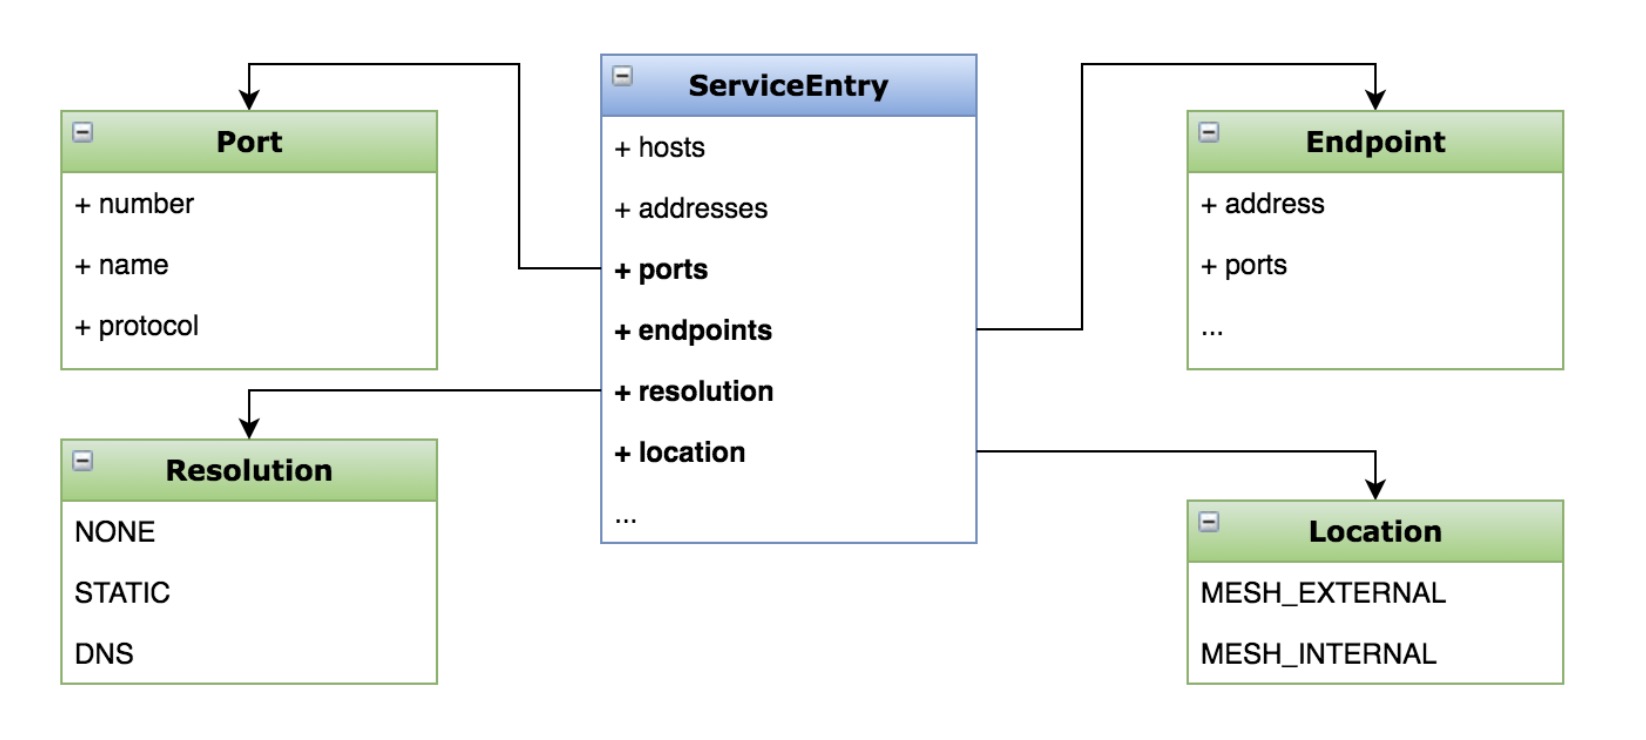
15 服务入口:用Service Entry扩展你的网格服务
服务入口的作用是
- 添加外部服务到网格内部
- 管理到外部服务的请求
安装用于测试的client
kubectl apply -f samples/sleep/sleep.yaml
关闭出流量访问权限
kubectl get configmap istio -n istio-system -o yaml | sed 's/mode: ALLOW_ANY/mode: REGISTRY_ONLY/g' | kubectl replace -n istio-system -f -
定义服务入口
kubectl apply -f - <<EOF
apiVersion: networking.istio.io/v1alpha3
kind: ServiceEntry
metadata:
  name: httpbin-ext
spec:
  hosts:
  - httpbin.org
  ports:
  - number: 80
    name: http
    protocol: HTTP
  resolution: DNS
  location: MESH_EXTERNAL
EOF
使用httpbin.org/headers来测试服务
16 流量转移:灰度发布是如何实现
有蓝绿发布,金丝雀发布等
kubectl apply -f samples/bookinfo/networking/virtual-service-reviews-50-v3.yaml
通过对VirtualService的route指向两个不同的destination,权重分别为50
17 Ingress: 控制进入网格的请求
Istio的Ingress和kubernetes的Ingress的区别
- Istio针对L4~L6,只定义接入点,复用的Virtual Server的L7路由协议
- kubernetes针对L7,可以定义路由规则
添加服务
kubectl apply -f samples/httpbin/httpbin.yaml
创建ingress
apiVersion: networking.istio.io/v1alpha3
kind: Gateway
metadata:
  name: httpbin-gateway
spec:
  selector:
    istio: ingressgateway
  servers:
  - port:
      number: 80
      name: http
      protocol: HTTP
    hosts:
    - "httpbin.example.com"
创建路由规则
apiVersion: networking.istio.io/v1alpha3
kind: VirtualService
metadata:
  name: httpbin
spec:
  hosts:
  - "httpbin.example.com"
  gateways:
  - httpbin-gateway
  http:
  - match:
    - uri:
        prefix: /status
    - uri:
        prefix: /delay
    route:
    - destination:
        port:
          number: 8000
        host: httpbin
测试接口
- /status/200
- /delay/2
18 Egress: 用Egress实现访问外部服务
istio访问外部的方式
- 使用ServiceEntry
- 配置sidecar跳过代理默认
- Egress
创建ServiceEntry,用于指向外部服务
apiVersion: networking.istio.io/v1alpha3
kind: ServiceEntry
metadata:
  name: httpbin
spec:
  hosts:
  - httpbin.org
  ports:
  - number: 80
    name: http-port
    protocol: HTTP
  resolution: DNS
这样是直接可以访问外部服务的
创建gateway,使用Egress来处理流量
apiVersion: networking.istio.io/v1alpha3
kind: Gateway
metadata:
  name: istio-egressgateway
spec:
  selector:
    istio: egressgateway
  servers:
  - port:
      number: 80
      name: http
      protocol: HTTP
    hosts:
    - httpbin.org
创建虚拟服务
apiVersion: networking.istio.io/v1alpha3
kind: VirtualService
metadata:
  name: vs-for-egressgateway
spec:
  hosts:
  - httpbin.org
  gateways:
  - istio-egressgateway
  - mesh
  http:
  - match:
    - gateways:
      - mesh
      port: 80
    route:
    - destination:
        host: istio-egressgateway.istio-system.svc.cluster.local
        subset: httpbin
        port:
          number: 80
      weight: 100
  - match:
    - gateways:
      - istio-egressgateway
      port: 80
    route:
    - destination:
        host: httpbin.org
        port:
          number: 80
      weight: 100
---
apiVersion: networking.istio.io/v1alpha3
kind: DestinationRule
metadata:
  name: dr-for-egressgateway
spec:
  host: istio-egressgateway.istio-system.svc.cluster.local
  subsets:
  - name: httpbin
这里针对mesh内部的,转发到egress,而egress才会转发到目标地址
19 超时重试:提升系统的健壮性和可用性
- 超时主要是为了控制故障的范围,避免扩散
- 重试主要是为了解决网络抖动时,通信失败的问题
添加服务的延迟时间
apiVersion: networking.istio.io/v1alpha3
kind: VirtualService
metadata:
  name: ratings
spec:
  hosts:
  - ratings
  http:
  - fault:
      delay:
        percent: 100
        fixedDelay: 2s
    route:
    - destination:
        host: ratings
        subset: v1
服务指向
apiVersion: networking.istio.io/v1alpha3
kind: VirtualService
metadata:
  name: reviews
spec:
  hosts:
    - reviews
  http:
  - route:
    - destination:
        host: reviews
        subset: v2
再加一个reviews添加超时设置
apiVersion: networking.istio.io/v1alpha3
kind: VirtualService
metadata:
  name: reviews
spec:
  hosts:
  - reviews
  http:
  - route:
    - destination:
        host: reviews
        subset: v2
    timeout: 1s
这时候请求就会获取不到数据了
再设置一下ratings的重试策略
apiVersion: networking.istio.io/v1alpha3
kind: VirtualService
metadata:
  name: ratings
spec:
  hosts:
  - ratings
  http:
  - fault:
      delay:
        percent: 100
        fixedDelay: 5s
    route:
    - destination:
        host: ratings
        subset: v1
    retries:
      attempts: 2
      perTryTimeout: 1s
20 熔断:秒杀场景下的过载保护如何实现
熔断是一种过载的保护手段,目的是避免服务级联失败
demo通过httpbin作为server端,client为一个压力测试工具
添加策略
apiVersion: networking.istio.io/v1alpha3
kind: DestinationRule
metadata:
  name: httpbin
spec:
  host: httpbin
  trafficPolicy:
    connectionPool:
      tcp:
        maxConnections: 1
      http:
        http1MaxPendingRequests: 1
        maxRequestsPerConnection: 1
    outlierDetection:
      consecutiveErrors: 1
      interval: 1s
      baseEjectionTime: 3m
      maxEjectionPercent: 100
配置的trafficPolicy有两个部分
- maxRequestsPerConnection为http每个连接的最大请求数为1
- outlierDetection触发熔断的次数为1
- interval为熔断的间隔时间为1s
- baseEjectionTime最大可驱逐时间
- maxEjectionPercent最大可驱逐比例
tcp还有connectTimeout和tcpKeepalive配置项
部署压力测试工具
kubectl apply -f samples/httpbin/sample-client/fortio-deploy.yaml
进行压力测试
kubectl exec -it $FORTIO_POD -c fortio /usr/bin/fortio -- load -c 2 -qps 0 -n 20 -loglevel Warning http://localhost:5000/get
可以看到存在503的熔断请求
kubectl exec -it $FORTIO_POD -c istio-proxy -- pilot-agent request GET stats | grep httpbin.default | grep pending
upstream_rq_pending_overflow就是被熔断的请求
21 故障注入:在Istio实现一个"Chaos Monkey"
故障注入由Netflix提出ChaosMonkey,以及后来的混沌工程
kubectl apply -f samples/bookinfo/networking/virtual-service-all-v1.yaml
kubectl apply -f samples/bookinfo/networking/virtual-service-reviews-test-v2.yaml
kubectl apply -f samples/bookinfo/networking/virtual-service-ratings-test-delay.yaml
除了延迟故障delay,还有终止故障abort,有httpStatus和percentage配置项
22 流量镜像:解决线上问题排查难题
流量镜像的目录有
- 线上问题排查
- 生产环境的压力测试
- 复制请求用于分析
部署v1和v2两个版本
apiVersion: apps/v1
kind: Deployment
metadata:
  name: httpbin-v1
spec:
  replicas: 1
  selector:
    matchLabels:
      app: httpbin
      version: v1
  template:
    metadata:
      labels:
        app: httpbin
        version: v1
    spec:
      containers:
      - image: docker.io/kennethreitz/httpbin
        imagePullPolicy: IfNotPresent
        name: httpbin
        command: ["gunicorn", "--access-logfile", "-", "-b", "0.0.0.0:80", "httpbin:app"]
        ports:
        - containerPort: 80
---
apiVersion: apps/v1
kind: Deployment
metadata:
  name: httpbin-v2
spec:
  replicas: 1
  selector:
    matchLabels:
      app: httpbin
      version: v2
  template:
    metadata:
      labels:
        app: httpbin
        version: v2
    spec:
      containers:
      - image: docker.io/kennethreitz/httpbin
        imagePullPolicy: IfNotPresent
        name: httpbin
        command: ["gunicorn", "--access-logfile", "-", "-b", "0.0.0.0:80", "httpbin:app"]
        ports:
        - containerPort: 80
创建虚拟主机的目标规则
apiVersion: networking.istio.io/v1alpha3
kind: VirtualService
metadata:
  name: httpbin
spec:
  hosts:
    - httpbin
  http:
  - route:
    - destination:
        host: httpbin
        subset: v1
      weight: 100
---
apiVersion: networking.istio.io/v1alpha3
kind: DestinationRule
metadata:
  name: httpbin
spec:
  host: httpbin
  subsets:
  - name: v1
    labels:
      version: v1
  - name: v2
    labels:
      version: v2
配置镜像
apiVersion: networking.istio.io/v1alpha3
kind: VirtualService
metadata:
  name: httpbin
spec:
  hosts:
    - httpbin
  http:
  - route:
    - destination:
        host: httpbin
        subset: v1
      weight: 100
    mirror:
      host: httpbin
      subset: v2
    mirror_percentage:
      value: 100
23 洞察你的服务:使用kiali观察你的微服务应用
微服务可视化的重要性
- 痛点:服务依赖复杂,问题排查困难
- 优点:梳理服务的交互关系,了解应用的行为与状态
kiali是一个Istio的可观测性控制台,通过服务拓扑的方式理解服务网格的架构,提供网格健康状态视图,具有服务网格配置功能
功能有
- 服务拓扑
- 健康检查
- 指标查看
- 配置验证
kiali架构
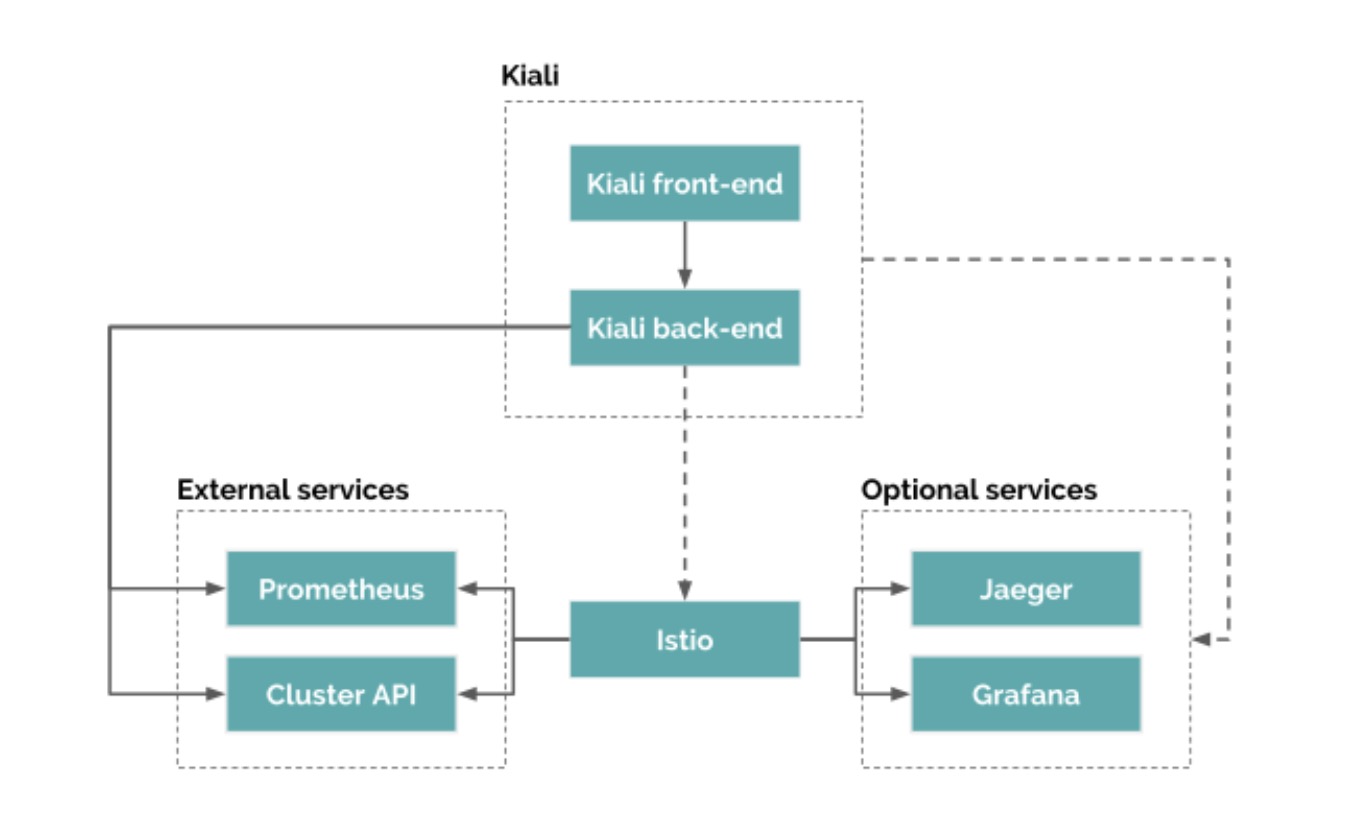
主要分前端和后端两部分,后端通过与Istio交互获取必要的数据,并且有两个扩展,prometheus和cluster的API
istioctl已经集成了dashboard
istioctl dashboard kiali
24 指标:使用prometheus收集指标
istio在1.5的遥测指标
- 请求数 istio_requests_total
- 请求时长 istio_request_duration_milliseconds
- 请求大小 istio_request_bytes
- 响应大小 istio_response_bytes
- tcp发送字节数 istio_tcp_send_bytes_total
- tcp响应字节数 istio_tcp_received_bytes_total
- tcp连接打开数 istio_tcp_connections_opened_total
- tcp连接关闭数 istio_tcp_connections_closed_total
在老的版本是通过mixter来提供metrics接口
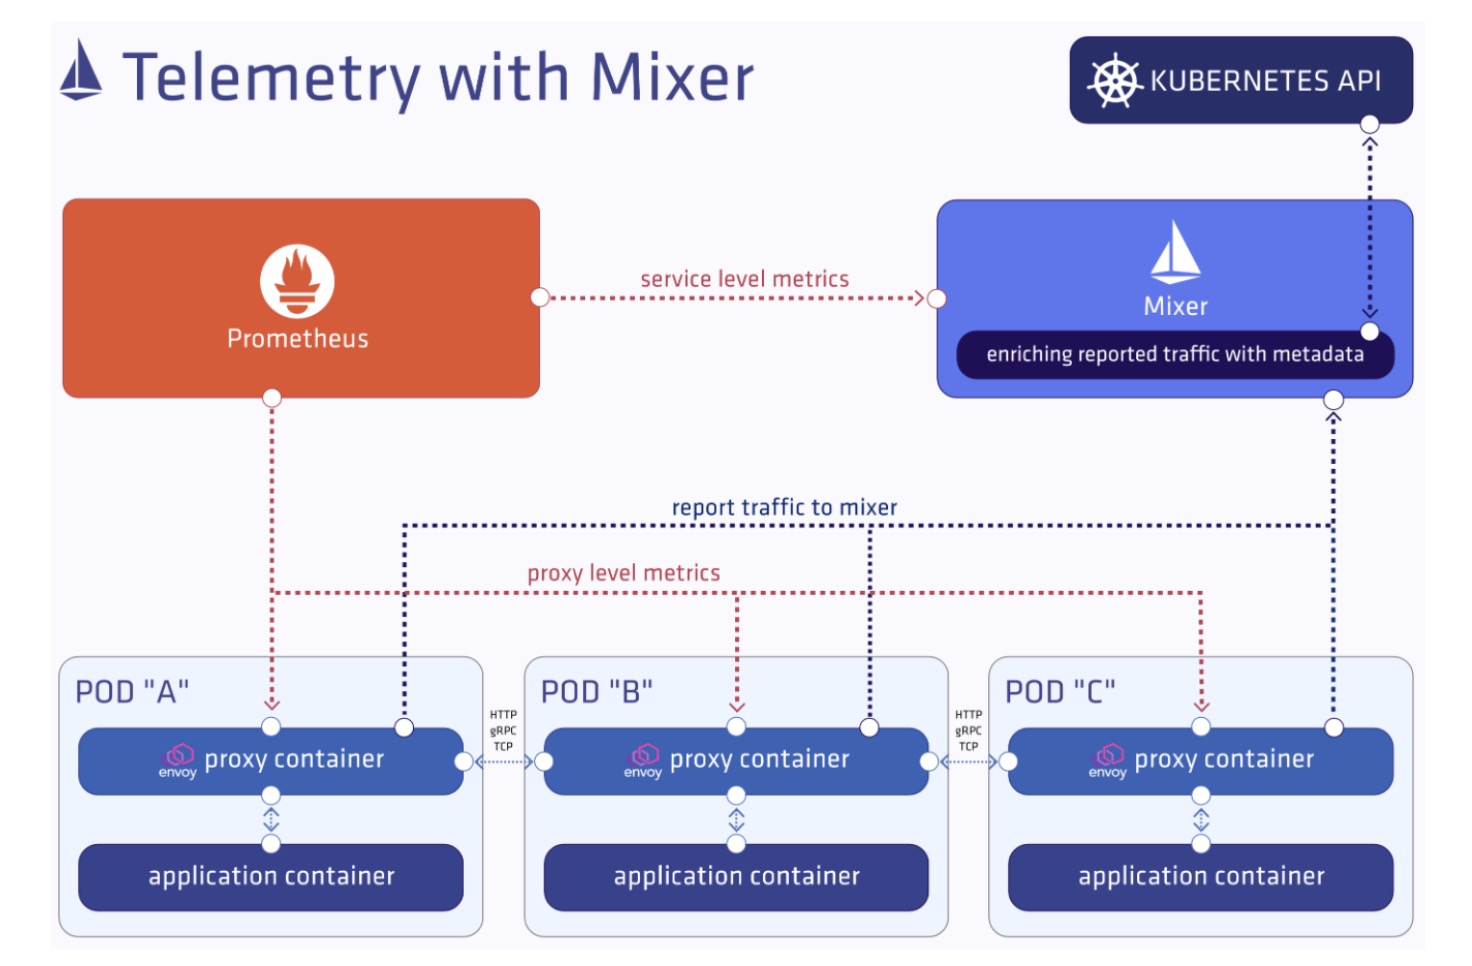
而新版本,prometheus直接与envoy进行交互
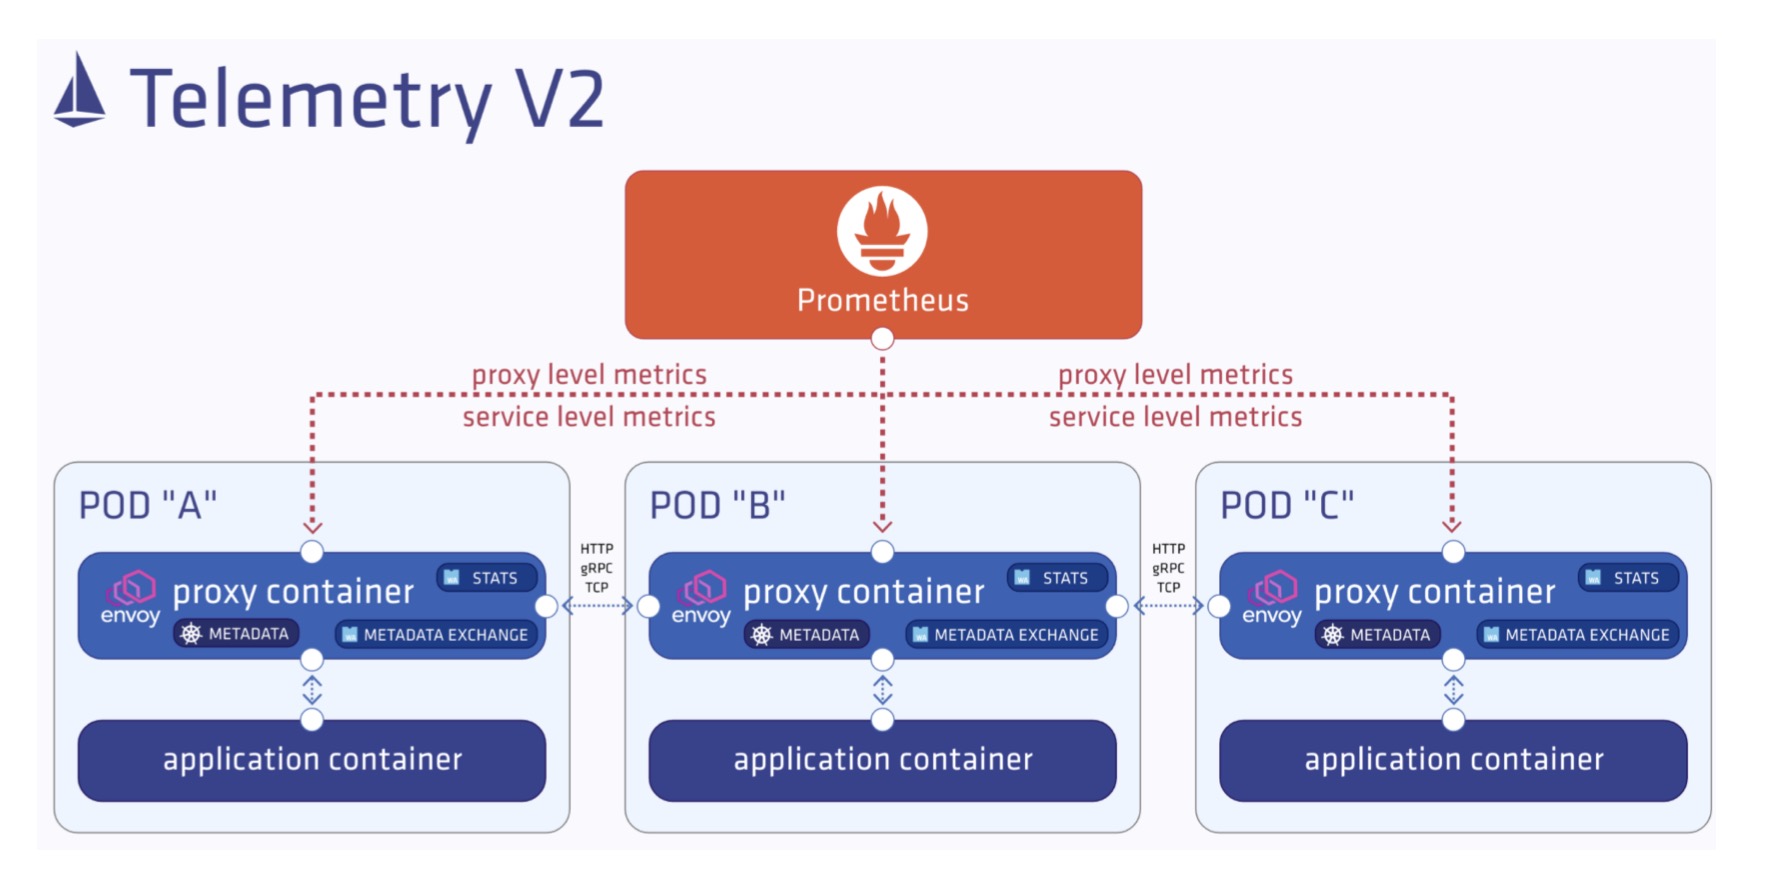
envoy使用了STATS和METADATA EXCHANGE插件来完成mixer的功能,但是扩展性很差了
后续最好的就是使用WebAssembly(字节码的方式),在1.5已经可以支持了
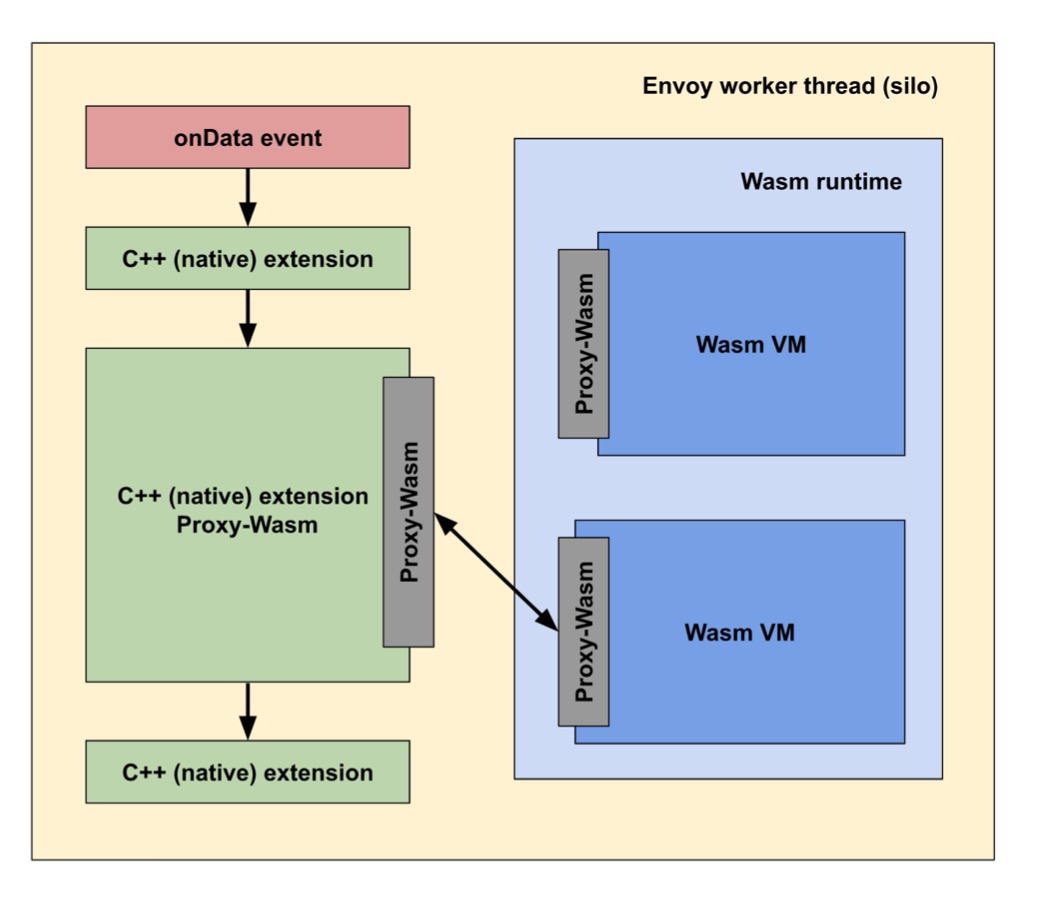
可以解决静态化编译的问题,优势在于
- 无需修改Envoy
- 避免远程调用
- 隔离性/安全/多样性
- 可移植/可维护
25 监控:使用Grafana查看系统的整体状态
Istio有默认的两种dashboard
Mesh
- 网格数据总览
- 服务视图
- 工作负载
Performance
- Istio系统总览
- 各组件负载
26 日志:如何获取envoy日志并进行调试
配置在istio的ns中名为istio的configmap,日志路径为accessLogFile字段,日志格式为accessLogEncoding字段
在istio中,sidecar都是使用的istio-proxy的容器名称
会有outbound和inbound的日志
Envoy的流量也包括五元组
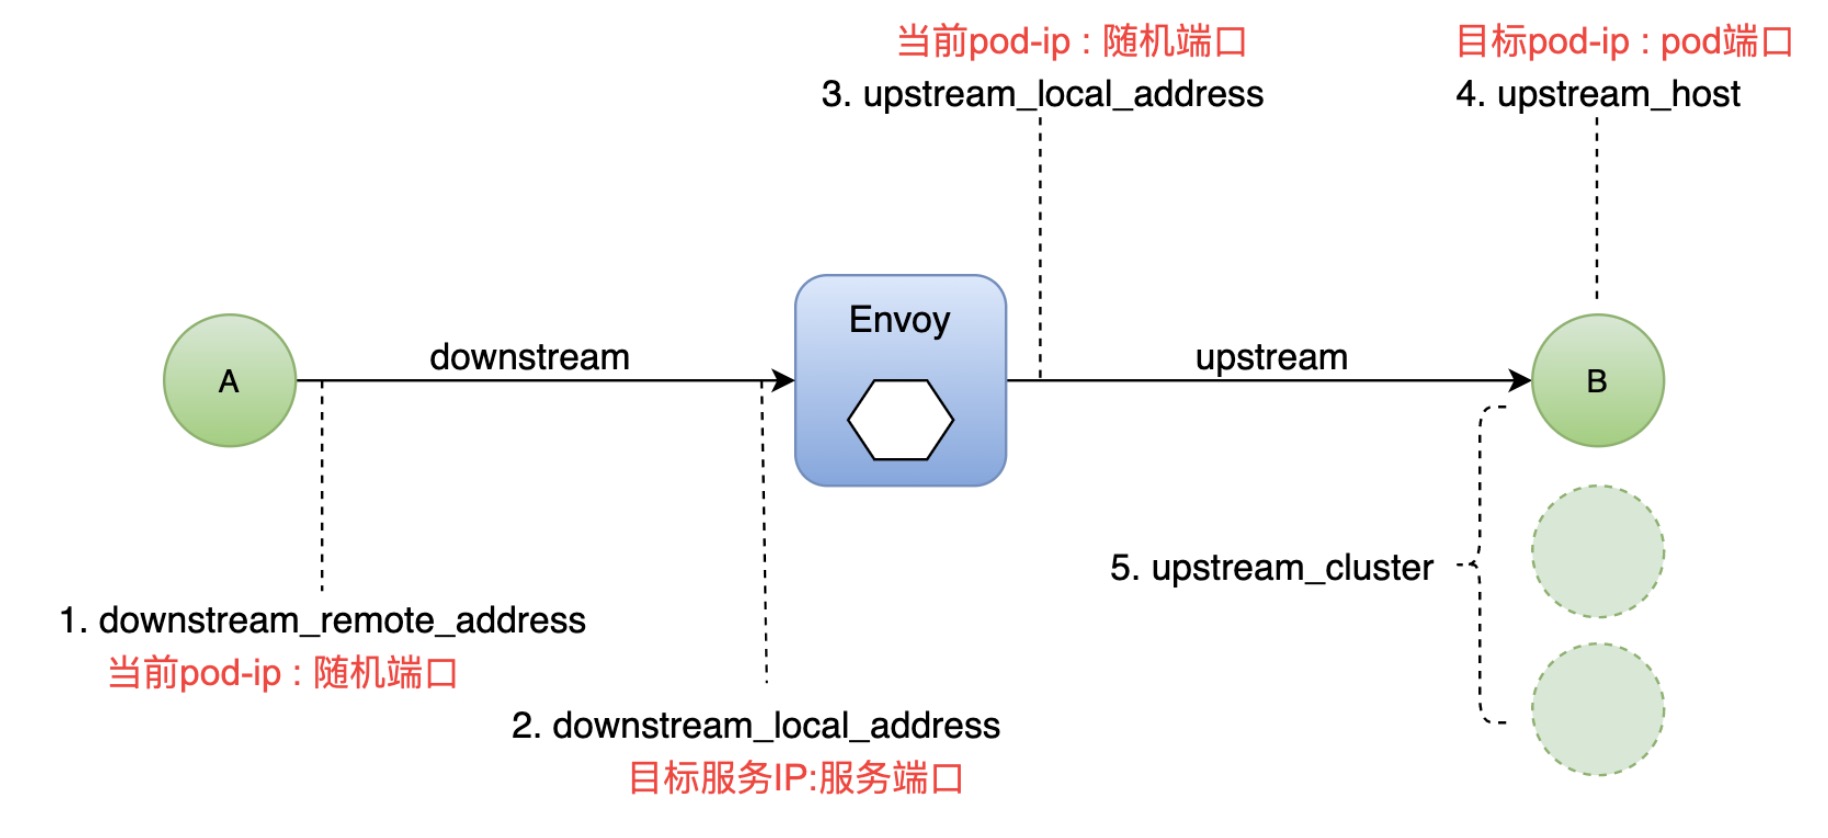
对于有问题,也有对应的字段RESPONSE_FLAGS
27 分布式追踪:使用Jaeger对应用进行分布式追踪
Jaeger的概念
- Span逻辑单元,有父子关系
- Trace是Span的组合
Jaeger架构
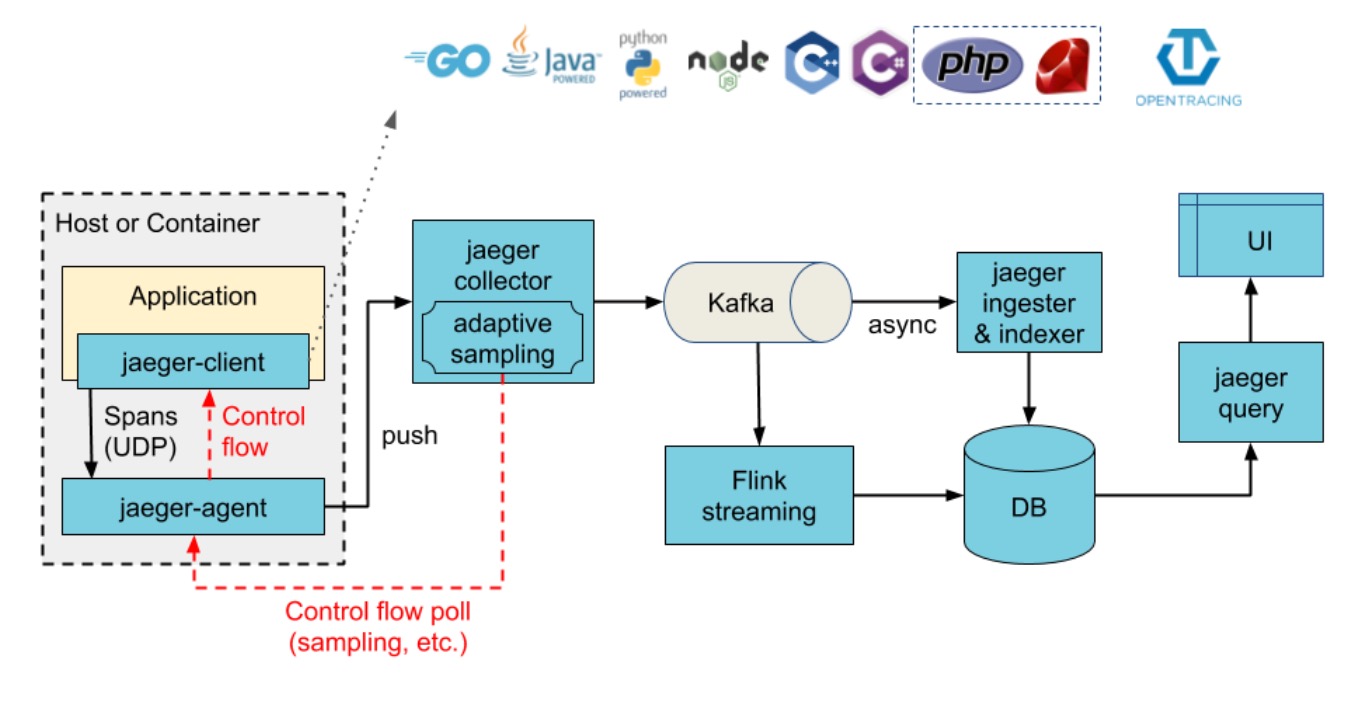
- agent需要从应用获取到span信息发送给collector
- collector为收集器,用于发送到存储
- query支持查询
- ingester配合kafka使用,调入到存储中
添加jaeger
--set values.tracing.enabled=true
--set values.global.tracer.zipkin.address=<jaeger-collector-service>.<jaeger-collector-namespace>:9411
28 守卫网络:配置TLS安全网关
1.5版本的Istio有那些更新
- SDS服务发现趋于稳定
- 对等认证和请求认证配置的分离
SDS安全发现服务架构(istio-agent为pilot-agent)
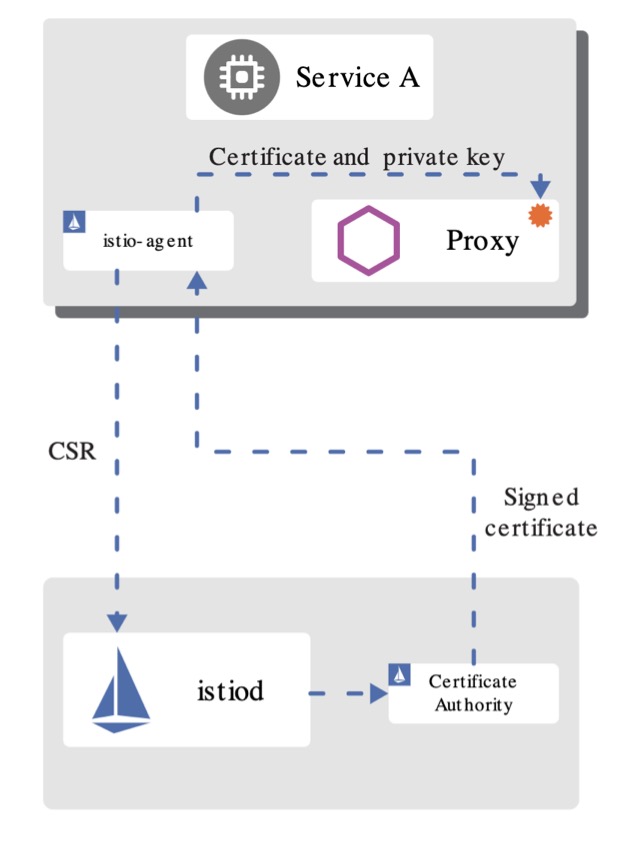
hhttp://image.whysdomain.com/jksj/istio22.png https://image.whysdomain.com/jksj/istio01.png
- istiod提供了grpc的服务,接收CSR证书签名请求
- envoy会通过SDS的API来发送CSR证书和密钥的请求
- istio-agnet会创建私钥和CSR发送给istiod索要签名
- ca校验签发证书,通过istio-agent将证书和密钥发送给envoy
功能
- 身份和证书管理
- 实现安全配置自动化
- 中心化的SDS Server
优点
- 无需挂载secret
- 动态更新证书
- 可监视多个证书密钥对
确认一下curl的编译参数
curl --version | grep LibreSSl
生成根证书
# 为服务创建根证书和私钥:
openssl req -x509 -sha256 -nodes -days 365 -newkey rsa:2048 -subj '/O=example Inc./CN=example.com' -keyout example.com.key -out example.com.crt

# 为httpbin.example.com创建证书和私钥:
openssl req -out httpbin.example.com.csr -newkey rsa:2048 -nodes -keyout httpbin.example.com.key -subj "/CN=httpbin.example.com/O=httpbin organization"
openssl x509 -req -days 365 -CA example.com.crt -CAkey example.com.key -set_serial 0 -in httpbin.example.com.csr -out httpbin.example.com.crt
部署httpbin
apiVersion: v1
kind: Service
metadata:
  name: httpbin
  labels:
    app: httpbin
spec:
  ports:
  - name: http
    port: 8000
  selector:
    app: httpbin
---
apiVersion: apps/v1
kind: Deployment
metadata:
  name: httpbin
spec:
  replicas: 1
  selector:
    matchLabels:
      app: httpbin
      version: v1
  template:
    metadata:
      labels:
        app: httpbin
        version: v1
    spec:
      containers:
      - image: docker.io/citizenstig/httpbin
        imagePullPolicy: IfNotPresent
        name: httpbin
        ports:
        - containerPort: 8000
提交证书
kubectl create -n istio-system secret tls httpbin-credential --key=httpbin.example.com.key --cert=httpbin.example.com.crt
创建入口网关
apiVersion: networking.istio.io/v1alpha3
kind: Gateway
metadata:
  name: mygateway
spec:
  selector:
    istio: ingressgateway
  servers:
  - port:
      number: 443
      name: https
      protocol: HTTPS
    tls:
      mode: SIMPLE
      credentialName: httpbin-credential
    hosts:
    - httpbin.example.com
这里SIMPLE为单向(标准)认证
请求验证,可以加一下-v的方式查看握手方式
curl -HHost:httpbin.example.com \
--resolve httpbin.example.com:443:127.0.0.1 \
--cacert example.com.crt "https://httpbin.example.com:443/status/418"
29 双重保障:为应用设置不同级别的双向TLS
认证策略的分类
- 对等认证
- 请求认证
认证策略范围(优先级最窄原则)
- 网格
- 命名空间
- 特性服务
mTLS是需要client和server都进行证书认证
demo介绍
- client为sleep
- server为httpbin
先设置兼容模式,测试功能
# 兼容模式
kubectl apply -f - <<EOF
apiVersion: "security.istio.io/v1beta1"
kind: "PeerAuthentication"
metadata:
  name: "default"
  namespace: "default"
spec:
  mtls:
    mode: PERMISSIVE
EOF
调整为严格模式,就不能通过了
# 严格模式
kubectl apply -f - <<EOF
apiVersion: "security.istio.io/v1beta1"
kind: "PeerAuthentication"
metadata:
  name: "default"
  namespace: "default"
spec:
  mtls:
    mode: STRICT
EOF
进行服务注入
kubectl apply -f <(istioctl kube-inject -f samples/sleep/sleep.yaml) -n testauth
如果需要全局进行限制
kubectl apply -f - <<EOF
apiVersion: "security.istio.io/v1beta1"
kind: "PeerAuthentication"
metadata:
  name: "default"
spec:
  mtls:
    mode: STRICT
EOF
也可以限制服务级别
30 授权策略:如何实现JWT身份认证与授权
JWT在Encode的时候就是一段字符串,而在Decode之后分三个部分
- Header 使用的加密算法
- Payload 传输的信息
- Signature 将以上数据根据约定的密钥进行签名
创建请求认证
kubectl apply -f - <<EOF
apiVersion: "security.istio.io/v1beta1"
kind: "RequestAuthentication"
metadata:
  name: "jwt-example"
  namespace: testjwt
spec:
  selector:
    matchLabels:
      app: httpbin
  jwtRules:
  - issuer: "testing@secure.istio.io"
    jwksUri: "https://raw.githubusercontent.com/malphi/geektime-servicemesh/master/c3-19/jwks.json"
EOF
测试访问
#测试不合法的jwt访问
kubectl exec $(kubectl get pod -l app=sleep -n foo -o jsonpath={.items..metadata.name}) -c sleep -n testjwt -- curl "http://httpbin.testjwt:8000/headers" -H "Authorization: Bearer invalidToken"

#测试没有授权策略时,都可以访问
kubectl exec $(kubectl get pod -l app=sleep -n foo -o jsonpath={.items..metadata.name}) -c sleep -n testjwt -- curl "http://httpbin.testjwt:8000/headers" -s -o /dev/null -w "%{http_code}\n"
创建授权策略
kubectl apply -f - <<EOF
apiVersion: security.istio.io/v1beta1
kind: AuthorizationPolicy
metadata:
  name: require-jwt
  namespace: testjwt
spec:
  selector:
    matchLabels:
      app: httpbin
  action: ALLOW
  rules:
  - from:
    - source:
       requestPrincipals: ["testing@secure.istio.io/testing@secure.istio.io"]
EOF
使用授权访问
#解析token
TOKEN=$(curl https://raw.githubusercontent.com/malphi/geektime-servicemesh/master/c3-19/demo.jwt -s) && echo $TOKEN | cut -d '.' -f2 - | base64 --decode -
#测试带token的请求
kubectl exec $(kubectl get pod -l app=sleep -n foo -o jsonpath={.items..metadata.name}) -c sleep -n testjwt -- curl "http://httpbin.foo:8000/headers" -s -o /dev/null -H "Authorization: Bearer $TOKEN" -w "%{http_code}\n"

