

<博客建立历程>阿里云建站9——添加写入页面并添加Markdown
目录:
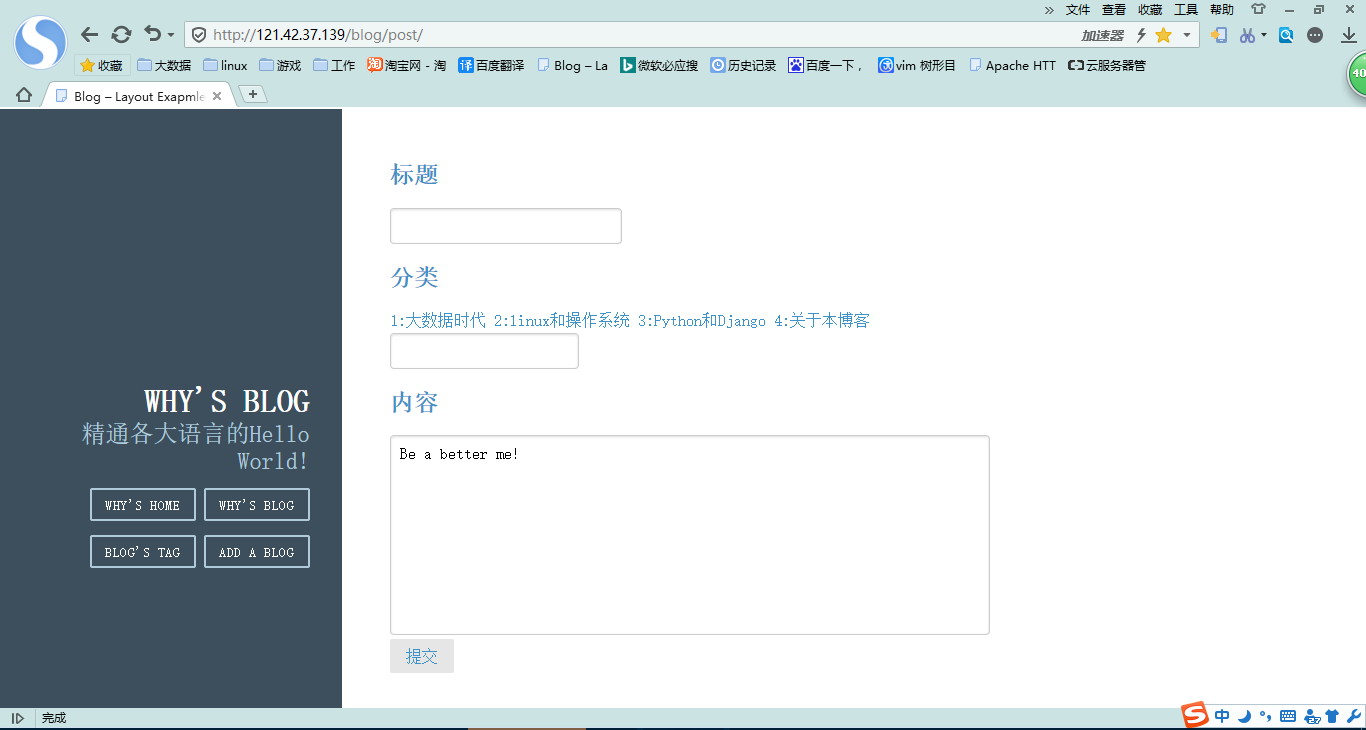
添加写入页面
首先urls中添加用作进行录入数据的url和实际录入数据的url
from django.conf.urls import url
from blog import views

urlpatterns = [
    url(r'^$', views.blog_index, name='index'),
    url(r'^(?P<blog_id>[0-9])*/$', views.blog_bond, name='blog'),
    url(r'^tag/', views.blog_tag, name='tag'),
    url(r'^tag(?P<blog_tag>[0-9])*/$', views.blog_bond_tag, name='blog_tag'),
    url(r'^post/', views.blog_post, name='postblog'),
    url(r'^blog_post_add/', views.blog_post_add, name='blog_post_add')
]
注意这两个,我在创建到9的时候页面跳转,10的时候就不跳转了,说明只识别1位数字,加上就可以识别了。正则学的不好,以后的补补了0.0
新增blog_post.html
{% extends "blog_base.html" %}
{% block content %}
<style type="text/css">
    textarea {
        resize: none;
        width: 600px;
        height: 200px;
    }
</style>
<div class = "posts">
    <section class="post">
        <form action={% url 'blog_post_add' %} class="pure-form pure-form-stacked" method="post">       #这个blog_post_add指向的是url中name='blog_post_add'
        <label><h2><a>标题</a></h2></label>
        <input class="pure-input-1-4" name="title" type="text">
        <label><h2><a>分类</a></h2></label>
        {% for blogs in blog_list_tag %}
        <a>{{blogs.id}}:{{ blogs.family_name }}</a>
        {% endfor %}
        <input class="pure-input-1-5" name="family_id" type="text">
        <label><h2><a>内容</a></h2></label>
        <textarea width:400px height:600px name='body'>Be a better me!</textarea>
        <button class="pure-button" type="submit"><a>提交</a></button>
        </form>
    </section>
{% endblock %}
views中添加
from django.shortcuts import render,render_to_response,HttpResponseRedirect
from datetime import datetime #为了调用系统时间
def blog_post(request):
blog_list_tag = Family.objects.all()
return render(request,'blog_post.html',{'blog_list_tag':blog_list_tag})
def blog_post_add(request):
body = request.POST.get('body') #在前端通过POST发送body数据给后台
title = request.POST.get('title') #在前端通过POST发送title数据给后台
family_id = request.POST.get('family_id') #在前端通过POST发送family数据给后台,还是老问题,那边是id
timestamp = datetime.now()
blog=BlogPost.objects.create(title=title, #新建博客写入数据库中
body=body,
family_id=family_id,
timestamp=timestamp,
)
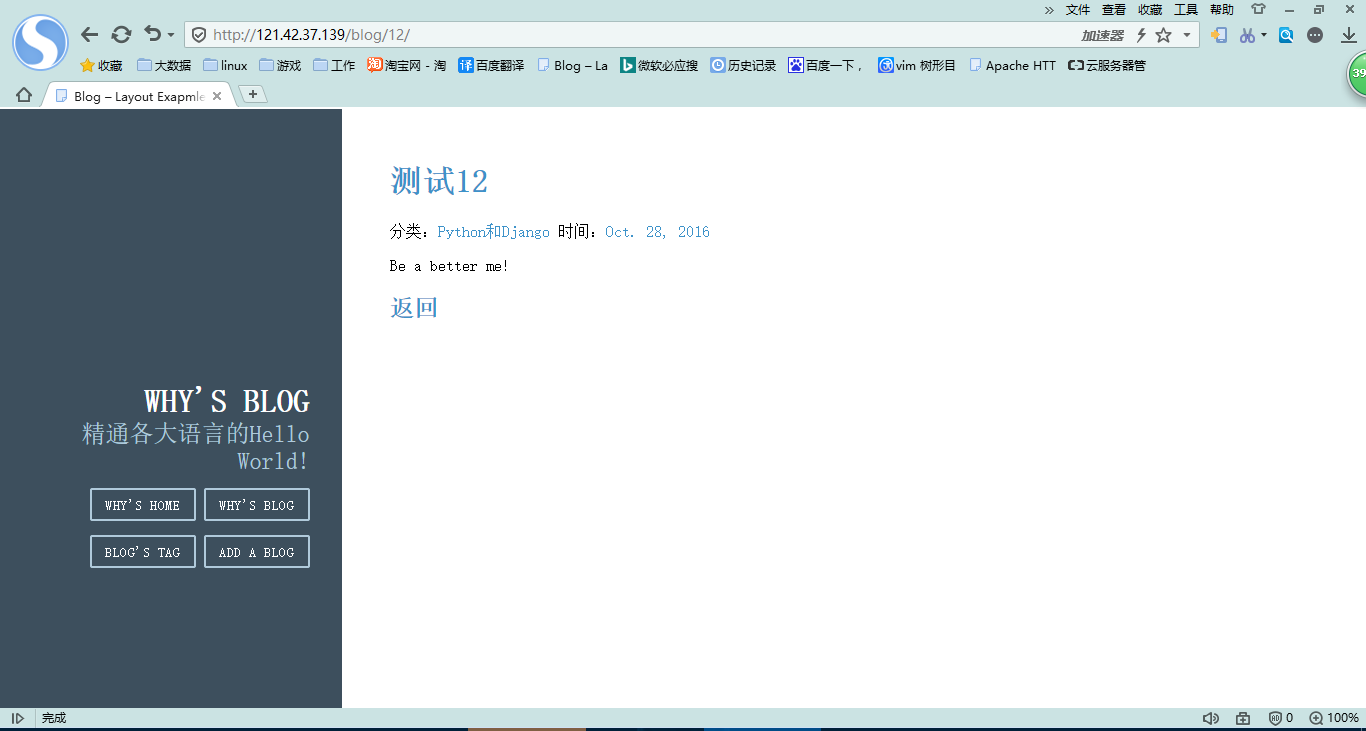
id= BlogPost.objects.order_by('-timestamp')[0].id #查找最新文章的id
return HttpResponseRedirect('/blog/%s' %id) #数据输入到数据库这是后台做的事,前端显示该博客的单篇博客详细内容比较合适
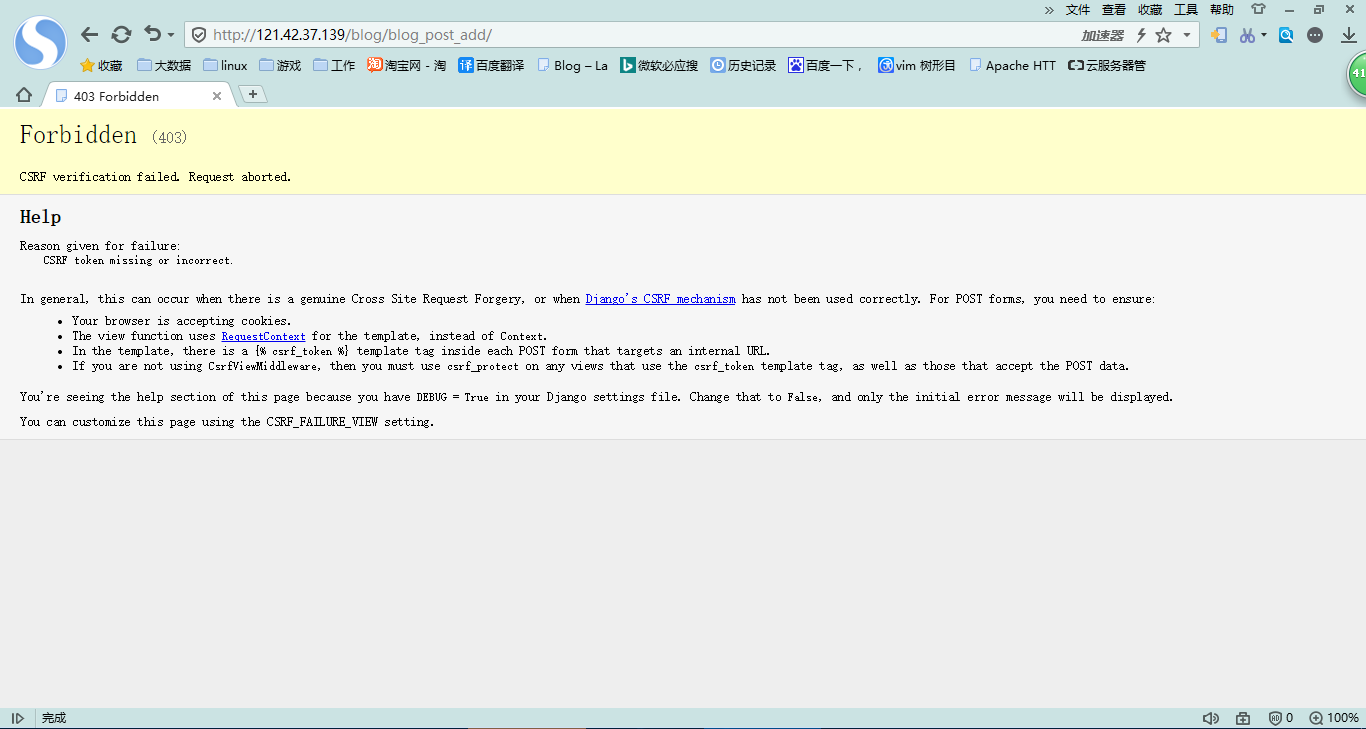
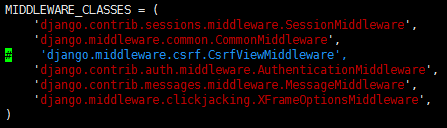
如果出现这个情况,可以注释掉setting.py中csrf中的内容。这个csrf在post过程中起保护作用。
添加Markdown
下载Markdown
[root@why ~]# pip install markdown
Requirement already satisfied (use --upgrade to upgrade): markdown in /usr/lib/python2.6/site-packages
Cleaning up...
[root@why ~]# pip install markdown --upgrade
http://mirrors.aliyun.com/pypi/simple/markdown/ uses an insecure transport scheme (http). Consider using https if mirrors.aliyun.com has it available
Downloading/unpacking markdown from http://mirrors.aliyun.com/pypi/packages/48/a4/fc6b002789c2239ac620ca963694c95b8f74e4747769cdf6021276939e74/Markdown-2.6.7.zip#md5=632710a7474bbb74a82084392251061f
  Downloading Markdown-2.6.7.zip (413kB): 413kB downloaded
  Running setup.py (path:/tmp/pip_build_root/markdown/setup.py) egg_info for package markdown
Installing collected packages: markdown
  Found existing installation: Markdown 2.6.6
    Uninstalling Markdown:
      Successfully uninstalled Markdown
  Running setup.py install for markdown
    changing mode of build/scripts-2.6/markdown_py from 644 to 755
    skipping build_docs: Markdown "import" failed!
    changing mode of /usr/bin/markdown_py to 755
Successfully installed markdown
Cleaning up...
[root@why ~]# echo $?
0
验证Markdown
[root@why mysite]# python
Python 2.6.6 (r266:84292, Aug 18 2016, 15:13:37)
[GCC 4.4.7 20120313 (Red Hat 4.4.7-17)] on linux2
Type "help", "copyright", "credits" or "license" for more information.
>>> import markdown
Traceback (most recent call last):
  File "<stdin>", line 1, in <module>
  File "/usr/lib/python2.6/site-packages/markdown/__init__.py", line 40, in <module>
    import importlib
ImportError: No module named importlib
>>> import importlib
Traceback (most recent call last):
  File "<stdin>", line 1, in <module>
ImportError: No module named importlib
>>> quit()
python中无法引入markdown,报错为缺少importlib。
pip importlib
[root@why ~]# pip install importlib
Downloading/unpacking importlib
  http://mirrors.aliyun.com/pypi/simple/importlib/ uses an insecure transport scheme (http). Consider using https if mirrors.aliyun.com has it available
  Downloading importlib-1.0.4.zip
  Running setup.py (path:/tmp/pip_build_root/importlib/setup.py) egg_info for package importlib
Installing collected packages: importlib
  Running setup.py install for importlib
Successfully installed importlib
Cleaning up...
[root@why ~]# echo $?
0
[root@why mysite]# python
Python 2.6.6 (r266:84292, Aug 18 2016, 15:13:37)
[GCC 4.4.7 20120313 (Red Hat 4.4.7-17)] on linux2
Type "help", "copyright", "credits" or "license" for more information.
>>> import importlib
>>> import markdown
>>> quit()
这样就可以引入markdown了。
创建Markdown过滤器
因为从1.6Django开始不支持Markdown,所以我们需要自己创建一个MarkDown过滤器。
[root@why blog]# mkdir templatetags
[root@why blog]# cd !$
cd templatetags
[root@why templatetags]# touch init.py
[root@why templatetags]# touch custom_markdown.py
[root@why templatetags]# vi !$
vi custom_markdown.py
[root@why templatetags]# cat !$
cat custom_markdown.py
#coding=utf-8
import markdown
from django import template
from django.template.defaultfilters import stringfilter
from django.utils.encoding import force_unicode
from django.utils.safestring import mark_safe

register = template.Library()  # 自定义filter时必须加上


@register.filter(is_safe=True)  # 注册template filter
@stringfilter  # 希望字符串作为参数
def custom_markdown(value):
    extensions = ["nl2br", "extra",]
    return mark_safe(markdown.markdown(force_unicode(value),
                                       extensions,
                                       safe_mode=True,
                                       enable_attributes=False))
这样就做好了一个过滤器。 不过还有个模块无法加载,不过达到了我的需求了。
Python Django中Markdown使用方法
直接在模板中加载。
{% load custom_markdown %}
{{ blog_list_two.body|custom_markdown }}

可以看一下blog_every.html
{% extends "blog_base.html" %}
{% load custom_markdown %}
{% block content %}
    <h1><a>{{ blog_list_two.title }}</a></h1>
    时间:<a>{{ blog_list_two.timestamp | date }}</a>
    分类:<a class="post-category post-category-js" href="#">{{ blog_list_two.family }}</a>
    <p>{{ blog_list_two.body|custom_markdown }}</p>
    <h2><a href="/blog">返回</a></h2>
{% endblock %}
测试博客数据
> ## This is a header.
>
> 1.   This is the first list item.
> 2.   This is the second list item.
>
> Here's some example code:
>
>     return shell_exec("echo $input | $markdown_script");

回去看看我们以前的博客内容
然后需要实现的是图片插入
按着makedown的格式插入图片即可
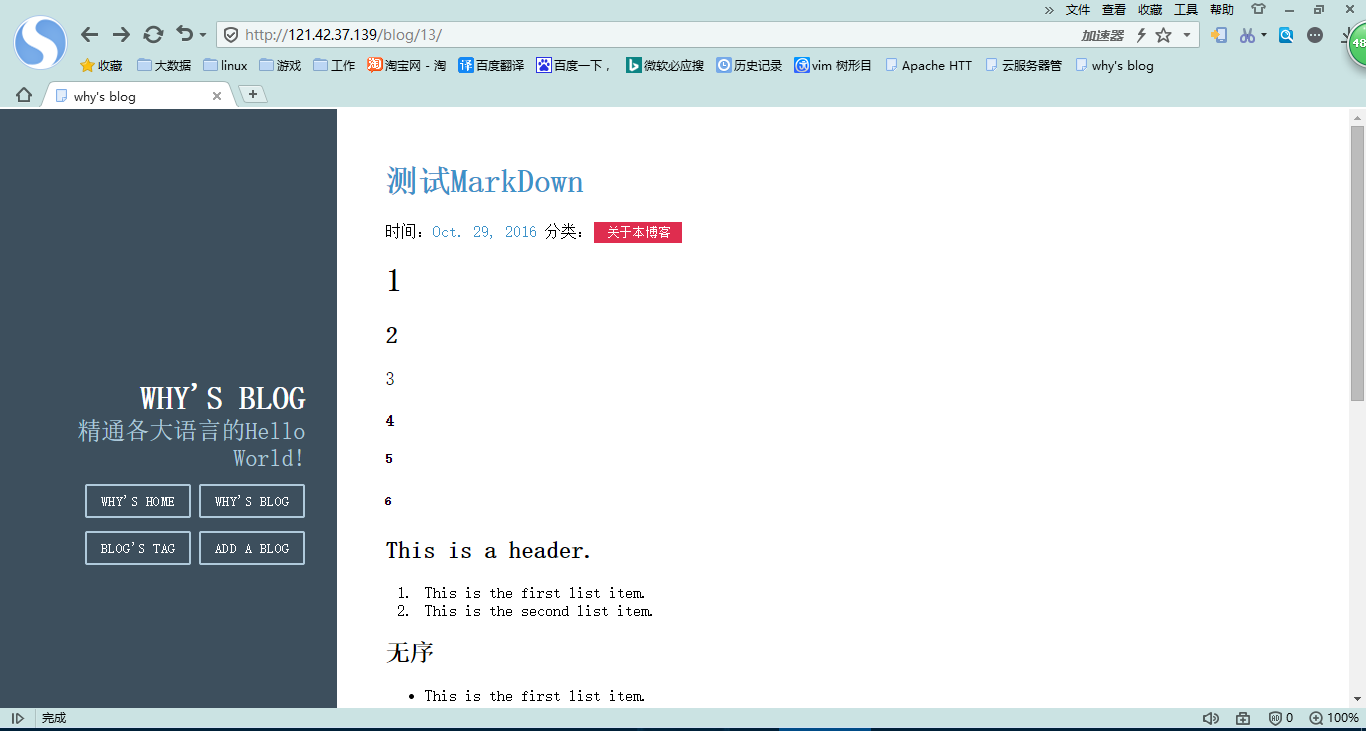
测试数据
# 1
## 2
### 3
#### 4
##### 5
###### 6
## This is a header.
1. This is the first list item.
2. This is the second list item.
## 无序
- This is the first list item.
- This is the second list item.
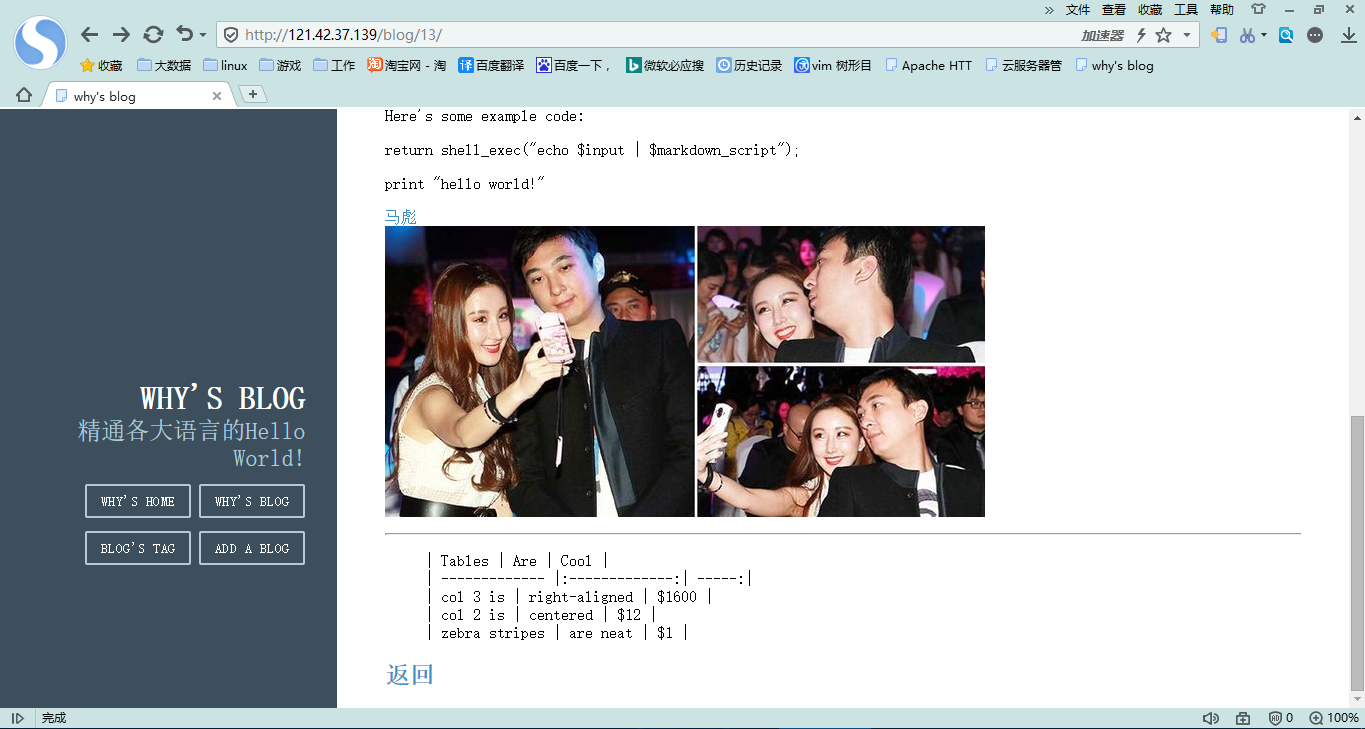
Here's some example code:
return shell_exec("echo $input | $markdown_script");
print "hello world!"
[马彪](http://yule.sohu.com/20161026/n471387069.shtml)

---
> | Tables | Are | Cool |
> | ------------- |:-------------:| -----:|
> | col 3 is | right-aligned | $1600 |
> | col 2 is | centered | $12 |
> | zebra stripes | are neat | $1 |
以后图片就可以通过上传到网络然后写入链接即可。

