

kubernetes集群使用
目录:
kubernetes组件之间协作
[why@why-01 ~]$ kubectl run httpd-app --image=httpd --replicas=2
kubectl run --generator=deployment/apps.v1 is DEPRECATED and will be removed in a future version. Use kubectl run --generator=run-pod/v1 or kubectl create instead.
deployment.apps/httpd-app created
[why@why-01 ~]$ kubectl get deployments.
NAME        READY   UP-TO-DATE   AVAILABLE   AGE
httpd-app   2/2     2            2           59s
[why@why-01 ~]$ kubectl get pod -o wide
NAME                        READY   STATUS    RESTARTS   AGE   IP           NODE     NOMINATED NODE   READINESS GATES
httpd-app-f9ccf4675-9slgk   1/1     Running   0          67s   10.244.2.2   why-03   <none>           <none>
httpd-app-f9ccf4675-rr46w   1/1     Running   0          67s   10.244.1.2   why-02   <none>           <none>
- kubectl 发送部署请求到 API Server。
- API Server 通知 Controller Manager 创建一个 deployment 资源。
- Scheduler 执行调度任务,将两个副本 Pod 分发到 k8s-node1 和 k8s-node2。
- k8s-node1 和 k8s-node2 上的 kubelet 在各自的节点上创建并运行 Pod。
补充两点:
- 应用的配置和当前状态信息保存在etcd中,执行
kubectl get pod时API Server会从etcd中读取这些数据。 - flannel会为每个Pod都分配IP。因为没有创建service,目前kube-proxy还没参与进来。
更多原理性的问题可以参考kubernetes权威指南阅读笔记——第三章核心原理
运行应用
[why@why-01 ~]$ kubectl run nginx-deployment --image=nginx:1.7.9 --replicas=2
kubectl run --generator=deployment/apps.v1 is DEPRECATED and will be removed in a future version. Use kubectl run --generator=run-pod/v1 or kubectl create instead.
deployment.apps/nginx-deployment created
部署包含两个副本的Deployment nginx-deployment,容器的image为nginx:1.7.9
[why@why-01 ~]$ kubectl get replicasets
NAME                          DESIRED   CURRENT   READY   AGE
nginx-deployment-578fb949d8   2         2         2       33m
用kubectl describe replicasets查看详细信息
[why@why-01 ~]$ kubectl describe replicasets nginx-deployment
Name:           nginx-deployment-578fb949d8
Namespace:      default
Selector:       pod-template-hash=578fb949d8,run=nginx-deployment
Labels:         pod-template-hash=578fb949d8
                run=nginx-deployment
Annotations:    deployment.kubernetes.io/desired-replicas: 2
                deployment.kubernetes.io/max-replicas: 3
                deployment.kubernetes.io/revision: 1
Controlled By:  Deployment/nginx-deployment
Replicas:       2 current / 2 desired
Pods Status:    2 Running / 0 Waiting / 0 Succeeded / 0 Failed
Pod Template:
  Labels:  pod-template-hash=578fb949d8
           run=nginx-deployment
  Containers:
   nginx-deployment:
    Image:        nginx:1.7.9
    Port:         <none>
    Host Port:    <none>
    Environment:  <none>
    Mounts:       <none>
  Volumes:        <none>
Events:
  Type    Reason            Age   From                   Message
  ----    ------            ----  ----                   -------
  Normal  SuccessfulCreate  16m   replicaset-controller  Created pod: nginx-deployment-578fb949d8-nvzw6
  Normal  SuccessfulCreate  16m   replicaset-controller  Created pod: nginx-deployment-578fb949d8-kw58v


Deployment、ReplicaSet、DaemonSet、StatefuleSet、Job 等多种 Controller
Events是deployment的日志,记录了两个副本Pod的创建
[why@why-01 ~]$ kubectl get deployment nginx-deployment
NAME               READY   UP-TO-DATE   AVAILABLE   AGE
nginx-deployment   2/2     2            2           35m
kubectl get pod创建好的Pod
[why@why-01 ~]$ kubectl get pod
NAME                                READY   STATUS    RESTARTS   AGE
nginx-deployment-578fb949d8-kw58v   1/1     Running   0          37m
nginx-deployment-578fb949d8-nvzw6   1/1     Running   0          37m
kubectl describe pod查看Pod的详细创建情况
[why@why-01 ~]$ kubectl describe pod nginx-deployment-578fb949d8-kw58v
Name:               nginx-deployment-578fb949d8-kw58v
Namespace:          default
Priority:           0
PriorityClassName:  <none>
Node:               why-02/172.19.0.8
Start Time:         Thu, 06 Dec 2018 17:46:43 +0800
Labels:             pod-template-hash=578fb949d8
                    run=nginx-deployment
Annotations:        <none>
Status:             Running
IP:                 10.244.1.4
Controlled By:      ReplicaSet/nginx-deployment-578fb949d8
Containers:
  nginx-deployment:
    Container ID:   docker://f4b70b8c94d250a3334fa3bf0d904864bf904eb46f746b9ce8b0e19d0708827e
    Image:          nginx:1.7.9
    Image ID:       docker-pullable://nginx@sha256:e3456c851a152494c3e4ff5fcc26f240206abac0c9d794affb40e0714846c451
    Port:           <none>
    Host Port:      <none>
    State:          Running
      Started:      Thu, 06 Dec 2018 17:46:44 +0800
    Ready:          True
    Restart Count:  0
    Environment:    <none>
    Mounts:
      /var/run/secrets/kubernetes.io/serviceaccount from default-token-6n8jc (ro)
Conditions:
  Type              Status
  Initialized       True
  Ready             True
  ContainersReady   True
  PodScheduled      True
Volumes:
  default-token-6n8jc:
    Type:        Secret (a volume populated by a Secret)
    SecretName:  default-token-6n8jc
    Optional:    false
QoS Class:       BestEffort
Node-Selectors:  <none>
Tolerations:     node.kubernetes.io/not-ready:NoExecute for 300s
                 node.kubernetes.io/unreachable:NoExecute for 300s
Events:
  Type    Reason     Age   From               Message
  ----    ------     ----  ----               -------
  Normal  Scheduled  37m   default-scheduler  Successfully assigned default/nginx-deployment-578fb949d8-kw58v to why-02
  Normal  Pulled     37m   kubelet, why-02    Container image "nginx:1.7.9" already present on machine
  Normal  Created    37m   kubelet, why-02    Created container
  Normal  Started    37m   kubelet, why-02    Started container
可以看到Pod的启动过程
- Scheduled调度Pod在why-02机器上启动
- docker pull对应镜像
- 创建容器并启动
kubernetes创建资源的两种模式
- 通过
kubectl run直接创建 - 通过
kubectl apply配置文件
基于命令的方式:
- 简单直观快捷,上手快
- 适合临时测试或实验。
基于配置文件的方式:
- 配置文件描述了What,即应用最终要达到的状态。
- 配置文件提供了创建资源的模板,能够重复部署。
- 可以像管理代码一样管理部署。
- 适合正式的、跨环境的、规模化部署。
- 这种方式要求熟悉配置文件的语法,有一定难度。
kubectl apply不但能够创建Kubernetes资源,也能对资源进行更新,非常方便。不过Kubernets还提供了几个类似的命令,例如kubectl create、kubectl replace、kubectl edit和kubectl patch
示例一下yml
apiVersion: extensions/v1beta1
kind: Deployment
metadata:
  name: nginx-deployment
spec:
  replicas: 2
  template:
    metadata:
      labels:
        app: web_server
    spec:
      containers:
      - name: nginx
        image: nginx:1.7.9
{
  apiVersion: 'extensions/v1beta1',
  kind: 'Deployment',
  metadata:
    { name: 'nginx-deployment' },
  spec:
    { replicas: 2,
      template:
        { metadata: { labels: { app: 'web_server' } },
          spec: { containers: [ { name: 'nginx', image: 'nginx:1.7.9' } ]
        }
      }
    }
}
简单的讲就是:是字典,-是数组,另外多个资源可以在一个yaml文件中定义,用---分割
更多yaml语法可以参考yaml语法
- apiVersion是配置格式的版本
- kind是要创建的资源
- metadata是资源的元数据,那么是必须的元数据项
- spec是对创建资源类型的说明
- replicas是副本数
- template是定义Pod的模板
- metadata是定义Pod的元数据,至少要定义一个label,label的key和value可以随意定义
- spec是对Pod规格的描述,可以定义Pod中每一个容器的属性,name和image都是必须的
创建Pod的一些规则
通过kubectl delete删除之前创建的deployment
[why@why-01 ~]$ kubectl delete deployments nginx-deployment
deployment.extensions "nginx-deployment" deleted
通过yaml创建deployment
[why@why-01 ~]$ kubectl apply -f nginx.yml
deployment.extensions/nginx-deployment created
[why@why-01 ~]$ kubectl get deployments
NAME               READY   UP-TO-DATE   AVAILABLE   AGE
nginx-deployment   2/2     2            2           15s
[why@why-01 ~]$ kubectl get pods -o wide
NAME                                READY   STATUS    RESTARTS   AGE   IP           NODE     NOMINATED NODE   READINESS GATES
nginx-deployment-65998d8886-n94bk   1/1     Running   0          12s   10.244.2.8   why-03   <none>           <none>
nginx-deployment-65998d8886-vbmpl   1/1     Running   0          12s   10.244.1.9   why-02   <none>           <none>
删除也可以通过指定yml的方式删除
[why@why-01 ~]$ kubectl delete -f nginx.yml
deployment.extensions "nginx-deployment" deleted
初始是两个副本,可以通过直接调整yml的replicas: 2为replicas: 3,再执行kubectl apply
[why@why-01 ~]$ kubectl get pods -o wide
NAME                                READY   STATUS    RESTARTS   AGE   IP            NODE     NOMINATED NODE   READINESS GATES
nginx-deployment-65998d8886-n94bk   1/1     Running   0          71s   10.244.2.8    why-03   <none>           <none>
nginx-deployment-65998d8886-r6zpv   1/1     Running   0          3s    10.244.1.10   why-02   <none>           <none>
nginx-deployment-65998d8886-vbmpl   1/1     Running   0          71s   10.244.1.9    why-02   <none>           <none>
新启动的节点也被调度到了这两个节点
默认情况下master节点是不会被调度Pod的,如果希望被调度可以指定kubectl taint node why-01 node-role.kubernetes.io/master-
[why@why-01 ~]$ kubectl taint node why-01 node-role.kubernetes.io/master-
node/why-01 untainted
指定再增加副本数就可以看到了master节点上的主机了
NAME                                READY   STATUS    RESTARTS   AGE    IP            NODE     NOMINATED NODE   READINESS GATES
nginx-deployment-65998d8886-h6xqs   1/1     Running   0          3s     10.244.0.5    why-01   <none>           <none>
nginx-deployment-65998d8886-n94bk   1/1     Running   0          102s   10.244.2.8    why-03   <none>           <none>
nginx-deployment-65998d8886-r6zpv   1/1     Running   0          34s    10.244.1.10   why-02   <none>           <none>
nginx-deployment-65998d8886-vbmpl   1/1     Running   0          102s   10.244.1.9    why-02   <none>           <none>
如果想要恢复的话
[why@why-01 ~]$ kubectl taint node why-01 node-role.kubernetes.io/master="":NoSchedule
node/why-01 tainted
在看一下Master上还是有节点的
[why@why-01 ~]$ kubectl get pods -o wide
NAME                                READY   STATUS    RESTARTS   AGE    IP            NODE     NOMINATED NODE   READINESS GATES
nginx-deployment-65998d8886-h6xqs   1/1     Running   0          28s    10.244.0.5    why-01   <none>           <none>
nginx-deployment-65998d8886-n94bk   1/1     Running   0          2m7s   10.244.2.8    why-03   <none>           <none>
nginx-deployment-65998d8886-r6zpv   1/1     Running   0          59s    10.244.1.10   why-02   <none>           <none>
nginx-deployment-65998d8886-vbmpl   1/1     Running   0          2m7s   10.244.1.9    why-02   <none>           <none>
减少一个Pod,可以看到优先是干掉Master上的Pod的
[why@why-01 ~]$ kubectl get pods -o wide
NAME                                READY   STATUS    RESTARTS   AGE     IP            NODE     NOMINATED NODE   READINESS GATES
nginx-deployment-65998d8886-n94bk   1/1     Running   0          2m51s   10.244.2.8    why-03   <none>           <none>
nginx-deployment-65998d8886-r6zpv   1/1     Running   0          103s    10.244.1.10   why-02   <none>           <none>
nginx-deployment-65998d8886-vbmpl   1/1     Running   0          2m51s   10.244.1.9    why-02   <none>           <none>
当Master发现Node不可用的时候,将Node上的Pod标记为Unknown状态,并在其他Pod上启动新的Pod维持Running状态的副本数稳定。
当Node恢复的时候Unknown的Pod会被删除,不过已经运行的Pod不会再被调度会原有Node了
用label控制Pod的位置
默认情况下Scheduler会将Pod调度到所有可用的Node。但是有些情况下我们需要将Pod调度到指定节点,就需要给节点加上label,创建Pod的时候通过指定label进而就可以调度到对应的节点了。当然了任何资源都可以设置label
为Node设置disktype为ssd的label
[why@why-01 ~]$ kubectl label node why-02 disktype=ssd
node/why-02 labeled
查看node的label
[why@why-01 ~]$ kubectl get node --show-labels
NAME     STATUS   ROLES    AGE   VERSION   LABELS
why-01   Ready    master   26h   v1.13.0   beta.kubernetes.io/arch=amd64,beta.kubernetes.io/os=linux,kubernetes.io/hostname=why-01,node-role.kubernetes.io/master=
why-02   Ready    <none>   25h   v1.13.0   beta.kubernetes.io/arch=amd64,beta.kubernetes.io/os=linux,disktype=ssd,kubernetes.io/hostname=why-02
why-03   Ready    <none>   25h   v1.13.0   beta.kubernetes.io/arch=amd64,beta.kubernetes.io/os=linux,kubernetes.io/hostname=why-03
已经可以看到why-02的node已经有了disktype=ssd的label,还有一些kubernetes自带的label。
修改yml
apiVersion: extensions/v1beta1
kind: Deployment
metadata:
  name: nginx-deployment
spec:
  replicas: 4
  template:
    metadata:
      labels:
        app: web_server
    spec:
      containers:
      - name: nginx
        image: nginx:1.7.9
      nodeSelector:
        disktype: ssd
在创建的时候,spec通过nodeSelector将指定Pod分配到label为disktype=ssd的Node上
[why@why-01 ~]$ kubectl apply -f nginx.yml
deployment.extensions/nginx-deployment created
[why@why-01 ~]$ kubectl get pods -o wide
NAME                                READY   STATUS    RESTARTS   AGE   IP            NODE     NOMINATED NODE   READINESS GATES
nginx-deployment-7c75d8cdf6-5rl4q   1/1     Running   0          9s    10.244.1.13   why-02   <none>           <none>
nginx-deployment-7c75d8cdf6-759fm   1/1     Running   0          9s    10.244.1.14   why-02   <none>           <none>
nginx-deployment-7c75d8cdf6-jdzm8   1/1     Running   0          9s    10.244.1.12   why-02   <none>           <none>
nginx-deployment-7c75d8cdf6-l55wv   1/1     Running   0          9s    10.244.1.11   why-02   <none>           <none>
删除label
[why@why-01 ~]$ kubectl label node why-02 disktype-
node/why-02 labeled
[why@why-01 ~]$ kubectl get node --show-labels
NAME     STATUS   ROLES    AGE   VERSION   LABELS
why-01   Ready    master   26h   v1.13.0   beta.kubernetes.io/arch=amd64,beta.kubernetes.io/os=linux,kubernetes.io/hostname=why-01,node-role.kubernetes.io/master=
why-02   Ready    <none>   25h   v1.13.0   beta.kubernetes.io/arch=amd64,beta.kubernetes.io/os=linux,kubernetes.io/hostname=why-02
why-03   Ready    <none>   25h   v1.13.0   beta.kubernetes.io/arch=amd64,beta.kubernetes.io/os=linux,kubernetes.io/hostname=why-03
命令中的"-"就是删除,删除之后Pod也是不会重新分配
DaemonSet
DaemonSet的不同之处在于:每个Node上最多只能运行一个副本
DaemonSet的经典应用场景
- 每个节点都运行的存储,例如glusterd或者ceph
- 每个节点都运行的日志收集,例如logstash
- 每个节点都运行的监控,例如Prometheus
kubernetes自身就在用DaemonSet
[why@why-01 ~]$ kubectl get daemonsets --all-namespaces
NAMESPACE     NAME                      DESIRED   CURRENT   READY   UP-TO-DATE   AVAILABLE   NODE SELECTOR                     AGE
kube-system   kube-flannel-ds-amd64     3         3         3       3            3           beta.kubernetes.io/arch=amd64     26h
kube-system   kube-flannel-ds-arm       0         0         0       0            0           beta.kubernetes.io/arch=arm       26h
kube-system   kube-flannel-ds-arm64     0         0         0       0            0           beta.kubernetes.io/arch=arm64     26h
kube-system   kube-flannel-ds-ppc64le   0         0         0       0            0           beta.kubernetes.io/arch=ppc64le   26h
kube-system   kube-flannel-ds-s390x     0         0         0       0            0           beta.kubernetes.io/arch=s390x     26h
kube-system   kube-proxy                3         3         3       3            3           <none>                            26h
对于系统组件都是通过--namespace=kube-system指定namespace进行创建的
参考flannel
$ wget https://raw.githubusercontent.com/coreos/flannel/master/Documentation/kube-flannel.yml
无法拿到yml文件的可以通过kubectl edit进行查看
$ kubectl edit daemonset kube-proxy --namespace=kube-system

# Please edit the object below. Lines beginning with a '#' will be ignored,
# and an empty file will abort the edit. If an error occurs while saving this file will be
# reopened with the relevant failures.
#
apiVersion: extensions/v1beta1
kind: DaemonSet
metadata:
  creationTimestamp: "2018-12-06T07:27:54Z"
  generation: 1
  labels:
    k8s-app: kube-proxy
  name: kube-proxy
  namespace: kube-system
  resourceVersion: "4695"
  selfLink: /apis/extensions/v1beta1/namespaces/kube-system/daemonsets/kube-proxy
  uid: 721ab9b6-f928-11e8-b21a-5254005c0df5
spec:
  revisionHistoryLimit: 10
  selector:
    matchLabels:
      k8s-app: kube-proxy
  template:
    metadata:
      annotations:
        scheduler.alpha.kubernetes.io/critical-pod: ""
      creationTimestamp: null
      labels:
        k8s-app: kube-proxy
    spec:
      containers:
      - command:
        - /usr/local/bin/kube-proxy
        - --config=/var/lib/kube-proxy/config.conf
        - --hostname-override=$(NODE_NAME)
        env:
        - name: NODE_NAME
          valueFrom:
            fieldRef:
              apiVersion: v1
              fieldPath: spec.nodeName
        image: k8s.gcr.io/kube-proxy:v1.13.0
        imagePullPolicy: IfNotPresent
        name: kube-proxy
        resources: {}
        securityContext:
          privileged: true
          procMount: Default
        terminationMessagePath: /dev/termination-log
        terminationMessagePolicy: File
        volumeMounts:
        - mountPath: /var/lib/kube-proxy
Job
容器按照持续运行的时间可分为两类:服务类容器和工作类容器。
- 服务类容器通常持续提供服务,需要一直运行,比如
http server,daemon等,Kubernetes 的 Deployment、ReplicaSet 和 DaemonSet 都用于管理服务类容器 - 工作类容器则是一次性任务,比如批处理程序,完成后容器就退出,对于工作类容器,我们用 Job
myjob.yml
apiVersion: batch/v1
kind: Job
metadata:
  name: myjob
spec:
  template:
    metadata:
      name: myjob
    spec:
      containers:
      - name: hello
        image: busybox
        command: ["echo", "Hello World"]
      restartPolicy: Never
- restartPolicy指定什么情况下需要重启容器。对于Job,只能设置为Never或者OnFailure。对于其他controller(比如 Deployment)可以设置为Always
[why@why-01 ~]$ kubectl apply -f myjob.yml
job.batch/myjob created
[why@why-01 ~]$ kubectl get job
NAME    COMPLETIONS   DURATION   AGE
myjob   1/1           7s         13s
[why@why-01 ~]$ kubectl get job -o wide
NAME    COMPLETIONS   DURATION   AGE   CONTAINERS   IMAGES    SELECTOR
myjob   1/1           7s         38s   hello        busybox   controller-uid=7a89795e-fb14-11e8-b21a-5254005c0df5
[why@why-01 ~]$ kubectl get pod
NAME                                READY   STATUS      RESTARTS   AGE
myjob-2xtfw                         0/1     Completed   0          69s
可以看下Pod的日志
[why@why-01 ~]$ kubectl logs myjob-2xtfw
Hello World
对于会失败的Job,如果设置restartPolicy为Never就会反复创建Pod进行制定Job,而如果设置为OnFailure则是重启Pod
并行执行Job
apiVersion: batch/v1
kind: Job
metadata:
  name: myjob
spec:
  parallelism: 2
  template:
    metadata:
      name: myjob
    spec:
      containers:
      - name: hello
        image: busybox
        command: ["echo", "Hello World"]
      restartPolicy: Never
启动Job
[why@why-01 ~]$ kubectl get job
NAME    COMPLETIONS   DURATION   AGE
myjob   2/1 of 2      10s        6m37s
[why@why-01 ~]$ kubectl get pod
NAME                                READY   STATUS      RESTARTS   AGE
myjob-dct95                         0/1     Completed   0          7m6s
myjob-rkjqh                         0/1     Completed   0          7m6s
可以看到启动的两个Pod的AGE都是相同的
还可以通过completions设置Job成功完成Pod的总数
apiVersion: batch/v1
kind: Job
metadata:
  name: myjob
spec:
  completions: 6
  parallelism: 2
  template:
    metadata:
      name: myjob
    spec:
      containers:
      - name: hello
        image: busybox
        command: ["echo", "Hello World"]
      restartPolicy: Never
查看一下job
[why@why-01 ~]$ kubectl get job
NAME    COMPLETIONS   DURATION   AGE
myjob   6/6           23s        25s
[why@why-01 ~]$ kubectl get pod
NAME                                READY   STATUS      RESTARTS   AGE
myjob-2lj9w                         0/1     Completed   0          31s
myjob-2sbdg                         0/1     Completed   0          19s
myjob-5lx9b                         0/1     Completed   0          23s
myjob-fvg47                         0/1     Completed   0          31s
myjob-k6dlz                         0/1     Completed   0          15s
myjob-xfwdq                         0/1     Completed   0          26s
可以看到启动了6个Pod,符合预期
如果不指定completions和parallelism,默认值均为1。一般批处理可能会用到这种并行的Job
定时Job
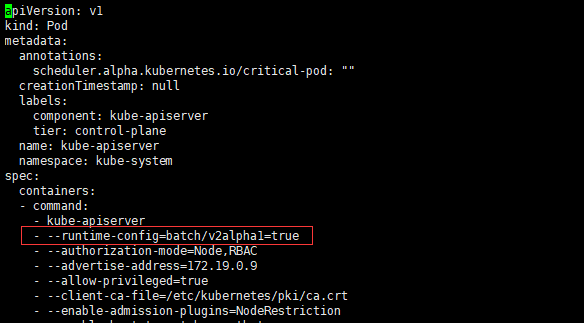
对于CronJob默认kubernetes是不支持的,需要在kube-apiserver中加入这个功能进行开启,否则会报no matches for kind "CronJob" in version "batch/v2alpha1"
编辑/etc/kubernetes/manifests/kube-apiserver.yaml,在启动参数中加上--runtime-config=batch/v2alpha1=true即可
重启kubectl服务
可以看到apiserver支持的版本
[why@why-01 ~]$ kubectl api-versions
admissionregistration.k8s.io/v1beta1
apiextensions.k8s.io/v1beta1
apiregistration.k8s.io/v1
apiregistration.k8s.io/v1beta1
apps/v1
apps/v1beta1
apps/v1beta2
authentication.k8s.io/v1
authentication.k8s.io/v1beta1
authorization.k8s.io/v1
authorization.k8s.io/v1beta1
autoscaling/v1
autoscaling/v2beta1
autoscaling/v2beta2
batch/v1
batch/v1beta1
batch/v2alpha1
certificates.k8s.io/v1beta1
coordination.k8s.io/v1beta1
events.k8s.io/v1beta1
extensions/v1beta1
networking.k8s.io/v1
policy/v1beta1
rbac.authorization.k8s.io/v1
rbac.authorization.k8s.io/v1beta1
scheduling.k8s.io/v1beta1
storage.k8s.io/v1
storage.k8s.io/v1beta1
v1
创建crontab.yml
apiVersion: batch/v2alpha1
kind: CronJob
metadata:
  name: hello
spec:
  schedule: "*/1 * * * *"
  jobTemplate:
    spec:
      template:
        spec:
          containers:
          - name: hello
            image: busybox
            command: ["echo", "Hello World"]
          restartPolicy: OnFailure
apply之后可以看到cronjobs
[why@why-01 ~]$ kubectl get cronjobs
NAME    SCHEDULE      SUSPEND   ACTIVE   LAST SCHEDULE   AGE
hello   */1 * * * *   False     0        42s             5m15s
[why@why-01 ~]$ kubectl get jobs
NAME               COMPLETIONS   DURATION   AGE
hello-1544297820   1/1           5s         2m57s
hello-1544297880   1/1           5s         117s
hello-1544297940   1/1           5s         57s
myjob              6/6           23s        66m
[why@why-01 ~]$ kubectl logs hello-1544297820
Error from server (NotFound): pods "hello-1544297820" not found
[why@why-01 ~]$ kubectl logs hello-1544297820-r7nkp
Hello World

