

容器网络
目录:
docker网络
原生网络
docker在安装的时候默认会创建三种网络
$ docker network ls
NETWORK ID          NAME                DRIVER              SCOPE
deb6e8301a00        bridge              bridge              local
49ed7a9bf8ce        host                host                local
92d0e5a8069e        none                null                local
none网络
none是什么都有没有的网络,只有lo本地回环网络
可以通过--network=none指定使用none网络
$ docker run -it --network=none busybox
/ # ifconfig
lo        Link encap:Local Loopback
          inet addr:127.0.0.1  Mask:255.0.0.0
          UP LOOPBACK RUNNING  MTU:65536  Metric:1
          RX packets:0 errors:0 dropped:0 overruns:0 frame:0
          TX packets:0 errors:0 dropped:0 overruns:0 carrier:0
          collisions:0 txqueuelen:1000
          RX bytes:0 (0.0 B)  TX bytes:0 (0.0 B)
对安全性要求高并且不需要联网的应用可以使用none网络,
执行一些需要联网的操作是不能够的
/ # wget www.baidu.com
wget: bad address 'www.baidu.com'
host网络
连接到主机网络,共享主机的网络栈,容器的网络和主机一致。
可以通过--network=host指定使用host网络
 docker run -it --network=host busybox
/ # ifconfig
docker0   Link encap:Ethernet  HWaddr 02:42:BB:BA:E1:B4
          inet addr:172.17.0.1  Bcast:172.17.255.255  Mask:255.255.0.0
          UP BROADCAST RUNNING MULTICAST  MTU:1500  Metric:1
          RX packets:0 errors:0 dropped:0 overruns:0 frame:0
          TX packets:0 errors:0 dropped:0 overruns:0 carrier:0
          collisions:0 txqueuelen:0
          RX bytes:0 (0.0 B)  TX bytes:0 (0.0 B)

eth0      Link encap:Ethernet  HWaddr 52:54:00:14:F8:EA
          inet addr:10.139.146.207  Bcast:10.139.159.255  Mask:255.255.224.0
          UP BROADCAST RUNNING MULTICAST  MTU:1500  Metric:1
          RX packets:839309 errors:0 dropped:0 overruns:0 frame:0
          TX packets:768407 errors:0 dropped:0 overruns:0 carrier:0
          collisions:0 txqueuelen:1000
          RX bytes:299340551 (285.4 MiB)  TX bytes:105060665 (100.1 MiB)

lo        Link encap:Local Loopback
          inet addr:127.0.0.1  Mask:255.0.0.0
          UP LOOPBACK RUNNING  MTU:65536  Metric:1
          RX packets:2 errors:0 dropped:0 overruns:0 frame:0
          TX packets:2 errors:0 dropped:0 overruns:0 carrier:0
          collisions:0 txqueuelen:1000
          RX bytes:272 (272.0 B)  TX bytes:272 (272.0 B)

veth4cb12c3 Link encap:Ethernet  HWaddr 72:F6:A7:F9:59:B7
          UP BROADCAST RUNNING MULTICAST  MTU:1500  Metric:1
          RX packets:0 errors:0 dropped:0 overruns:0 frame:0
          TX packets:0 errors:0 dropped:0 overruns:0 carrier:0
          collisions:0 txqueuelen:0
          RX bytes:0 (0.0 B)  TX bytes:0 (0.0 B)
host网络最大的好处就是性能,如果容器对网络传输效率有较高要求,则可以选择host网络。当然不便之处就是牺牲一些灵活性,比如要考虑端口冲突问题,主机上已经使用的端口就不能再用了
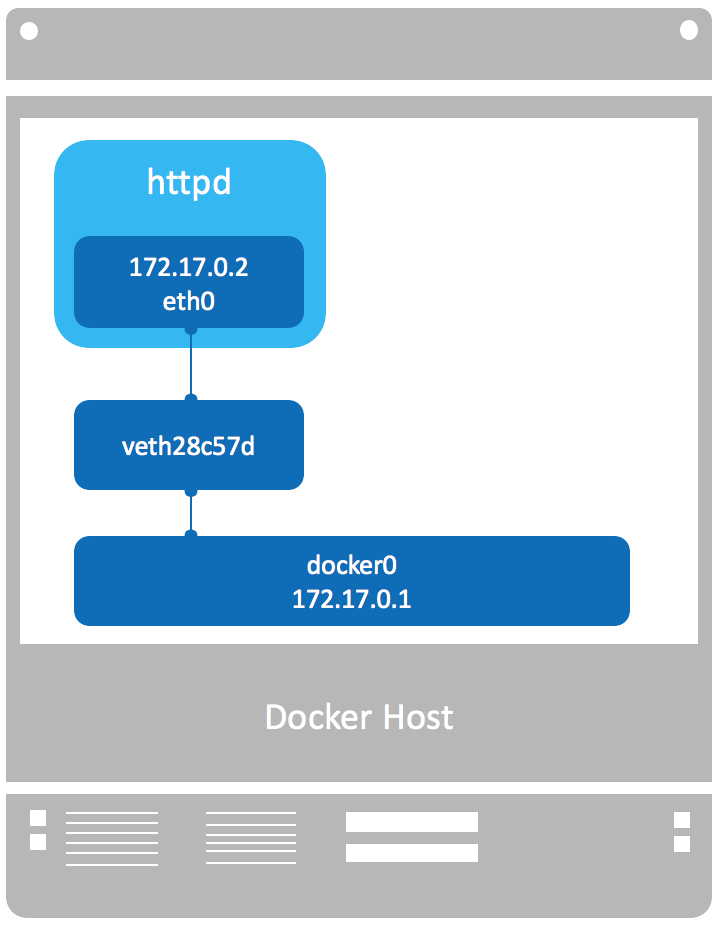
bridge网络
docker在启动的时候会创建一个docker0的linux bright,如果不指定--network创建的网卡就会挂到docker0上
brctl命令可以看到只有一个网卡被挂载到docker0上,这边在启动一个容器
$ brctl show
bridge name bridge id       STP enabled interfaces
docker0     8000.0242bbbae1b4   no      veth4cb12c3
$ docker run -d httpd
WARNING: IPv4 forwarding is disabled. Networking will not work.
bd324275e4e3316cdb47c027eaeb5bf6237e0c4cc31dbdb7a03ae95938395fbc
如果没有brctl命令
yum install bridge-utils
查看docker0网卡
$ brctl show
bridge name bridge id       STP enabled interfaces
docker0     8000.0242bbbae1b4   no      veth4cb12c3
                                        vetha36e63b
可以看到一个网络接口vetha36e63b被挂载到docker0上,这个就是新创建的容器的虚拟网卡
$ docker exec -it bd324275e4e3316cdb47c027eaeb5bf6237e0c4cc31dbdb7a03ae95938395fbc /bin/bash
root@bd324275e4e3:/usr/local/apache2#  ifconfig
eth0: flags=4163<UP,BROADCAST,RUNNING,MULTICAST>  mtu 1500
        inet 172.17.0.3  netmask 255.255.0.0  broadcast 172.17.255.255
        ether 02:42:ac:11:00:03  txqueuelen 0  (Ethernet)
        RX packets 3831  bytes 8369953 (7.9 MiB)
        RX errors 0  dropped 0  overruns 0  frame 0
        TX packets 3454  bytes 233699 (228.2 KiB)
        TX errors 0  dropped 0 overruns 0  carrier 0  collisions 0

lo: flags=73<UP,LOOPBACK,RUNNING>  mtu 65536
        inet 127.0.0.1  netmask 255.0.0.0
        loop  txqueuelen 1000  (Local Loopback)
        RX packets 0  bytes 0 (0.0 B)
        RX errors 0  dropped 0  overruns 0  frame 0
        TX packets 0  bytes 0 (0.0 B)
        TX errors 0  dropped 0 overruns 0  carrier 0  collisions 0
容器内部有一个eth0的网卡,这个eth0和docker0上的vetha36e63b网卡是一对veth pair
容器IP地址为172.17.0.3,参考bridge的网络信息
$ docker network inspect bridge
[
    {
        "Name": "bridge",
        "Id": "deb6e8301a00ea45bf3c5c68da05457cc7022805faa06f2b73a1c3cf3e770fe7",
        "Created": "2018-11-26T10:32:03.157547898+08:00",
        "Scope": "local",
        "Driver": "bridge",
        "EnableIPv6": false,
        "IPAM": {
            "Driver": "default",
            "Options": null,
            "Config": [
                {
                    "Subnet": "172.17.0.0/16",
                    "Gateway": "172.17.0.1"
                }
            ]
        },
        "Internal": false,
        "Attachable": false,
        "Ingress": false,
        "ConfigFrom": {
            "Network": ""
        },
        "ConfigOnly": false,
        "Containers": {
            "583d56f9a4e136d476cd1453269ad24e32eb063d212ee93e2041bfde770803f0": {
                "Name": "sleepy_hawking",
                "EndpointID": "d919b98d868189b763ab871687e93f8de01fe85639f5025b80c43b5acde83bd3",
                "MacAddress": "02:42:ac:11:00:02",
                "IPv4Address": "172.17.0.2/16",
                "IPv6Address": ""
            },
            "bd324275e4e3316cdb47c027eaeb5bf6237e0c4cc31dbdb7a03ae95938395fbc": {
                "Name": "mystifying_kare",
                "EndpointID": "6c3743a85b3c28d448e4211bbdc7b47fb7de955d35de4085c4234a1f84671c46",
                "MacAddress": "02:42:ac:11:00:03",
                "IPv4Address": "172.17.0.3/16",
                "IPv6Address": ""
            }
        },
        "Options": {
            "com.docker.network.bridge.default_bridge": "true",
            "com.docker.network.bridge.enable_icc": "true",
            "com.docker.network.bridge.enable_ip_masquerade": "true",
            "com.docker.network.bridge.host_binding_ipv4": "0.0.0.0",
            "com.docker.network.bridge.name": "docker0",
            "com.docker.network.driver.mtu": "1500"
        },
        "Labels": {}
    }
]
查看一下docker0网卡
$ ifconfig docker0
docker0: flags=4163<UP,BROADCAST,RUNNING,MULTICAST>  mtu 1500
        inet 172.17.0.1  netmask 255.255.0.0  broadcast 172.17.255.255
        ether 02:42:bb:ba:e1:b4  txqueuelen 0  (Ethernet)
        RX packets 3454  bytes 185343 (180.9 KiB)
        RX errors 0  dropped 0  overruns 0  frame 0
        TX packets 3831  bytes 8369953 (7.9 MiB)
        TX errors 0  dropped 0 overruns 0  carrier 0  collisions 0
自定义网络
Docker提供三种user-defined网络驱动:bridge, overlay和macvlan。overlay和macvlan用于创建跨主机的网络
bridge网络
通过bridge驱动创建bridge网络
$ docker network create --driver bridge test_net
97965434abfbbb062e6b2d67e555c2b53c6feb291b8d63bcc0df22eed4d43f26
通过brctl可以看到
$ brctl show
bridge name bridge id       STP enabled interfaces
br-97965434abfb     8000.02424fd51de3   no
docker0     8000.0242bbbae1b4   no      veth4cb12c3
                            vetha36e63b
查看一下test_net网络的信息
$ docker network inspect test_net
[
    {
        "Name": "test_net",
        "Id": "97965434abfbbb062e6b2d67e555c2b53c6feb291b8d63bcc0df22eed4d43f26",
        "Created": "2018-11-27T19:46:12.082084923+08:00",
        "Scope": "local",
        "Driver": "bridge",
        "EnableIPv6": false,
        "IPAM": {
            "Driver": "default",
            "Options": {},
            "Config": [
                {
                    "Subnet": "172.18.0.0/16",
                    "Gateway": "172.18.0.1"
                }
            ]
        },
        "Internal": false,
        "Attachable": false,
        "Ingress": false,
        "ConfigFrom": {
            "Network": ""
        },
        "ConfigOnly": false,
        "Containers": {},
        "Options": {},
        "Labels": {}
    }
]
网段和网关都可以自行定义
--subnet指定网段--gateway指定网关
示例
$ docker network create --driver bridge  --subnet 192.168.100.0/24 --gateway 192.168.100.1  test_net_v2
9906dae0bf4e118f63668e33c35e50083bbce5228d548872340d27b6d89adbae
$ docker network inspect test_net_v2
[
    {
        "Name": "test_net_v2",
        "Id": "9906dae0bf4e118f63668e33c35e50083bbce5228d548872340d27b6d89adbae",
        "Created": "2018-11-28T10:15:00.913436455+08:00",
        "Scope": "local",
        "Driver": "bridge",
        "EnableIPv6": false,
        "IPAM": {
            "Driver": "default",
            "Options": {},
            "Config": [
                {
                    "Subnet": "192.168.100.0/24",
                    "Gateway": "192.168.100.1"
                }
            ]
        },
        "Internal": false,
        "Attachable": false,
        "Ingress": false,
        "ConfigFrom": {
            "Network": ""
        },
        "ConfigOnly": false,
        "Containers": {},
        "Options": {},
        "Labels": {}
    }
容器启动的时候可以通过指定网络的方式(--network)来实现指定网络,通过--ip的方式指定创建容器的IP
$ docker run -it --network=test_net_v2 --ip=192.168.100.100 busybox
/ # ifconfig
eth0      Link encap:Ethernet  HWaddr 02:42:C0:A8:64:64
          inet addr:192.168.100.100  Bcast:192.168.100.255  Mask:255.255.255.0
          UP BROADCAST RUNNING MULTICAST  MTU:1500  Metric:1
          RX packets:0 errors:0 dropped:0 overruns:0 frame:0
          TX packets:0 errors:0 dropped:0 overruns:0 carrier:0
          collisions:0 txqueuelen:0
          RX bytes:0 (0.0 B)  TX bytes:0 (0.0 B)

lo        Link encap:Local Loopback
          inet addr:127.0.0.1  Mask:255.0.0.0
          UP LOOPBACK RUNNING  MTU:65536  Metric:1
          RX packets:0 errors:0 dropped:0 overruns:0 frame:0
          TX packets:0 errors:0 dropped:0 overruns:0 carrier:0
          collisions:0 txqueuelen:1000
          RX bytes:0 (0.0 B)  TX bytes:0 (0.0 B)
只有创建网络时指定--subnet的网络才能指定静态IP,否则会报错
$ docker run -it --network=test_net --ip=172.18.0.100 busybox
docker: Error response from daemon: user specified IP address is supported only when connecting to networks with user configured subnets.
容器通信方式
IP通信
对于同一个bridge的网络肯定是互通的了,对于不同的dridge网络容器之间是不互通的
$ iptables-save
...
-A DOCKER-ISOLATION-STAGE-1 -i br-9906dae0bf4e ! -o br-9906dae0bf4e -j DOCKER-ISOLATION-STAGE-2
-A DOCKER-ISOLATION-STAGE-1 -i br-97965434abfb ! -o br-97965434abfb -j DOCKER-ISOLATION-STAGE-2
-A DOCKER-ISOLATION-STAGE-1 -i docker0 ! -o docker0 -j DOCKER-ISOLATION-STAGE-2
-A DOCKER-ISOLATION-STAGE-1 -j RETURN
-A DOCKER-ISOLATION-STAGE-2 -o br-9906dae0bf4e -j DROP
-A DOCKER-ISOLATION-STAGE-2 -o br-97965434abfb -j DROP
-A DOCKER-ISOLATION-STAGE-2 -o docker0 -j DROP
...
可以看到bridge之间被防火墙隔开了
可以通过docker network connect将容器绑定到对应的bridge
docker network connect test_net_v2 bd324275e4e3
$ docker network connect test_net_v2 bd324275e4e3
$ docker exec -it bd324275e4e3 /bin/bash
root@bd324275e4e3:/usr/local/apache2# ifconfig
eth0: flags=4163<UP,BROADCAST,RUNNING,MULTICAST>  mtu 1500
        inet 172.17.0.3  netmask 255.255.0.0  broadcast 172.17.255.255
        ether 02:42:ac:11:00:03  txqueuelen 0  (Ethernet)
        RX packets 3831  bytes 8369953 (7.9 MiB)
        RX errors 0  dropped 0  overruns 0  frame 0
        TX packets 3454  bytes 233699 (228.2 KiB)
        TX errors 0  dropped 0 overruns 0  carrier 0  collisions 0

eth1: flags=4163<UP,BROADCAST,RUNNING,MULTICAST>  mtu 1500
        inet 192.168.100.2  netmask 255.255.255.0  broadcast 192.168.100.255
        ether 02:42:c0:a8:64:02  txqueuelen 0  (Ethernet)
        RX packets 0  bytes 0 (0.0 B)
        RX errors 0  dropped 0  overruns 0  frame 0
        TX packets 0  bytes 0 (0.0 B)
        TX errors 0  dropped 0 overruns 0  carrier 0  collisions 0

lo: flags=73<UP,LOOPBACK,RUNNING>  mtu 65536
        inet 127.0.0.1  netmask 255.0.0.0
        loop  txqueuelen 1000  (Local Loopback)
        RX packets 0  bytes 0 (0.0 B)
        RX errors 0  dropped 0  overruns 0  frame 0
        TX packets 0  bytes 0 (0.0 B)
        TX errors 0  dropped 0 overruns 0  carrier 0  collisions 0
Docker内嵌DNS
从Docker1.10版本开始,daemon实现了内嵌的DNS,可以直接通过容器名进行通信
joined容器
$ docker run -d -it --name=web1 httpd
dd56f9f11732bdd7f9e5816d7d0896e64db5205b2f0700457e0ac76a14966063
$ docker exec -it web1 /bin/bash
root@dd56f9f11732:/usr/local/apache2# ifconfig
eth0: flags=4163<UP,BROADCAST,RUNNING,MULTICAST>  mtu 1500
        inet 172.17.0.4  netmask 255.255.0.0  broadcast 172.17.255.255
        ether 02:42:ac:11:00:04  txqueuelen 0  (Ethernet)
        RX packets 2093  bytes 8263610 (7.8 MiB)
        RX errors 0  dropped 0  overruns 0  frame 0
        TX packets 2103  bytes 149929 (146.4 KiB)
        TX errors 0  dropped 0 overruns 0  carrier 0  collisions 0

lo: flags=73<UP,LOOPBACK,RUNNING>  mtu 65536
        inet 127.0.0.1  netmask 255.0.0.0
        loop  txqueuelen 1000  (Local Loopback)
        RX packets 10  bytes 897 (897.0 B)
        RX errors 0  dropped 0  overruns 0  frame 0
        TX packets 10  bytes 897 (897.0 B)
        TX errors 0  dropped 0 overruns 0  carrier 0  collisions 0
root@dd56f9f11732:exit
$ docker run -it --network=container:web1 busybox
/ # ip -a
BusyBox v1.29.3 (2018-10-01 22:37:18 UTC) multi-call binary.

Usage: ip [OPTIONS] address|route|link|tunnel|neigh|rule [COMMAND]

OPTIONS := -f[amily] inet|inet6|link | -o[neline]
COMMAND :=
ip addr add|del IFADDR dev IFACE | show|flush [dev IFACE] [to PREFIX]
ip route list|flush|add|del|change|append|replace|test ROUTE
ip link set IFACE [up|down] [arp on|off] [multicast on|off]
    [promisc on|off] [mtu NUM] [name NAME] [qlen NUM] [address MAC]
    [master IFACE | nomaster]
ip tunnel add|change|del|show [NAME]
    [mode ipip|gre|sit]
    [remote ADDR] [local ADDR] [ttl TTL]
ip neigh show|flush [to PREFIX] [dev DEV] [nud STATE]
ip rule [list] | add|del SELECTOR ACTION
/ # ifconfig
eth0      Link encap:Ethernet  HWaddr 02:42:AC:11:00:04
          inet addr:172.17.0.4  Bcast:172.17.255.255  Mask:255.255.0.0
          UP BROADCAST RUNNING MULTICAST  MTU:1500  Metric:1
          RX packets:0 errors:0 dropped:0 overruns:0 frame:0
          TX packets:0 errors:0 dropped:0 overruns:0 carrier:0
          collisions:0 txqueuelen:0
          RX bytes:0 (0.0 B)  TX bytes:0 (0.0 B)

lo        Link encap:Local Loopback
          inet addr:127.0.0.1  Mask:255.0.0.0
          UP LOOPBACK RUNNING  MTU:65536  Metric:1
          RX packets:0 errors:0 dropped:0 overruns:0 frame:0
          TX packets:0 errors:0 dropped:0 overruns:0 carrier:0
          collisions:0 txqueuelen:1000
          RX bytes:0 (0.0 B)  TX bytes:0 (0.0 B)
网卡mac地址与IP完全一样,它们共享了相同的网络栈,所以可以直接使用127.0.0.1来访问http服务
/ # wget 127.0.0.1
Connecting to 127.0.0.1 (127.0.0.1:80)
index.html           100% |******************************************************************************************************************************************************************************************************************************|    45  0:00:00 ETA
joined容器的适用场景
- 不同容器中的程序希望通过 loopback 高效快速地通信,比如web server与app server。
- 希望监控其他容器的网络流量,比如运行在独立容器中的网络监控程序。
容器与外部进行通信
只要主机能访问外网,docker容器就是可以访问外网的,原理也是通过iptables
$ iptables -t nat -S
-P PREROUTING ACCEPT
-P INPUT ACCEPT
-P OUTPUT ACCEPT
-P POSTROUTING ACCEPT
-N DOCKER
-A PREROUTING -m addrtype --dst-type LOCAL -j DOCKER
-A OUTPUT ! -d 127.0.0.0/8 -m addrtype --dst-type LOCAL -j DOCKER
-A POSTROUTING -s 192.168.100.0/24 ! -o br-9906dae0bf4e -j MASQUERADE
-A POSTROUTING -s 172.18.0.0/16 ! -o br-97965434abfb -j MASQUERADE
-A POSTROUTING -s 172.17.0.0/16 ! -o docker0 -j MASQUERADE
-A POSTROUTING -s 172.17.0.2/32 -d 172.17.0.2/32 -p tcp -m tcp --dport 5000 -j MASQUERADE
-A DOCKER -i br-9906dae0bf4e -j RETURN
-A DOCKER -i br-97965434abfb -j RETURN
-A DOCKER -i docker0 -j RETURN
-A DOCKER ! -i docker0 -p tcp -m tcp --dport 5000 -j DNAT --to-destination 172.17.0.2:5000
-A POSTROUTING -s 172.17.0.0/16 ! -o docker0 -j MASQUERADE代表源地址为172.17.0.0/16,且目标地址不为本bridge就进行NAT转换,将数据报地址转换为主机IP进行发送
查看容器的路由
/ # ip r
default via 172.17.0.1 dev eth0
172.17.0.0/16 dev eth0 scope link  src 172.17.0.5
docker0网卡抓到的包
$ tcpdump -i docker0 -n icmp
tcpdump: verbose output suppressed, use -v or -vv for full protocol decode
listening on docker0, link-type EN10MB (Ethernet), capture size 262144 bytes
16:56:01.110183 IP 172.17.0.5 > 123.125.115.110: ICMP echo request, id 2304, seq 22, length 64
16:56:01.145115 IP 123.125.115.110 > 172.17.0.5: ICMP echo reply, id 2304, seq 22, length 64
16:56:02.110331 IP 172.17.0.5 > 123.125.115.110: ICMP echo request, id 2304, seq 23, length 64
16:56:02.145264 IP 123.125.115.110 > 172.17.0.5: ICMP echo reply, id 2304, seq 23, length 64
16:56:03.110460 IP 172.17.0.5 > 123.125.115.110: ICMP echo request, id 2304, seq 24, length 64
16:56:03.145375 IP 123.125.115.110 > 172.17.0.5: ICMP echo reply, id 2304, seq 24, length 64
eth0网卡抓到的包
$ tcpdump -i eth0 -n icmp
tcpdump: verbose output suppressed, use -v or -vv for full protocol decode
listening on eth0, link-type EN10MB (Ethernet), capture size 262144 bytes
17:36:50.176292 IP 10.139.146.207 > 123.125.115.110: ICMP echo request, id 2560, seq 5, length 64
17:36:50.211190 IP 123.125.115.110 > 10.139.146.207: ICMP echo reply, id 2560, seq 5, length 64
17:36:51.176408 IP 10.139.146.207 > 123.125.115.110: ICMP echo request, id 2560, seq 6, length 64
17:36:51.211283 IP 123.125.115.110 > 10.139.146.207: ICMP echo reply, id 2560, seq 6, length 64
17:36:52.176572 IP 10.139.146.207 > 123.125.115.110: ICMP echo request, id 2560, seq 7, length 64
17:36:52.211429 IP 123.125.115.110 > 10.139.146.207: ICMP echo reply, id 2560, seq 7, length 64
过程为
- busybox发送给ping的包
- docker0发现是发送给外网的,转交给NAT处理
- NAT将源地址转换为eth0的10.139.146.207发送
- ping包从eth0发送出去
外部访问容器内部
方式是端口映射
将容器对外提供服务的端口映射到主机的某个端口,外网通过该端口访问容器。容器启动时通过-p参数映射端口
$ docker run -d -p 80 httpd
17265a10462b3dad18515e31322ea9b0f1585d287dae58bdbad31a8c98da81bd
$  docker ps -a
CONTAINER ID        IMAGE               COMMAND                  CREATED             STATUS              PORTS                    NAMES
17265a10462b        httpd               "httpd-foreground"       3 seconds ago       Up 2 seconds        0.0.0.0:32768->80/tcp    practical_nobel
583d56f9a4e1        registry:2          "/entrypoint.sh /etc…"   5 days ago          Up 2 days           0.0.0.0:5000->5000/tcp   sleepy_hawking
$ curl 127.0.0.1:32768
<html><body><h1>It works!</h1></body></html>
这是映射的动态端口,映射动态端口
$ docker run -d -p 80:80 httpd
e55bceafa992f925bd73b5f0d501ba1ab36a5a6750ba46d8d74bc242e8780f2d
$ curl 127.0.0.1:80
<html><body><h1>It works!</h1></body></html>
每次创建
$ ps -ef | grep docker-proxy
root     29599  2255  0 18:40 ?        00:00:00 /usr/bin/docker-proxy -proto tcp -host-ip 0.0.0.0 -host-port 32768 -container-ip 172.17.0.3 -container-port 80
root     31699  2255  0 18:55 ?        00:00:00 /usr/bin/docker-proxy -proto tcp -host-ip 0.0.0.0 -host-port 80 -container-ip 172.17.0.4 -container-port 80
解析一下
- docker-proxy监听主机的32768
- 请求主机的32768,转发到容器的80端口
跨主机网络
- docker原生的overlay和macvlan
- 第三方方案:flannel、weave和calico等
跨主机解决方案
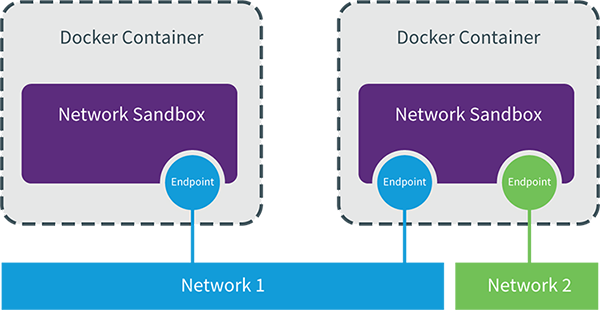
libnetwork是docker容器网络库,最核心的内容是其定义的Container Network Model(CNM),这个模型对容器网络进行了抽象,由以下三类组件组成:
Sandbox
Sandbox是网络栈,包含容器接口、路由表和DNS设置。linux网络就是Sandbox的标准实现
Endpoint
Endpoint的作用是讲Sandbox接入Network,经典的实现为veth pair。
Network
Network包含一组Endpoint,同一Network的Endpoint可以直接通信。Network的实现可以是Linux Bridge、VLAN等
CNM示例
Docker Machine(跨主机网络的准备)
示例环境
| IP地址 | 主机名 |
|---|---|
| 172.27.0.14 | test-01 |
| 172.27.0.2 | test-02 |
| 172.27.0.5 | test-03 |
安装Docker Machine
[root@test-01 ~]# base=https://github.com/docker/machine/releases/download/v0.16.0 && curl -L $base/docker-machine-$(uname -s)-$(uname -m) >/tmp/docker-machine && sudo install /tmp/docker-machine /usr/local/bin/docker-machine
[root@test-01 ~]# docker-machine version
docker-machine version 0.16.0, build 702c267f
[root@test-01 ~]# docker-machine ls
NAME   ACTIVE   DRIVER   STATE   URL   SWARM   DOCKER   ERRORS
创建第一个machine,创建machine需要ssh免密码登录
[root@test-01 ~]# ssh-copy-id test-02
[root@test-01 ~]# docker-machine create --driver generic --generic-ip-address=172.27.0.2 test-02
Creating CA: /root/.docker/machine/certs/ca.pem
Creating client certificate: /root/.docker/machine/certs/cert.pem
Running pre-create checks...
Creating machine...
(test-02) No SSH key specified. Assuming an existing key at the default location.       ①
Waiting for machine to be running, this may take a few minutes...
Detecting operating system of created instance...
Waiting for SSH to be available...
Detecting the provisioner...
Provisioning with centos...         ②
Copying certs to the local machine directory...             ③
Copying certs to the remote machine...
Setting Docker configuration on the remote daemon...            ④
Checking connection to Docker...                ⑤
Docker is up and running!
To see how to connect your Docker Client to the Docker Engine running on this virtual machine, run: docker-machine env test-02
[root@test-01 ~]# docker-machine ls
NAME      ACTIVE   DRIVER    STATE     URL                     SWARM   DOCKER     ERRORS
test-02   -        generic   Running   tcp://172.27.0.2:2376           v18.09.0
--generic-ip-address指定目标系统的IP
- ssh登录远程主机
- 安装docker
- 拷贝证书
- 配置docker daemon
- 启动docker
然后就能查看到节点已经加到这边了
[root@test-02 ~]# vi /etc/systemd/system/docker.service.d/10-machine.conf
[Service]
ExecStart=/usr/bin/dockerd -H tcp://0.0.0.0:2376 -H unix:///var/run/docker.sock --storage-driver overlay2 --tlsverify --tlscacert /etc/docker/ca.pem --tlscert /etc/docker/server.pem --tlskey /etc/docker/server-key.pem --label provider=generic
Environment=
再次添加主机test-03
[root@test-01 ~]# docker-machine create --driver generic --generic-ip-address=172.27.0.5 test-03
[root@test-01 ~]# docker-machine ls
NAME      ACTIVE   DRIVER    STATE     URL                     SWARM   DOCKER     ERRORS
test-02   -        generic   Running   tcp://172.27.0.2:2376           v18.09.0
test-03   -        generic   Running   tcp://172.27.0.5:2376           v18.09.0
远程执行
[root@test-01 ~]# docker-machine env test-02
export DOCKER_TLS_VERIFY="1"
export DOCKER_HOST="tcp://172.27.0.2:2376"
export DOCKER_CERT_PATH="/root/.docker/machine/machines/test-02"
export DOCKER_MACHINE_NAME="test-02"
# Run this command to configure your shell:
# eval $(docker-machine env test-02)
[root@test-01 ~]# eval $(docker-machine env test-02)
[root@test-01 ~]# docker run -itd busybox
Unable to find image 'busybox:latest' locally
latest: Pulling from library/busybox
90e01955edcd: Pull complete
Digest: sha256:2a03a6059f21e150ae84b0973863609494aad70f0a80eaeb64bddd8d92465812
Status: Downloaded newer image for busybox:latest
445f61e27d6df379957a8238cbce0e1e75291f08c8048affa0e71c1e0226eae3
在test主机上可以查看到容器的启动
[root@test-02 ~]# docker ps -a
CONTAINER ID        IMAGE               COMMAND             CREATED             STATUS              PORTS               NAMES
445f61e27d6d        busybox             "sh"                50 seconds ago      Up 49 seconds                           sleepy_liskov
其他操作
更新docker版本
[root@test-01 ~]# docker-machine upgrade test-02 test-03
查看配置
[root@test-01 ~]# docker-machine config test-02
--tlsverify
--tlscacert="/root/.docker/machine/machines/test-02/ca.pem"
--tlscert="/root/.docker/machine/machines/test-02/cert.pem"
--tlskey="/root/.docker/machine/machines/test-02/key.pem"
-H=tcp://172.27.0.2:2376
远程拷贝
docker-machine scp 可以在不同 machine 之间拷贝文件,比如:docker-machine scp test-02:/tmp/a test-03:/tmp/b
[root@test-01 ~]# docker-machine scp test-02:/tmp/a test-03:/tmp/b
[root@test-01 ~]# ssh test-03 'cat /tmp/b'
test-02 a
overlay
overlay环境准备
overlay网络需要一个key-value数据库用于保存网络状态信息,可以使用Consul,etcd和zookeeper等。
[root@test-01 ~]# docker run -d -p 8500:8500 -h consul --name consul progrium/consul -server -bootstrap
在test-02和test-03机器上docker daemon的配置文件/etc/systemd/system/docker.service
[root@test-02 ~]# vi /etc/systemd/system/docker.service.d/10-machine.conf
[Service]
ExecStart=
ExecStart=/usr/bin/dockerd -H tcp://0.0.0.0:2376 -H unix:///var/run/docker.sock --storage-driver overlay2 --tlsverify --tlscacert /etc/docker/ca.pem --tlscert /etc/docker/server.pem --tlskey /etc/docker/server-key.pem --label provider=generic --cluster-store=consul://172.27.0.14:8500 --cluster-advertise=172.27.0.2:2376
Environment=
[root@test-02 ~]# systemctl daemon-reload
[root@test-02 ~]# systemctl restart docker.service
--cluster-store指定consul的地址--cluster-advertise告知consul自己的连接地址
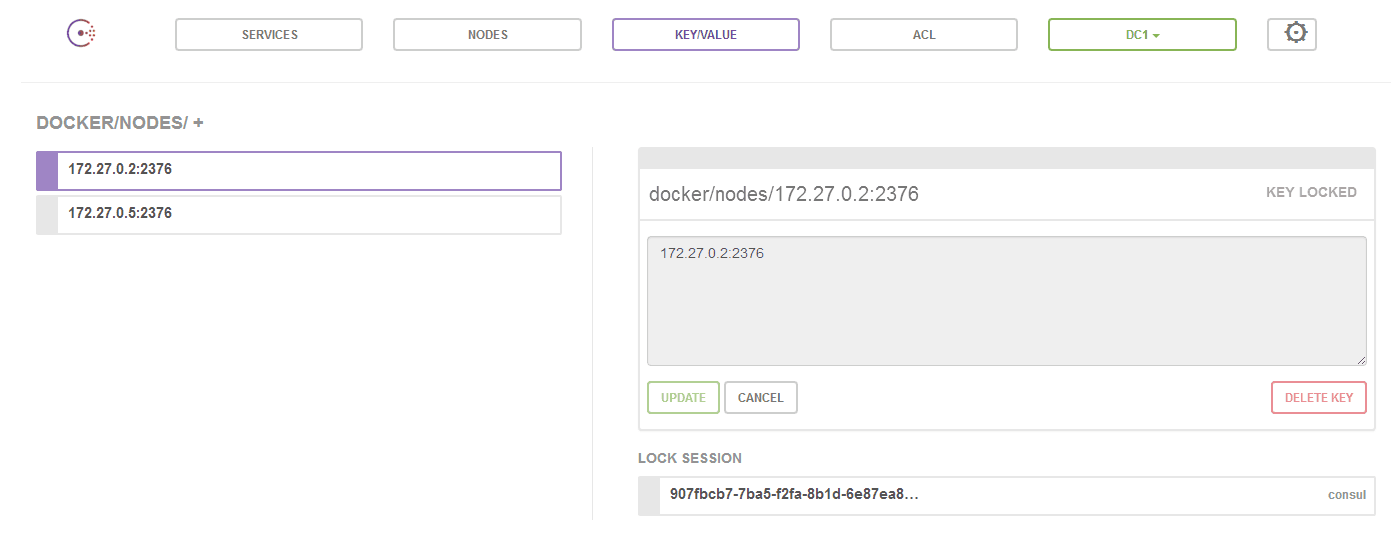
数据自动注册到Consul数据库中
创建overlay网络
创建overlay网络,-d overlay指定driver为overaly
[root@test-03 ~]# docker network create -d overlay ov_net1
1e316d62528213c70423b4f48d17c36c2c98bb5acd6e79e8bf79738b18646987
[root@test-03 ~]# docker network  ls
NETWORK ID          NAME                DRIVER              SCOPE
a131be7523ec        bridge              bridge              local
5b7272fcb5a6        host                host                local
41d90d5a4358        none                null                local
1e316d625282        ov_net1             overlay             global
ov_net1的SCOPE为global,而其他网络为local,在test2上查看
[root@test-02 ~]# docker network  ls
NETWORK ID          NAME                DRIVER              SCOPE
2abf54bc8ab6        bridge              bridge              local
0e8328e16c23        host                host                local
3c3151a36564        none                null                local
1e316d625282        ov_net1             overlay             global
[root@test-02 ~]# docker network inspect ov_net1
[
    {
        "Name": "ov_net1",
        "Id": "1e316d62528213c70423b4f48d17c36c2c98bb5acd6e79e8bf79738b18646987",
        "Created": "2018-11-30T18:02:00.078876002+08:00",
        "Scope": "global",
        "Driver": "overlay",
        "EnableIPv6": false,
        "IPAM": {
            "Driver": "default",
            "Options": {},
            "Config": [
                {
                    "Subnet": "10.0.0.0/24",
                    "Gateway": "10.0.0.1"
                }
            ]
        },
        "Internal": false,
        "Attachable": false,
        "Ingress": false,
        "ConfigFrom": {
            "Network": ""
        },
        "ConfigOnly": false,
        "Containers": {},
        "Options": {},
        "Labels": {}
    }
]
在test02也能看到,这是数据同步到了consul上的结果,分配的网段为10.0.0.0/24
docker默认为overlay网络分配24位掩码的子网(10.0.X.0/24),所有主机共享这个subnet,容器启动时会顺序从此空间分配IP。当然我们也可以通过--subnet指定IP空间
docker network create -d overlay --subnet 10.22.1.0/24 ov_net3
创建overlay网络上的容器
创建容器
[root@test-02 ~]# docker run -itd --name testbox1 --network ov_net1 busybox
a3a209fe8aac5d4af1e38c9e40f8fd48a023bc4227e0b9fb7b4a6d63d1d06dcd
[root@test-03 ~]# docker run -itd --name testbox2 --network ov_net1 busybox
850d2ec5005cc39bd4ca44bb482d398168d2f43a2d3bac36c09ab4c2fbf0a3f5
overlay网络上容器的连通性
[root@test-02 ~]# docker exec testbox1 ping -c 3 testbox2
PING testbox2 (10.0.0.3): 56 data bytes
64 bytes from 10.0.0.3: seq=0 ttl=64 time=0.697 ms
64 bytes from 10.0.0.3: seq=1 ttl=64 time=0.533 ms
64 bytes from 10.0.0.3: seq=2 ttl=64 time=0.756 ms
可以看到可以直接ping通,并且DNS服务正常
[root@test-02 ~]# docker exec testbox1 ip r
default via 172.18.0.1 dev eth1
10.0.0.0/24 dev eth0 scope link  src 10.0.0.2
172.18.0.0/16 dev eth1 scope link  src 172.18.0.2
[root@test-02 ~]# docker exec testbox1 ip a
1: lo: <LOOPBACK,UP,LOWER_UP> mtu 65536 qdisc noqueue qlen 1000
    link/loopback 00:00:00:00:00:00 brd 00:00:00:00:00:00
    inet 127.0.0.1/8 scope host lo
       valid_lft forever preferred_lft forever
9: eth0@if10: <BROADCAST,MULTICAST,UP,LOWER_UP,M-DOWN> mtu 1450 qdisc noqueue
    link/ether 02:42:0a:00:00:02 brd ff:ff:ff:ff:ff:ff
    inet 10.0.0.2/24 brd 10.0.0.255 scope global eth0
       valid_lft forever preferred_lft forever
12: eth1@if13: <BROADCAST,MULTICAST,UP,LOWER_UP,M-DOWN> mtu 1500 qdisc noqueue
    link/ether 02:42:ac:12:00:02 brd ff:ff:ff:ff:ff:ff
    inet 172.18.0.2/16 brd 172.18.255.255 scope global eth1
       valid_lft forever preferred_lft forever
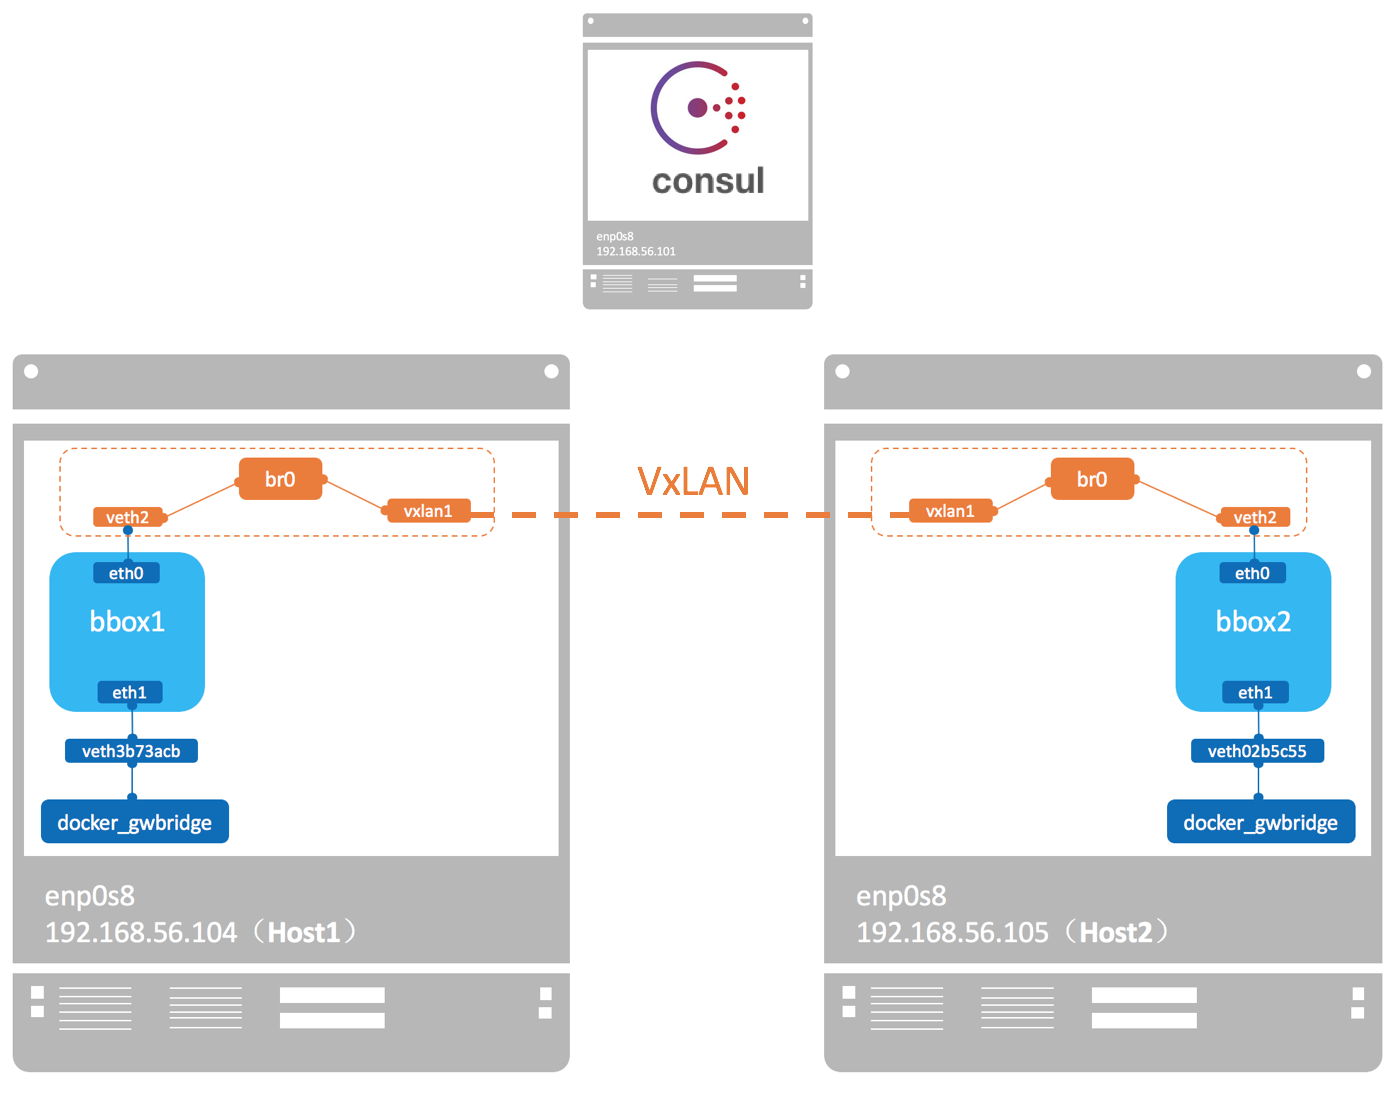
overlay网络跨主机通信的原理
当时我们看了overlay网络启动的容器的路由和两个网卡
docker会为每个overlay网络创建一个独立的network namespace
- 一个
linux bridge br0,endpoint还是由veth pair实现,一端连接到容器中(即 eth0),另一端连接到namespace的br0上 br0除了连接所有的endpoint,还会连接一个vxlan设备,用于与其他host建立vxlan tunnel。容器之间的数据就是通过这个tunnel通信的。
逻辑网络拓扑结构如图所示:
查看主机的namespace
[root@test-02 ~]# ln -s /var/run/docker/netns /var/run/netns
[root@test-02 ~]# ip netns
9c4c3d656efb (id: 1)
1-1e316d6252 (id: 0)

[root@test-03 ~]# ln -s /var/run/docker/netns /var/run/netns
[root@test-03 ~]# ip netns
83426b226cd6 (id: 1)
1-1e316d6252 (id: 0)
这个1-1e316d6252就是ov_net1的namespace
[root@test-03 ~]# ip netns exec 1-1e316d6252 brctl show
bridge name bridge id       STP enabled interfaces
br0     8000.1a30a9b33e2b   no      veth0
                                    vxlan0
[root@test-03 ~]# ip netns exec 1-1e316d6252 ip -d l show vxlan0
6: vxlan0: <BROADCAST,MULTICAST,UP,LOWER_UP> mtu 1450 qdisc noqueue master br0 state UNKNOWN mode DEFAULT group default
    link/ether 76:25:71:bb:05:9e brd ff:ff:ff:ff:ff:ff link-netnsid 0 promiscuity 1
    vxlan id 256 srcport 0 0 dstport 4789 proxy l2miss l3miss ageing 300 noudpcsum noudp6zerocsumtx noudp6zerocsumrx
    bridge_slave state forwarding priority 32 cost 100 hairpin off guard off root_block off fastleave off learning on flood on port_id 0x8001 port_no 0x1 designated_port 32769 designated_cost 0 designated_bridge 8000.1a:30:a9:b3:3e:2b designated_root 8000.1a:30:a9:b3:3e:2b hold_timer    0.00 message_age_timer    0.00 forward_delay_timer    0.00 topology_change_ack 0 config_pending 0 proxy_arp off proxy_arp_wifi off mcast_router 1 mcast_fast_leave off mcast_flood on addrgenmode eui64 numtxqueues 1 numrxqueues 1 gso_max_size 65536 gso_max_segs 65535
10.0.0.0网段是用于跨主机通信,172.18.0.0/16用于与宿主机通信
overlay网络间的隔离
不同overlay网络之间是隔离的,也需要进行network connect才能进行连接的
flannel
flannel是CoreOS开发的容器网络解决方案,flannel为每个host分配一个subnet,容器从这个subnet分配IP,IP可以在主机间进行路由。
flannel会在每个host运行Agent用来划分subnet,用etcd存储网络配置。
数据包如何在主机间转发是由backend实现的。flannel提供了多种backend,最常用的有vxlan和host-gw,其他backend请参考
安装etcd
ETCD_VER=v2.3.7
DOWNLOAD_URL=https://github.com/coreos/etcd/releases/download
curl -L ${DOWNLOAD_URL}/${ETCD_VER}/etcd-${ETCD_VER}-linux-amd64.tar.gz -o /tmp/etcd-${ETCD_VER}-linux-amd64.tar.gz
mkdir -p /tmp/test-etcd && tar xzvf /tmp/etcd-${ETCD_VER}-linux-amd64.tar.gz -C /tmp/test-etcd --strip-components=1
cp /tmp/test-etcd/etcd* /usr/local/bin/
脚本是从github上下载etcd的可执行文件并保存到/usr/local/bin/
启动etcd并打开2379监听端口,并验证一下etcd服务
[root@test-01 ~]# etcd -listen-client-urls http://172.27.0.14:2379 -advertise-client-urls http://172.27.0.14:2379 &
[root@test-01 ~]# etcdctl --endpoints=172.27.0.14:2379 set foo "bar"
bar
[root@test-01 ~]# etcdctl --endpoints=172.27.0.14:2379 get foo
bar
安装flannel
下载flannel源码进行构建
yum install -y git
git clone https://github.com/coreos/flannel.git
cd flannel
make dist/flanneld-amd64
echo $?
cp dist/flanneld-amd64 /usr/local/bin/flanneld
配置flannel网络
[root@test-01 ~]# vi flannel-config.json
{
  "Network": "10.2.0.0/16",
  "SubnetLen": 24,
  "Backend": {
    "Type": "vxlan"
  }
}
- Network定义该网络的IP池为
10.2.0.0/16 - SubnetLen指定每个主机分配到的subnet大小为24位,即10.2.X.0/24
- Backend为vxlan,即主机间通过vxlan通信
配置存入etcd
[root@test-01 ~]# etcdctl --endpoints=172.27.0.14:2379 set /docker-test/network/config < flannel-config.json
这个key后面会作为flanneld的一个启动参数
启动flannel
[root@test-02 flannel]# flanneld -etcd-endpoints=http://172.27.0.14:2379 -iface=eth0 -etcd-prefix=/docker-test/network
I1202 17:38:47.467525    3052 main.go:544] Defaulting external address to interface address (172.27.0.2)        ①
I1202 17:38:47.467649    3052 main.go:244] Created subnet manager: Etcd Local Manager with Previous Subnet: None
I1202 17:38:47.467659    3052 main.go:247] Installing signal handlers
I1202 17:38:47.470516    3052 main.go:386] Found network config - Backend type: vxlan
I1202 17:38:47.470566    3052 vxlan.go:120] VXLAN config: VNI=1 Port=0 GBP=false DirectRouting=false
I1202 17:38:47.477201    3052 local_manager.go:234] Picking subnet in range 10.2.1.0 ... 10.2.255.0             ②
I1202 17:38:47.480195    3052 local_manager.go:220] Allocated lease (10.2.89.0/24) to current node (172.27.0.2) ③
I1202 17:38:47.480662    3052 main.go:317] Wrote subnet file to /run/flannel/subnet.env
I1202 17:38:47.480680    3052 main.go:321] Running backend.
I1202 17:38:47.480845    3052 vxlan_network.go:60] watching for new subnet leases
I1202 17:38:47.483270    3052 main.go:429] Waiting for 22h59m59.999687371s to renew lease
I1202 17:38:47.499750    3052 iptables.go:145] Some iptables rules are missing; deleting and recreating rules
I1202 17:38:47.499799    3052 iptables.go:167] Deleting iptables rule: -s 10.2.0.0/16 -j ACCEPT
I1202 17:38:47.502079    3052 iptables.go:167] Deleting iptables rule: -d 10.2.0.0/16 -j ACCEPT
I1202 17:38:47.503802    3052 iptables.go:155] Adding iptables rule: -s 10.2.0.0/16 -j ACCEPT
I1202 17:38:47.506289    3052 iptables.go:155] Adding iptables rule: -d 10.2.0.0/16 -j ACCEPT

[root@test-03 flannel]# flanneld -etcd-endpoints=http://172.27.0.14:2379 -iface=eth0 -etcd-prefix=/docker-test/network
-etcd-endpoints指定etcd url-iface指定主机间数据传输使用的interface-etcd-prefix指定etcd存放flannel网络配置信息的key
flannel网络启动流程
- eth0被选作与外部主机通信的interface
- 识别flannel网络池10.2.0.0/16
- 分配的subnet为10.2.89.0/24
可以看到本地多个网卡
[root@test-02 flannel]# ip addr show flannel.1
18: flannel.1: <BROADCAST,MULTICAST,UP,LOWER_UP> mtu 1450 qdisc noqueue state UNKNOWN group default
    link/ether 7e:69:dd:b3:05:16 brd ff:ff:ff:ff:ff:ff
    inet 10.2.89.0/32 scope global flannel.1
       valid_lft forever preferred_lft forever
路由表中10.2.12.0/24的网络被指向了flannel.1网卡发送
[root@test-02 flannel]# ip route
default via 172.27.0.1 dev eth0
10.2.12.0/24 via 10.2.12.0 dev flannel.1 onlink
169.254.0.0/16 dev eth0 scope link metric 1002
172.17.0.0/16 dev docker0 proto kernel scope link src 172.17.0.1
172.18.0.0/16 dev docker_gwbridge proto kernel scope link src 172.18.0.1
172.27.0.0/20 dev eth0 proto kernel scope link src 172.27.0.2
docker使用flannel网络
更改docker配置
[root@test-02 flannel]# vi /etc/systemd/system/docker.service.d/10-machine.conf
[Service]
ExecStart=
ExecStart=/usr/bin/dockerd -H tcp://0.0.0.0:2376 -H unix:///var/run/docker.sock --storage-driver overlay2 --tlsverify --tlscacert /etc/docker/ca.pem --tlscert /etc/docker/server.pem --tlskey /etc/docker/server-key.pem --label provider=generic --bip=10.2.89.1/24 --mtu=1450
Environment=
配置要与一下配置文件保持一致
[root@test-02 flannel]# cat /run/flannel/subnet.env
FLANNEL_NETWORK=10.2.0.0/16
FLANNEL_SUBNET=10.2.89.1/24
FLANNEL_MTU=1450
FLANNEL_IPMASQ=false
重启docker
[root@test-03 ~]# systemctl daemon-reload
[root@test-03 ~]# systemctl restart docker.service
启动容器,这是容器默认就是在flannel网络上
[root@test-03 ~]# docker run -itd --name testbox5 busybox
38bd9ae0144c28582fb9ba0a2700f69eb73476c9a02b69d1a01fef2119f5ab42
[root@test-03 ~]# docker exec testbox5 ip r
default via 10.2.12.1 dev eth0
10.2.12.0/24 dev eth0 scope link  src 10.2.12.2
[root@test-03 ~]# docker exec testbox5 ip a
1: lo: <LOOPBACK,UP,LOWER_UP> mtu 65536 qdisc noqueue qlen 1000
    link/loopback 00:00:00:00:00:00 brd 00:00:00:00:00:00
    inet 127.0.0.1/8 scope host lo
       valid_lft forever preferred_lft forever
17: eth0@if18: <BROADCAST,MULTICAST,UP,LOWER_UP,M-DOWN> mtu 1450 qdisc noqueue
    link/ether 02:42:0a:02:0c:02 brd ff:ff:ff:ff:ff:ff
    inet 10.2.12.2/24 brd 10.2.12.255 scope global eth0
       valid_lft forever preferred_lft forever
同理再test-02上操作
[root@test-02 flannel]# docker run -itd --name testbox6 busybox
620a0736736378b7d4139d842ac5401a55510ef5286d1f061caf1a6875ed4d6d
[root@test-02 flannel]# docker exec testbox6 ip r
default via 10.2.89.1 dev eth0
10.2.89.0/24 dev eth0 scope link  src 10.2.89.2
flannel网络的连通性和隔离性
[root@test-02 flannel]# docker exec testbox6 ping -c 2 10.2.12.2
PING 10.2.12.2 (10.2.12.2): 56 data bytes
64 bytes from 10.2.12.2: seq=0 ttl=62 time=1.043 ms
64 bytes from 10.2.12.2: seq=1 ttl=62 time=0.864 ms

--- 10.2.12.2 ping statistics ---
2 packets transmitted, 2 packets received, 0% packet loss
round-trip min/avg/max = 0.864/0.953/1.043 ms
原理是
- 在testbox6上将数据发送给eth0
- eth0将数据包进行封装转发到test-03
- test-03接收到数据包进行解包,发现数据包的目的地址为10.2.12.2,转发给了flannel,通过docker0到达了testbox5
如图所示
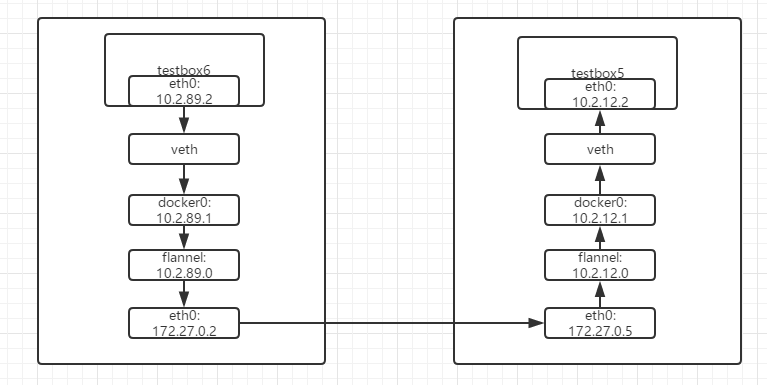
即
testbox6上的eth0 ->
veth ->
docker0(10.2.89.1) ->
flannel(10.2.89.0) ->
test-02的eth0 ->
test-03的eth0 ->
flannel(10.2.12.0) ->
docker0(10.2.12.1) ->
veth ->
testbox5上的eth0
flannel将所有的容器网络都连接到了一起,并没有进行隔离
flannel网络容器访问外网,由于默认也是使用的bridge网络,一样是通过NAT的方式进行访问外网,通过端口映射的方式使外网访问容器内部
flannel网络的host-gw模式
与vxlan不同,host-gw不会封装数据包,而是在主机的路由表中创建到其他主机subnet的路由条目,从而实现容器跨主机通信。
[root@test-01 ~]# vi flannel-config.json
{
  "Network": "10.2.0.0/16",
  "SubnetLen": 24,
  "Backend": {
    "Type": "host-gw"
  }
}
其他的操作和vxlan模式一样,两者的区别就是
- host-gw把每个主机都配置成网关,主机知道其他主机的subnet和转发地址。vxlan则在主机间建立隧道,不同主机的容器都在一个大的网段内(比如 10.2.0.0/16)
- 虽然vxlan与host-gw使用不同的机制建立主机之间连接,但对于容器则无需任何改变
- 由于vxlan需要对数据进行额外打包和拆包,性能会稍逊于host-gw
Weave
weave是Weaveworks开发的容器网络解决方案
weave 创建的虚拟网络可以将部署在多个主机上的容器连接起来。对容器来说,weave 就像一个巨大的以太网交换机,所有容器都被接入这个交换机,容器可以直接通信,无需 NAT 和端口映射。除此之外,weave 的 DNS 模块使容器可以通过 hostname 访问。
安装Weave
curl -L git.io/weave -o /usr/local/bin/weave
chmod a+x /usr/local/bin/weave
运行weave
[root@test-02 ~]# weave launch
2.5.0: Pulling from weaveworks/weave
605ce1bd3f31: Pull complete
18e9c1482d54: Pull complete
20978932838c: Pull complete
4738e62f8d03: Pull complete
68add50beeee: Pull complete
Digest: sha256:3a6086f15bf1f68092e372bfbb08d2d3679cf8a2b0f501ceb11c2fccd06a4b03
Status: Downloaded newer image for weaveworks/weave:2.5.0
latest: Pulling from weaveworks/weavedb
9b0681f946a1: Pull complete
Digest: sha256:c280cf4e7208f4ca0d2514539e0f476dd12db70beacdc368793b7736de023d8d
Status: Downloaded newer image for weaveworks/weavedb:latest
Unable to find image 'weaveworks/weaveexec:2.5.0' locally
2.5.0: Pulling from weaveworks/weaveexec
605ce1bd3f31: Already exists
18e9c1482d54: Already exists
20978932838c: Already exists
4738e62f8d03: Already exists
68add50beeee: Already exists
c10a1d502a6f: Pull complete
bec5b671028d: Pull complete
0467a09afdc2: Pull complete
ade22b35f72f: Pull complete
Digest: sha256:425c74052faaf6e76525f5a088a584a44353fb04fa51f6d800644e0acd64fce1
Status: Downloaded newer image for weaveworks/weaveexec:2.5.0
7499492fb92aaf147a39e6fb999338ac4f9ed37e18e97111ceb41470b0d95f99
可以看到weave pull了三个容器
[root@test-02 ~]# docker ps -a
CONTAINER ID        IMAGE                        COMMAND                  CREATED             STATUS              PORTS               NAMES
7499492fb92a        weaveworks/weave:2.5.0       "/home/weave/weaver …"   About an hour ago   Up 5 minutes                            weave
e4bc4a221360        weaveworks/weaveexec:2.5.0   "data-only"              About an hour ago   Created                                 weavevolumes-2.5.0
7167a1cacb6c        weaveworks/weavedb:latest    "data-only"              About an hour ago   Created                                 weavedb
- weave是主程序,负责建立weave网络,收发数据,提供DNS服务等。
- weaveplugin是
libnetwork CNM driver,实现Docker网络。 - weaveproxy 提供Docker命令的代理服务,当用户运行Docker CLI创建容器时,它会自动将容器添加到weave网络。
[root@test-02 ~]# docker network ls
NETWORK ID          NAME                DRIVER              SCOPE
0a18f2dcfe76        bridge              bridge              local
d9de7c911819        docker_gwbridge     bridge              local
0e8328e16c23        host                host                local
54bfd5ccef1f        mac_net1            macvlan             local
3c3151a36564        none                null                local
e751f6bc32ea        weave               weavemesh           local
可以看到docker创建一个weave的网络
[root@test-02 ~]# docker network inspect weave
[
    {
        "Name": "weave",
        "Id": "e751f6bc32ea990e4e3e303e1c4a9b85857a0f3dfd70d4c577519bf8e748695f",
        "Created": "2018-12-02T21:36:19.707323988+08:00",
        "Scope": "local",
        "Driver": "weavemesh",
        "EnableIPv6": false,
        "IPAM": {
            "Driver": "weavemesh",
            "Options": null,
            "Config": [
                {
                    "Subnet": "10.32.0.0/12"
                }
            ]
        },
        "Internal": false,
        "Attachable": false,
        "Ingress": false,
        "ConfigFrom": {
            "Network": ""
        },
        "ConfigOnly": false,
        "Containers": {},
        "Options": {
            "works.weave.multicast": "true"
        },
        "Labels": {}
    }
]
子网为10.32.0.0/12
10.32.0.0/12是weave网络使用的默认subnet,如果此地址空间与现有IP冲突,可以通过--ipalloc-range分配特定的subnet
weave launch --ipalloc-range 10.2.0.0/16
不过请确保所有 host 都使用相同的 subnet。
[root@test-02 ~]# eval $(weave env)
[root@test-02 ~]# docker run --name testbox7 -itd busybox
3d7ff9b44596d362166986b9ebf45e0e838c05781ad8ac7c4142e87966faed4d
[root@test-02 ~]# docker exec -it testbox7 ip a
1: lo: <LOOPBACK,UP,LOWER_UP> mtu 65536 qdisc noqueue qlen 1000
    link/loopback 00:00:00:00:00:00 brd 00:00:00:00:00:00
    inet 127.0.0.1/8 scope host lo
       valid_lft forever preferred_lft forever
40: eth0@if41: <BROADCAST,MULTICAST,UP,LOWER_UP,M-DOWN> mtu 1500 qdisc noqueue
    link/ether 02:42:0a:02:59:02 brd ff:ff:ff:ff:ff:ff
    inet 10.2.89.2/24 brd 10.2.89.255 scope global eth0
       valid_lft forever preferred_lft forever
42: ethwe@if43: <BROADCAST,MULTICAST,UP,LOWER_UP,M-DOWN> mtu 1376 qdisc noqueue
    link/ether ae:ed:41:c0:81:c1 brd ff:ff:ff:ff:ff:ff
    inet 10.32.0.1/12 brd 10.47.255.255 scope global ethwe
       valid_lft forever preferred_lft forever
注意一定要eval $(weave env),这样才会将后续的请求发到weave-proxy处理,如果要恢复之前的环境,可执行eval $(weave env --restore)
可以看到有eth0和ethwe两个接口,eth0是使用的默认的bridge网络,另一是ethwe,可以看一下host的43编号的网卡
[root@test-02 ~]# ip link | grep 43 -A 1
43: vethwepl6429@if42: <BROADCAST,MULTICAST,UP,LOWER_UP> mtu 1376 qdisc noqueue master weave state UP mode DEFAULT group default
    link/ether ce:b0:3f:c3:2b:42 brd ff:ff:ff:ff:ff:ff link-netnsid 0
vethwepl6429和ethwe是一对veth pair
[root@test-02 ~]# brctl show
bridge name bridge id       STP enabled interfaces
docker0     8000.02423e53673b   no      veth4700b40
docker_gwbridge     8000.0242675d954a   no
weave       8000.fa35189ca5db   no      vethwe-bridge
                                        vethwepl6429
而vethwepl6429挂在网桥weave上,而除了vethwepl6429还有一个vethwe-bridge
[root@test-02 ~]# ip -d link
③  25: datapath: <BROADCAST,MULTICAST,UP,LOWER_UP> mtu 1376 qdisc noqueue state UNKNOWN mode DEFAULT group default qlen 1000
    link/ether c2:36:e2:0f:9d:fa brd ff:ff:ff:ff:ff:ff promiscuity 1
    openvswitch addrgenmode eui64 numtxqueues 1 numrxqueues 1 gso_max_size 65536 gso_max_segs 65535
27: weave: <BROADCAST,MULTICAST,UP,LOWER_UP> mtu 1376 qdisc noqueue state UP mode DEFAULT group default qlen 1000
    link/ether fa:35:18:9c:a5:db brd ff:ff:ff:ff:ff:ff promiscuity 0
    bridge forward_delay 1500 hello_time 200 max_age 2000 ageing_time 30000 stp_state 0 priority 32768 vlan_filtering 0 vlan_protocol 802.1Q bridge_id 8000.fa:35:18:9c:a5:db designated_root 8000.fa:35:18:9c:a5:db root_port 0 root_path_cost 0 topology_change 0 topology_change_detected 0 hello_timer    0.00 tcn_timer    0.00 topology_change_timer    0.00 gc_timer  124.84 vlan_default_pvid 1 vlan_stats_enabled 0 group_fwd_mask 0 group_address 01:80:c2:00:00:00 mcast_snooping 1 mcast_router 1 mcast_query_use_ifaddr 0 mcast_querier 0 mcast_hash_elasticity 4 mcast_hash_max 512 mcast_last_member_count 2 mcast_startup_query_count 2 mcast_last_member_interval 100 mcast_membership_interval 26000 mcast_querier_interval 25500 mcast_query_interval 12500 mcast_query_response_interval 1000 mcast_startup_query_interval 3125 mcast_stats_enabled 0 mcast_igmp_version 2 mcast_mld_version 1 nf_call_iptables 0 nf_call_ip6tables 0 nf_call_arptables 0 addrgenmode eui64 numtxqueues 1 numrxqueues 1 gso_max_size 65536 gso_max_segs 65535
28: dummy0: <BROADCAST,NOARP> mtu 1500 qdisc noop state DOWN mode DEFAULT group default qlen 1000
    link/ether 12:55:44:9a:b2:0f brd ff:ff:ff:ff:ff:ff promiscuity 0
    dummy addrgenmode eui64 numtxqueues 1 numrxqueues 1 gso_max_size 65536 gso_max_segs 65535
②  30: vethwe-datapath@vethwe-bridge: <BROADCAST,MULTICAST,UP,LOWER_UP> mtu 1376 qdisc noqueue master datapath state UP mode DEFAULT group default
    link/ether ce:f9:04:85:6c:9c brd ff:ff:ff:ff:ff:ff promiscuity 1
    veth
    openvswitch_slave addrgenmode eui64 numtxqueues 1 numrxqueues 1 gso_max_size 65536 gso_max_segs 65535
①  31: vethwe-bridge@vethwe-datapath: <BROADCAST,MULTICAST,UP,LOWER_UP> mtu 1376 qdisc noqueue master weave state UP mode DEFAULT group default
    link/ether 26:d1:dc:83:a2:d5 brd ff:ff:ff:ff:ff:ff promiscuity 1
    veth
    bridge_slave state forwarding priority 32 cost 2 hairpin off guard off root_block off fastleave off learning on flood on port_id 0x8001 port_no 0x1 designated_port 32769 designated_cost 0 designated_bridge 8000.fa:35:18:9c:a5:db designated_root 8000.fa:35:18:9c:a5:db hold_timer    0.00 message_age_timer    0.00 forward_delay_timer    0.00 topology_change_ack 0 config_pending 0 proxy_arp off proxy_arp_wifi off mcast_router 1 mcast_fast_leave off mcast_flood on addrgenmode eui64 numtxqueues 1 numrxqueues 1 gso_max_size 65536 gso_max_segs 65535
④  39: vxlan-6784: <BROADCAST,MULTICAST,UP,LOWER_UP> mtu 65520 qdisc noqueue master datapath state UNKNOWN mode DEFAULT group default qlen 1000
    link/ether f6:8e:fd:a8:9c:ea brd ff:ff:ff:ff:ff:ff promiscuity 1
    vxlan id 0 srcport 0 0 dstport 6784 nolearning ageing 300 udpcsum noudp6zerocsumtx udp6zerocsumrx external
    openvswitch_slave addrgenmode eui64 numtxqueues 1 numrxqueues 1 gso_max_size 65536 gso_max_segs 65535
41: veth4700b40@if40: <BROADCAST,MULTICAST,UP,LOWER_UP> mtu 1500 qdisc noqueue master docker0 state UP mode DEFAULT group default
    link/ether 0e:fb:b9:ac:11:ee brd ff:ff:ff:ff:ff:ff link-netnsid 0 promiscuity 1
    veth
    bridge_slave state forwarding priority 32 cost 2 hairpin off guard off root_block off fastleave off learning on flood on port_id 0x8001 port_no 0x1 designated_port 32769 designated_cost 0 designated_bridge 8000.2:42:3e:53:67:3b designated_root 8000.2:42:3e:53:67:3b hold_timer    0.00 message_age_timer    0.00 forward_delay_timer    0.00 topology_change_ack 0 config_pending 0 proxy_arp off proxy_arp_wifi off mcast_router 1 mcast_fast_leave off mcast_flood on addrgenmode eui64 numtxqueues 1 numrxqueues 1 gso_max_size 65536 gso_max_segs 65535
43: vethwepl6429@if42: <BROADCAST,MULTICAST,UP,LOWER_UP> mtu 1376 qdisc noqueue master weave state UP mode DEFAULT group default
    link/ether ce:b0:3f:c3:2b:42 brd ff:ff:ff:ff:ff:ff link-netnsid 0 promiscuity 1
    veth
    bridge_slave state forwarding priority 32 cost 2 hairpin on guard off root_block off fastleave off learning on flood on port_id 0x8002 port_no 0x2 designated_port 32770 designated_cost 0 designated_bridge 8000.fa:35:18:9c:a5:db designated_root 8000.fa:35:18:9c:a5:db hold_timer    0.00 message_age_timer    0.00 forward_delay_timer    0.00 topology_change_ack 0 config_pending 0 proxy_arp off proxy_arp_wifi off mcast_router 1 mcast_fast_leave off mcast_flood on addrgenmode eui64 numtxqueues 1 numrxqueues 1 gso_max_size 65536 gso_max_segs 65535
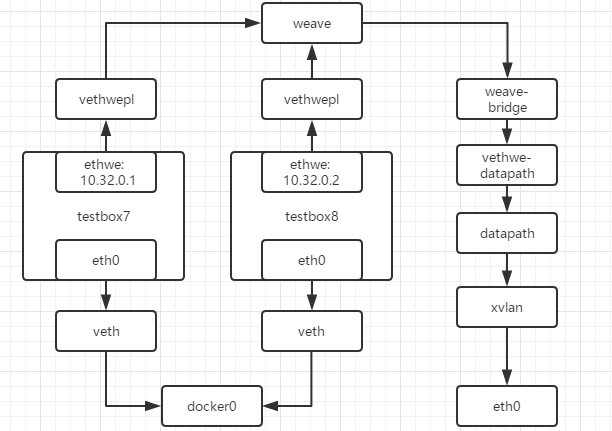
可以看到新增了很多网络
出现了多个新 interface:
- vethwe-bridge与vethwe-datapath是veth pair
- vethwe-datapath 的父设备(master)是datapath
- datapath是一个openvswitch
- vxlan-6784是 vxlan interface,其master也是datapath,weave主机间是通过VxLAN通信的
weave网络包含两个虚拟交换机:Linux bridge weave和Open vSwitch datapath
- veth pair将vethwe-bridge和vethwe-datapath二者连接在一起
- weave和datapath 分工不同,weave负责将容器接入weave网络
- datapath负责在主机间VxLAN隧道中并收发数据
[root@test-02 ~]# docker run --name testbox8 -itd busybox
274ac1b1c20684f70dc29030865befa16f0e500635024cf31cdba3459f05f9aa
[root@test-02 ~]# docker exec testbox08 hostname
testbox08.weave.local
[root@test-02 ~]# docker exec testbox08 ping -c 2 testbox7
PING testbox7 (10.32.0.1): 56 data bytes
64 bytes from 10.32.0.1: seq=0 ttl=64 time=0.133 ms
64 bytes from 10.32.0.1: seq=1 ttl=64 time=0.106 ms

--- testbox7 ping statistics ---
2 packets transmitted, 2 packets received, 0% packet loss
round-trip min/avg/max = 0.106/0.119/0.133 ms
网络图如下所示
weave网络的连通性和隔离性
[root@test-03 ~]# weave launch 172.27.0.2
这里必须指定test-02的IP,这样才能加入同一个weave网络
[root@test-03 ~]# docker run --name testbox9 -itd busybox
3de24b20762c147ea0d7ebfc100440b34c99d1da025fb0d049e3bd8447cb2143
[root@test-03 ~]# docker exec testbox9 ping -c 2 testbox8
PING testbox08 (10.32.0.2): 56 data bytes
64 bytes from 10.32.0.2: seq=0 ttl=64 time=2.105 ms
64 bytes from 10.32.0.2: seq=1 ttl=64 time=0.515 ms

--- testbox8 ping statistics ---
2 packets transmitted, 2 packets received, 0% packet loss
round-trip min/avg/max = 0.515/1.310/2.105 ms
[root@test-03 ~]# docker exec testbox09 ping -c 2 testbox7
PING testbox7 (10.32.0.1): 56 data bytes
64 bytes from 10.32.0.1: seq=0 ttl=64 time=1.691 ms
64 bytes from 10.32.0.1: seq=1 ttl=64 time=0.642 ms

--- testbox7 ping statistics ---
2 packets transmitted, 2 packets received, 0% packet loss
round-trip min/avg/max = 0.642/1.166/1.691 ms
[root@test-03 ~]# docker exec testbox9 ip a
1: lo: <LOOPBACK,UP,LOWER_UP> mtu 65536 qdisc noqueue qlen 1000
    link/loopback 00:00:00:00:00:00 brd 00:00:00:00:00:00
    inet 127.0.0.1/8 scope host lo
       valid_lft forever preferred_lft forever
27: eth0@if28: <BROADCAST,MULTICAST,UP,LOWER_UP,M-DOWN> mtu 1500 qdisc noqueue
    link/ether 02:42:0a:02:0c:02 brd ff:ff:ff:ff:ff:ff
    inet 10.2.12.2/24 brd 10.2.12.255 scope global eth0
       valid_lft forever preferred_lft forever
29: ethwe@if30: <BROADCAST,MULTICAST,UP,LOWER_UP,M-DOWN> mtu 1376 qdisc noqueue
    link/ether c2:94:01:c7:f3:82 brd ff:ff:ff:ff:ff:ff
    inet 10.44.0.0/12 brd 10.47.255.255 scope global ethwe
       valid_lft forever preferred_lft forever
可以看到三个容器的IP地址为10.32.0.1,10.32.0.2和10.44.0.0,都是在10.32.0.0网段,主机之间通过vxlan进行通信
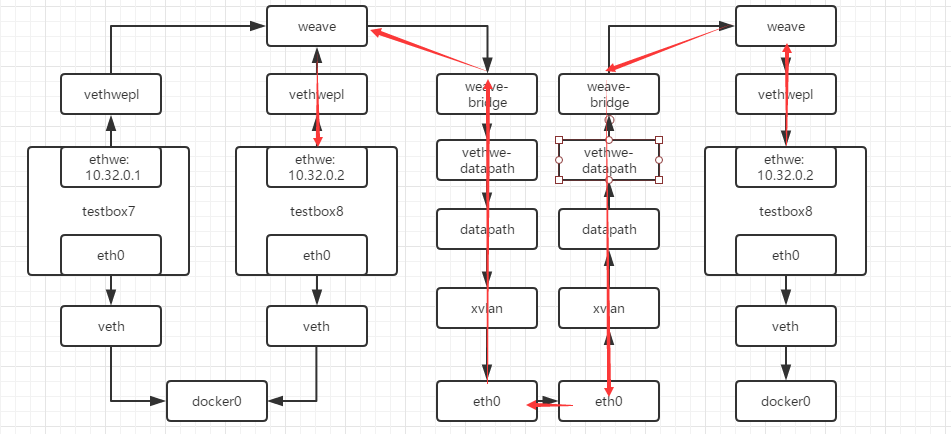
[root@test-03 ~]# docker exec testbox9 ip r
default via 10.2.12.1 dev eth0
10.2.12.0/24 dev eth0 scope link  src 10.2.12.2
10.32.0.0/12 dev ethwe scope link  src 10.44.0.0
224.0.0.0/4 dev ethwe scope link
- 可以看到发往10.32.0.0/12网段的都发送到10.44.0.0,即ethwe网卡
- 主机的weave查询目的主机,将数据发送给test-02
- test-02上的weave收到数据,将数据发送给对应容器
默认配置下,weave使用一个大subnet(例如 10.32.0.0/12),所有主机的容器都从这个地址空间中分配IP,因为同属一个 subnet,容器可以直接通信。如果要实现网络隔离,可以通过环境变量WEAVE_CIDR为容器分配不同subnet的IP
[root@test-03 ~]# docker run -e WEAVE_CIDR=net:10.32.2.0/24 --name testbox10 -it busybox
/ # ip r
default via 10.2.12.1 dev eth0
10.2.12.0/24 dev eth0 scope link  src 10.2.12.3
10.32.2.0/24 dev ethwe scope link  src 10.32.2.129
224.0.0.0/4 dev ethwe scope link
/ # ping -c 2 testbox7
PING testbox7 (10.32.0.1): 56 data bytes

--- testbox7 ping statistics ---
2 packets transmitted, 0 packets received, 100% packet loss
10.32.2.0/24和10.32.0.0/12不在一个subnet,所以就不会ping通了,当然也可以为容器分配指定IP
docker run -e WEAVE_CIDR=ip:10.32.2.100/24 --name testbox11 -it busybox
weave与外网联通
weave是一个私有的VxLAN网络,默认与外部网络隔离,外部网络不能正常访问
因为容器也绑定在docker0网卡上的,可以直接通过端口映射的方式启动
需要按照以下步骤进行操作
- 将主机加入到 weave 网络
- 然后把主机当作访问 weave 网络的网关
[root@test-02 ~]# docker exec testbox7 ping -c 2 www.baidu.com
PING www.baidu.com (180.97.33.108): 56 data bytes
64 bytes from 180.97.33.108: seq=0 ttl=50 time=33.922 ms
64 bytes from 180.97.33.108: seq=1 ttl=50 time=33.912 ms

--- www.baidu.com ping statistics ---
2 packets transmitted, 2 packets received, 0% packet loss
round-trip min/avg/max = 33.912/33.917/33.922 ms
访问外网是没有问题的
将主机绑定到weave上
[root@test-02 ~]# weave expose
10.32.0.3
[root@test-02 ~]# ip addr show weave
27: weave: <BROADCAST,MULTICAST,UP,LOWER_UP> mtu 1376 qdisc noqueue state UP group default qlen 1000
    link/ether fa:35:18:9c:a5:db brd ff:ff:ff:ff:ff:ff
    inet 10.32.0.3/12 brd 10.47.255.255 scope global weave
       valid_lft forever preferred_lft forever
然后网络结构就变成了
[root@test-02 ~]# ping -c 2 10.32.0.1
PING 10.32.0.1 (10.32.0.1) 56(84) bytes of data.
64 bytes from 10.32.0.1: icmp_seq=1 ttl=64 time=0.118 ms
64 bytes from 10.32.0.1: icmp_seq=2 ttl=64 time=0.110 ms

--- 10.32.0.1 ping statistics ---
2 packets transmitted, 2 received, 0% packet loss, time 1000ms
rtt min/avg/max/mdev = 0.110/0.114/0.118/0.004 ms
[root@test-02 ~]# ping -c 2 10.44.0.0
PING 10.44.0.0 (10.44.0.0) 56(84) bytes of data.
64 bytes from 10.44.0.0: icmp_seq=1 ttl=64 time=1.41 ms
64 bytes from 10.44.0.0: icmp_seq=2 ttl=64 time=1.07 ms

--- 10.44.0.0 ping statistics ---
2 packets transmitted, 2 received, 0% packet loss, time 1001ms
rtt min/avg/max/mdev = 1.078/1.245/1.412/0.167 ms
让非weave主机访问到容器,就需要将网关指向test-02
[root@test-01 ~]# ip route add 10.32.0.0/12 via 172.27.0.2
Calico
Calico是一个纯三层的虚拟网络方案,Calico为每个容器分配一个IP,每个host都是router,把不同host的容器连接起来。
与VxLAN不同的是,Calico不对数据包做额外封装,不需要NAT和端口映射,扩展性和性能都很好。
与其他容器网络方案相比,Calico还有一大优势:network policy。用户可以动态定义ACL规则,控制进出容器的数据包,实现业务需求。
Calico依赖etcd在不同主机间共享和交换信息,存储Calico网络状态 Calico网络中的每个主机都需要运行Calico组件,提供容器interface管理、动态路由、动态ACL、报告状态等功能
环境准备
安装并启动etcd
[root@test-01 ~]# etcd -listen-client-urls http://172.27.0.16:2379 -advertise-client-urls http://172.27.0.16:2379 &
修改docker配置
[root@test-02 ~]# vi /etc/systemd/system/docker.service.d/10-machine.conf
[Service]
ExecStart=
ExecStart=/usr/bin/dockerd -H tcp://0.0.0.0:2376 -H unix:///var/run/docker.sock --storage-driver overlay2 --tlsverify --tlscacert /etc/docker/ca.pem --tlscert /etc/docker/server.pem --tlskey /etc/docker/server-key.pem --label provider=generic --cluster-store=etcd://172.27.0.16:2379
Environment=
[root@test-02 ~]# systemctl daemon-reload
[root@test-02 ~]# systemctl restart docker.service
安装calico
安装calico
[root@test-02 ~]# wget -O /usr/local/bin/calicoctl https://github.com/projectcalico/calicoctl/releases/download/v1.0.2/calicoctl
[root@test-02 ~]# chmod +x  /usr/local/bin/calicoctl
配置calico
[root@test-02 ~]# mkdir /etc/calico/
[root@test-02 ~]# vi /etc/calico/calicoctl.cfg
apiVersion: v1
kind: calicoApiConfig
metadata:
spec:
  datastoreType: "etcdv2"
  etcdEndpoints: http://172.27.0.16:2379
/etc/calico/calicoctl.cfg是calicoctl node run的默认启动配置文件
[root@test-03 ~]# calicoctl node run
Running command to load modules: modprobe -a xt_set ip6_tables
Enabling IPv4 forwarding
Enabling IPv6 forwarding        ①
Increasing conntrack limit
Removing old calico-node container (if running).
Running the following command to start calico-node:

docker run --net=host --privileged --name=calico-node -d --restart=always -e CALICO_NETWORKING_BACKEND=bird -e NO_DEFAULT_POOLS= -e CALICO_LIBNETWORK_ENABLED=true -e CALICO_LIBNETWORK_IFPREFIX=cali -e ETCD_ENDPOINTS=http://172.27.0.14:2379 -e ETCD_AUTHORITY= -e ETCD_SCHEME= -e NODENAME=test-03 -v /var/log/calico:/var/log/calico -v /run/docker/plugins:/run/docker/plugins -v /var/run/docker.sock:/var/run/docker.sock -v /var/run/calico:/var/run/calico -v /lib/modules:/lib/modules calico/node:v1.0.2         ②

Image may take a short time to download if it is not available locally.
Container started, checking progress logs.
Waiting for etcd connection...      ③
Using auto-detected IPv4 address: 172.27.0.5
No IPv6 address configured
Using global AS number
Calico node name:  test-03
CALICO_LIBNETWORK_ENABLED is true - start libnetwork service
Calico node started successfully            ④
- 设置主机网络,例如
enable IP forwarding。 - 下载并启动
calico-node容器,calico会以容器的形式运行 - 连接
etcd。 calico启动成功。
创建calico网络
[root@test-02 ~]# docker network create --driver calico --ipam-driver calico-ipam cal_net1
a17f33c2c253a82b2719933a51cabca4428513ca7f31b1cd49717f06c0f7702d
--driver calico指定使用calico的libnetwork CNM driver--ipam-driver calico-ipam指定使用calico的IPAM driver管理IP
calico为global网络,etcd会将cal_net同步到所有主机
[root@test-02 ~]# docker network ls
NETWORK ID          NAME                DRIVER              SCOPE
1e01f7b5a99f        bridge              bridge              local
a17f33c2c253        cal_net1            calico              global
759b03fcbba2        host                host                local
3244f9053db2        none                null                local
启动calico网络上的容器
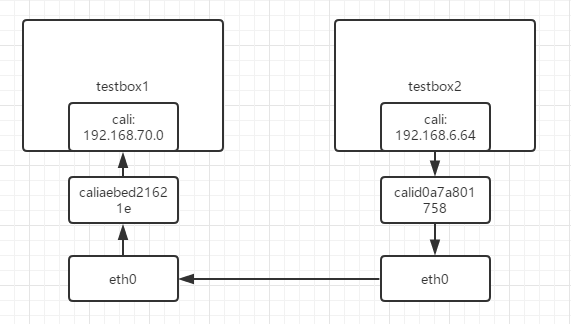
[root@test-02 ~]# docker run -itd --name testbox1 --net cal_net1 busybox
[root@test-02 ~]# docker exec testbox1 ip a
1: lo: <LOOPBACK,UP,LOWER_UP> mtu 65536 qdisc noqueue qlen 1000
link/loopback 00:00:00:00:00:00 brd 00:00:00:00:00:00
inet 127.0.0.1/8 scope host lo
valid_lft forever preferred_lft forever
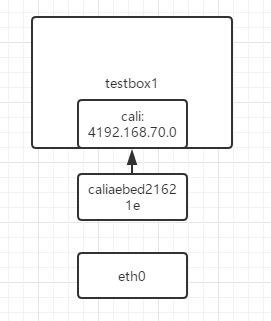
4: cali0@if5: <BROADCAST,MULTICAST,UP,LOWER_UP,M-DOWN> mtu 1500 qdisc noqueue
link/ether ee:ee:ee:ee:ee:ee brd ff:ff:ff:ff:ff:ff
inet 192.168.70.0/32 brd 192.168.70.0 scope global cali0
valid_lft forever preferred_lft forever
对应主机上编号为5的主机
[root@test-02 ~]# ip link  | grep '5: ' -A 1
5: caliaebed21621e@if4: <BROADCAST,MULTICAST,UP,LOWER_UP> mtu 1500 qdisc noqueue state UP mode DEFAULT group default
    link/ether ee:cf:ee:40:0d:1e brd ff:ff:ff:ff:ff:ff link-netnsid 0
查看一下本机路由
[root@test-02 ~]# ip route
default via 172.27.0.1 dev eth0
169.254.0.0/16 dev eth0 scope link metric 1002
172.17.0.0/16 dev docker0 proto kernel scope link src 172.17.0.1
172.27.0.0/20 dev eth0 proto kernel scope link src 172.27.0.9
192.168.70.0 dev caliaebed21621e scope link
blackhole 192.168.70.0/26 proto bird
发往192.168.70.0的数据都会发往caliaebed21621e,往caliaebed21621e和cali0是一对veth pair
网络图
在test-03上不需要创建网络,直接启动容器
[root@test-03 ~]# docker network ls
NETWORK ID          NAME                DRIVER              SCOPE
cd7317bb43c9        bridge              bridge              local
a17f33c2c253        cal_net1            calico              global
82f5b4ea2127        host                host                local
550c17dcdb44        none                null                local
[root@test-03 ~]# docker container run --net cal_net1 --name testbox2 -tid busybox
fe7d7018f9caf842d524186f011f068da3ed19bf5c551f24c68f9e84e3e8b2a4
[root@test-03 ~]# docker exec testbox2 ip a
1: lo: <LOOPBACK,UP,LOWER_UP> mtu 65536 qdisc noqueue qlen 1000
    link/loopback 00:00:00:00:00:00 brd 00:00:00:00:00:00
    inet 127.0.0.1/8 scope host lo
       valid_lft forever preferred_lft forever
4: cali0@if5: <BROADCAST,MULTICAST,UP,LOWER_UP,M-DOWN> mtu 1500 qdisc noqueue
    link/ether ee:ee:ee:ee:ee:ee brd ff:ff:ff:ff:ff:ff
    inet 192.168.6.64/32 brd 192.168.6.64 scope global cali0
       valid_lft forever preferred_lft forever
查看一下本机的路由
[root@test-03 ~]# ip route
default via 172.27.0.1 dev eth0
169.254.0.0/16 dev eth0 scope link metric 1002
172.17.0.0/16 dev docker0 proto kernel scope link src 172.17.0.1
172.27.0.0/20 dev eth0 proto kernel scope link src 172.27.0.17
192.168.6.64 dev calia43ebdcd113 scope link
blackhole 192.168.6.64/26 proto bird
192.168.70.0/26 via 172.27.0.9 dev eth0 proto bird
可以看到本机增加了到testbox1(192.168.70.0/26)的路由和到本机上testbox2(192.168.6.64)的路由
[root@test-02 ~]# ip route
default via 172.27.0.1 dev eth0
169.254.0.0/16 dev eth0 scope link metric 1002
172.17.0.0/16 dev docker0 proto kernel scope link src 172.17.0.1
172.27.0.0/20 dev eth0 proto kernel scope link src 172.27.0.9
192.168.6.64/26 via 172.27.0.17 dev eth0 proto bird
192.168.70.0 dev caliaebed21621e scope link
blackhole 192.168.70.0/26 proto bird
test-02上也多了一条路由
calico网络连通性
[root@test-03 ~]# docker exec testbox2 ping -c 2 testbox1
PING testbox1 (192.168.70.1): 56 data bytes
64 bytes from 192.168.70.1: seq=0 ttl=63 time=0.110 ms
64 bytes from 192.168.70.1: seq=1 ttl=63 time=0.099 ms

--- testbox1 ping statistics ---
2 packets transmitted, 2 packets received, 0% packet loss
round-trip min/avg/max = 0.099/0.104/0.110 ms
默认是可以ping通
- 根据testbox2的路由表,将数据包从cal0发出。
- 数据经过veth pair到达test-03,查看路由表,数据由eth0发给 host2(192.168.56.105)。 192.168.70.0/26 via 172.27.0.9 dev eth0 proto bird
- host2收到数据包,根据路由表发送给calic8bf9e68397,进而通过 veth pair cali0 到达 bbox2。 192.168.70.1 dev calid0a7a801758 scope link
不同calico网络之间的连通性
docker network create --driver calico --ipam-driver calico-ipam cal_net2
docker container run --net cal_net2 --name testbox3 -tid busybox
指定测试连通性
docker exec testbox3 ping -c 2 testbox1
虽然位于同一个host,而且网络相同,但是属于不同的calico网络,默认是不通的
- calico默认的policy规则是:容器只能与同一个calico网络中的容器通信
- calico的每个网络都有一个同名的profile,profile中定义了该网络的policy
查看cal_net1的profile
[root@test-02 ~]# calicoctl get profile cal_net1 -o yaml
- apiVersion: v1
  kind: profile
  metadata:
    name: cal_net1      ①
    tags:
    - cal_net1          ②
  spec:
    egress:
    - action: allow     ③
      destination: {}
      source: {}
    ingress:            ④
    - action: allow
      destination: {}
      source:
        tag: cal_net1
- 命名为
cal_net1,这就是calico网络cal_net1的profile。 - 为profile添加一个tag为
cal_net1。注意,这个tag虽然也叫cal_net1,其实可以随便设置,这跟上面的name: cal_net1没有任何关系。 - egress对从容器发出的数据包进行控制,当前没有任何限制。
- ingress对进入容器的数据包进行限制,当前设置是接收来自
tag cal_net1的容器,实际上就是只接收本网络的数据包,这也进一步解释了前面的实验结果
既然这是默认policy,那就有方法定制policy,这也是calico较其他网络方案最大的特性。
定制calico policy
创建cal_web
docker network create --driver calico --ipam-driver calico-ipam cal_web
创建网络上的容器
docker container run --net cal_web --name web1 -d httpd
目前两个网络之间无法访问
创建policy文件web.yml
- apiVersion: v1
  kind: profile
  metadata:
    name: cal_web       ①
  spec:
    ingress:
    - action: allow
      protocol: tcp
      source:
        tag: cal_net2       ②
      destination:
        ports:
        - 80        ③
- profile与
cal_web网络同名,cal_web的所有容器都会应用此profile中的policy - ingress允许
cal_net2中的容器访问 - 只开放80端口
应用该policy
calicoctl apply -f web.yml
再进行访问
http://docs.projectcalico.org/v2.0/reference/calicoctl/resources/policy
更多可以参考官网
定制calico ip池
定义一个IP Pool
cat << EOF | calicoctl create -f -
- apiVersion: v1
 kind: ipPool
 metadata:
   cidr: 17.2.0.0/16
EOF
用此IP Pool创建calico网络
docker network create --driver calico --ipam-driver calico-ipam --subnet=17.2.0.0/16 my_net
创建容器
docker run --net my_net -ti busybox
指定IP地址
docker run --net my_net --ip 17.2.2.2 -ti busybox
https://www.cnblogs.com/netonline/p/9720279.html
网络选型
考虑的点
- 网络模型 采用何种网络模型支持
multi-host网络? - 分布式存储 是否需要
etcd或consul这类分布式key-value数据库存储网络信息? - IPMA 如何管理容器网络的 IP?
- 连通与隔离 提供怎样的网络连通性?支持容器间哪个级别和哪个类型的隔离?
- 性能 性能比较。
| \ | Docker Overlay | macvlan | Flannel vxlan | Flannel host-gw | weave | calico | |
|---|---|---|---|---|---|---|---|
| 网络模型 | Overlay:vxlan | underlay | Overlay:vxlan | 三层underlay | Overlay:vxlan | 三层underlay | |
| 分布式存储 | Yes | No | Yes | Yes | Yes | No | Yes |
| IPAM | 单一subnet | 自定义,需要用户进行管理IP | 每个host一个subnet | 每个host一个subnet | 单一subnet | 每个host一个subnet | |
| 连通与隔离 | 同一网络容器可以通信,跨网络需要加入网络,与外网通信使用docker_gwbridge | 网络的连通或隔离完全取决于二层VLAN和三层路由 | 网络内容器可以进行通信,没有隔离,与外网通信通过bridge | 同一网络可以通信,与外网通信通过bridge | 同一网络容器可以通信,Policy可以进行访问控制 |
对于性能,可能需要对不同的场景来进行比较了
不过Underlay网络性能优于Overlay网络,而Overlay较Underlay可以支持更多的二层网段,能更好地利用已有网络,以及有避免物理交换机MAC表耗尽等优势
网络利用隧道技术,将数据包封装到UDP中进行传输。因为涉及数据包的封装和解封,存在额外的CPU和网络开销。虽然几乎所有Overlay网络方案底层都采用Linux kernel的vxlan模块,这样可以尽量减少开销,但这个开销与Underlay网络相比还是存在的。所以Macvlan、Flannel host-gw、Calico的性能会优于Docker overlay、Flannel vxlan和Weave。

