

镜像与容器
目录:
Docker镜像
最小的Docker镜像
$ docker pull hello-world
Using default tag: latest
latest: Pulling from library/hello-world
d1725b59e92d: Pull complete
Digest: sha256:0add3ace90ecb4adbf7777e9aacf18357296e799f81cabc9fde470971e499788
Status: Downloaded newer image for hello-world:latest
查看一下大小
$  docker images hello-world
REPOSITORY          TAG                 IMAGE ID            CREATED             SIZE
hello-world         latest              4ab4c602aa5e        2 months ago        1.84kB
运行一下
$ docker run hello-world

Hello from Docker!
This message shows that your installation appears to be working correctly.

To generate this message, Docker took the following steps:
 1. The Docker client contacted the Docker daemon.
 2. The Docker daemon pulled the "hello-world" image from the Docker Hub.
    (amd64)
 3. The Docker daemon created a new container from that image which runs the
    executable that produces the output you are currently reading.
 4. The Docker daemon streamed that output to the Docker client, which sent it
    to your terminal.

To try something more ambitious, you can run an Ubuntu container with:
 $ docker run -it ubuntu bash

Share images, automate workflows, and more with a free Docker ID:
 https://hub.docker.com/

For more examples and ideas, visit:
 https://docs.docker.com/get-started/
对应的dockerfile为
FROM scratch
COPY hello /
CMD ["/hello"]
连最基本的/usr,/lib等目录都没有
base镜像
base镜像的含义
- 不依赖其他镜像,从scratch构建
- 其他镜像可以之为基础进行扩展
$ docker pull centos
$ docker images centos
REPOSITORY          TAG                 IMAGE ID            CREATED             SIZE
centos              latest              75835a67d134        6 weeks ago         200MB
CentOS的镜像只有200MB
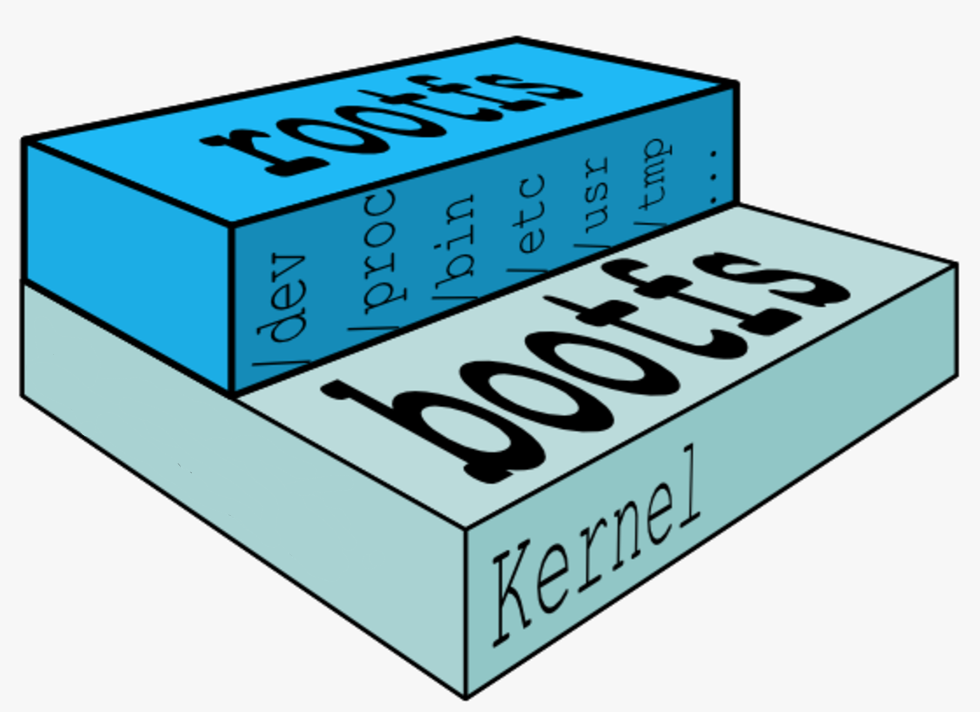
操作系统由内核空间(kernel的bootfs)和其上的用户空间(rootfs包含/etc,/usr,/lib等)等组成
rootfs
Linux刚启动的时候,会加载bootfs,之后bootfs被卸载。对于base镜像直接使用底层的kernel,自行提供rootfs。rootfs除了基本的组件,更多的组件可以省略,就可以精简rootfs了。
CentOS镜像的dockerfile
FROM scratch
ADD centos-7
CMD ["/bin/bash"]
ADD指令添加到镜像的tar包就是CentOS7的rootfs。在制作镜像时,这个tar包会自动解压到/目录下,生成/dev, /proc, /bin等目录
用户空间可以是不同的操作系统,但是使用的kernel版本都是宿主机的kernel版本
镜像分层
Docker支持通过扩展现有镜像,创建新的镜像
绝大多数镜像都是通过在base镜像中安装和配置需要的软件构建出来的。比如我们现在构建一个新的镜像
FORM debian
RUN apt-get install emacs
RUN apt-get install apaches
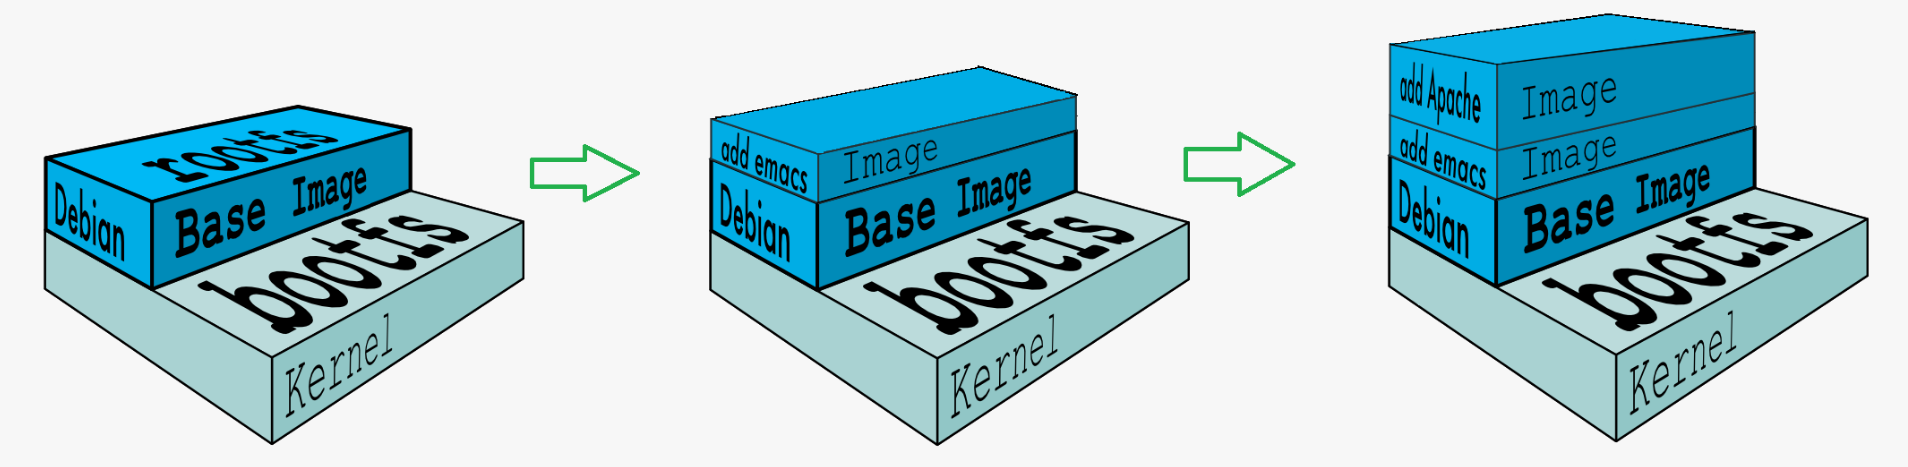
新镜像是从base镜像一层一层叠加生成的。每安装一个软件,就在现有镜像的基础上增加一层。
docker镜像这样做的好处就是共享资源,如果是多个镜像都由一个base镜像构建而来,那么主机上只需要保证有一份base镜像即可,内存中也加载一份base镜像,就可以为所有容器服务,而镜像的每个层可以进行共享。
可写的容器层
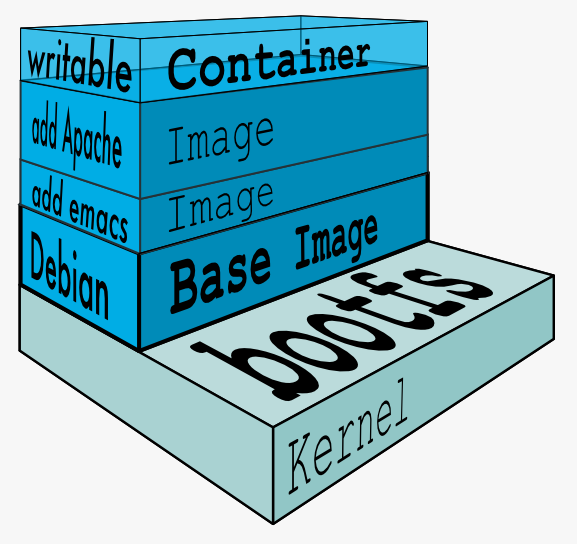
当容器启动时,一个新的可写层被加载到镜像的顶部。
这一层通常被称作容器层,容器层之下的都叫镜像层。就是容器的Copy-on-Write特性,所有对容器的改动,无论添加、删除、还是修改文件都只会发生在容器层中。
镜像层数量可能会很多,所有镜像层会联合在一起组成一个统一的文件系统。如果不同层中有一个相同路径的文件,比如/a,上层的/a会覆盖下层的/a,也就是说用户只能访问到上层中的文件/a。在容器层中,用户看到的是一个叠加之后的文件系统。
- 添加文件 在容器中创建文件时,新文件被添加到容器层中。
- 读取文件 在容器中读取某个文件时,Docker会从上往下依次在各镜像层中查找此文件。一旦找到,立即将其复制到容器层,然后打开并读入内存。
- 修改文件 在容器中修改已存在的文件时,Docker 会从上往下依次在各镜像层中查找此文件。一旦找到,立即将其复制到容器层,然后修改之。
- 删除文件 在容器中删除文件时,Docker 也是从上往下依次在镜像层中查找此文件。找到后,会在容器层中记录下此删除操作。
只有当需要修改时才复制一份数据,这种特性被称作Copy-on-Write。可见,容器层保存的是镜像变化的部分,不会对镜像本身进行任何修改。
这样就解释了我们前面提出的问题:容器层记录对镜像的修改,所有镜像层都是只读的,不会被容器修改,所以镜像可以被多个容器共享。
构建镜像
常用的镜像都已经被Docker官方或者组织创建镜像,可以直接稍作配置即可使用。
如果需要特殊的功能或者自己开发的应用程序则需要构建镜像
docker commit
创建新镜像最直观的方法,包含三个步骤
- 运行容器
- 修改容器
- 将容器保存为新的镜像
1.运行容器
$ docker images centos
2.修改容器
root@6dc5a846751f:/# echo test > /test.txt
root@6dc5a846751f:/# cat !$
cat /test.txt
test
3.保存为新镜像
$ docker ps -a
CONTAINER ID        IMAGE               COMMAND              CREATED             STATUS                     PORTS                NAMES
6dc5a846751f        ubuntu              "/bin/bash"          6 minutes ago       Exited (0) 7 seconds ago                        modest_keldysh
$ docker images
REPOSITORY          TAG                 IMAGE ID            CREATED             SIZE
ubuntu              latest              93fd78260bd1        3 days ago          86.2MB
httpd               latest              2a51bb06dc8b        7 days ago          132MB
centos              latest              75835a67d134        6 weeks ago         200MB
hello-world         latest              4ab4c602aa5e        2 months ago        1.84kB
$ docker commit modest_keldysh ubuntu-with-test
sha256:a11f50d537524c6325260e55a3e874503cdcc71a343474d1e86a1646785c0f69
$ docker images
REPOSITORY          TAG                 IMAGE ID            CREATED             SIZE
ubuntu-with-test    latest              a11f50d53752        4 seconds ago       86.2MB
ubuntu              latest              93fd78260bd1        3 days ago          86.2MB
httpd               latest              2a51bb06dc8b        7 days ago          132MB
centos              latest              75835a67d134        6 weeks ago         200MB
hello-world         latest              4ab4c602aa5e        2 months ago        1.84kB
可以看到提交的ubuntu-with-test镜像,docker ps -a看到的容器NAMES:modest_keldysh是docker随机生成的NAMES
验证一下启动的镜像
$ docker run -it ubuntu-with-test
root@90f243d22da9:/# cat  /test.txt
test
但是这样手工构建会有弊端,容易出错,效率低,可重复性差,所以不建议使用这种方式
Dockerfile构建镜像
Dockerfile内容
FROM ubuntu
RUN echo test > /test.txt
$ docker build -t ubuntu-with-test-dockerfile .   ①
Sending build context to Docker daemon  17.92kB   ②
Step 1/2 : FROM ubuntu      ③
 ---> 93fd78260bd1
Step 2/2 : RUN echo test > /test.txt    ④
 ---> Running in 773eef64fc1a   ⑤
Removing intermediate container 773eef64fc1a    ⑥
 ---> 1bfc60a32096
Successfully built 1bfc60a32096     ⑦
Successfully tagged ubuntu-with-test-dockerfile:latest      ⑧
- 运行docker build,使用
-t参数指定镜像名称为ubuntu-with-test-dockerfile,.指定build context为当前目录,docker会在这个目录查找Dockerfile,也可以通过-f指定Dockerfile位置 - 根据dockerfile中ADD和COPY等命令将
build context中的文件发送到docker daemon,为构建的镜像提供需要的目录和文件 - 执行FROM,将ubuntu作为base镜像,镜像ID为93fd78260bd1
- 执行RUN
- 启动773eef64fc1a的临时容器,在这里执行`echo test > /test.txt
- 将容器保存为镜像1bfc60a32096
- 成功构建镜像1bfc60a32096
- 镜像构建成功
$ docker history ubuntu-with-test-dockerfile
IMAGE               CREATED             CREATED BY                                      SIZE                COMMENT
1bfc60a32096        32 minutes ago      /bin/sh -c echo test > /test.txt                5B
93fd78260bd1        3 days ago          /bin/sh -c #(nop)  CMD ["/bin/bash"]            0B
<missing>           3 days ago          /bin/sh -c mkdir -p /run/systemd && echo 'do…   7B
<missing>           3 days ago          /bin/sh -c rm -rf /var/lib/apt/lists/*          0B
<missing>           3 days ago          /bin/sh -c set -xe   && echo '#!/bin/sh' > /…   745B
<missing>           3 days ago          /bin/sh -c #(nop) ADD file:39e5bc157a8be63bb…   86.2MB
$ docker history ubuntu
IMAGE               CREATED             CREATED BY                                      SIZE                COMMENT
93fd78260bd1        3 days ago          /bin/sh -c #(nop)  CMD ["/bin/bash"]            0B
<missing>           3 days ago          /bin/sh -c mkdir -p /run/systemd && echo 'do…   7B
<missing>           3 days ago          /bin/sh -c rm -rf /var/lib/apt/lists/*          0B
<missing>           3 days ago          /bin/sh -c set -xe   && echo '#!/bin/sh' > /…   745B
<missing>           3 days ago          /bin/sh -c #(nop) ADD file:39e5bc157a8be63bb…   86.2MB
使用docker history可以看到只不过在ubuntu镜像上多加了一个1bfc60a32096镜像层
镜像的缓存特性
Docker会缓存已有镜像的镜像层,构建新镜像时,如果某镜像层已经存在,就直接使用,无需重新创建。
更改Dockerfile
FROM ubuntu
RUN echo test > /test.txt
COPY testfile /
进行构建
$ docker build -t ubuntu-with-test-dockerfile-v2 .
Sending build context to Docker daemon  18.94kB
Step 1/3 : FROM ubuntu
 ---> 93fd78260bd1
Step 2/3 : RUN echo test > /test.txt
 ---> Using cache
 ---> 1bfc60a32096
Step 3/3 : COPY testfile /
 ---> 47c7394b2770
Successfully built 47c7394b2770
Successfully tagged ubuntu-with-test-dockerfile-v2:latest
希望在构建镜像时不使用缓存,可以在docker build命令中加上--no-cache参数
除了构建时使用缓存,Docker在下载镜像时也会使用。
debug Dockerfile
Dockerfile 构建镜像的过程:
- 从base镜像运行一个容器。
- 执行一条指令,对容器做修改。
- 执行类似
docker commit的操作,生成一个新的镜像层。 - Docker 再基于刚刚提交的镜像运行一个新容器。
- 重复2-4步,直到
Dockerfile中的所有指令执行完毕。
如果Dockerfile由于某种原因执行到某个指令失败了,我们也将能够得到前一个指令成功执行构建出的镜像,这对调试Dockerfile非常有帮助。我们可以运行最新的这个镜像,执行失败的命令,进而定位指令失败的原因
dockerfile指令
- FROM 指定
base镜像 - MAINTAINER 设置镜像的作者,可以是任意字符串
- COPY 将文件从
build context复制到镜像,支持两种形式:1.COPY src dest和2.COPY ["src", "dest"] - ADD 与COPY类似,从
build context复制文件到镜像。不同的是,如果 src 是归档文件(tar, zip, tgz, xz等),文件会被自动解压到dest - ENV 设置环境变量,环境变量可被后面的指令使用
- EXPOSE 指定容器中的进程会监听某个端口,Docker 可以将该端口暴露出来
- VOLUME 将文件或目录声明为 volume
- WORKDIR 为RUN, CMD, ENTRYPOINT, ADD或COPY指令设置镜像中的当前工作目录,目录不存在会创建
- RUN 在容器中运行指定的命令
- CMD 容器启动时运行指定的命令,Dockerfile中可以有多个CMD指令,但只有最后一个生效。CMD可以被
docker run之后的参数替换 - ENTRYPOINT 设置容器启动时运行的命令,Dockerfile中可以有多个ENTRYPOINT指令,但只有最后一个生效。CMD或
docker run之后的参数会被当做参数传递给ENTRYPOINT
Shell和Exec格式
- Shell格式
<instruction> <command>,例如RUN apt-get install python3 - Exec格式
<instruction> ["executable", "param1", "param2", ...],例如RUN ["apt-get", "install", "python3"]
shell格式底层会调用/bin/sh -c <command>, Exec格式直接调用<command>
对于以下dockerfile
ENV name Why
ENTRYPOINT echo "Hello, $name"
执行结果为Hello, Why,$name变量生效
ENV name Why
ENTRYPOINT ["/bin/echo", "Hello, $name"]
执行结果为Hello, $name, $name变量并没有生效,也需要这样修改一下ENTRYPOINT ["/bin/sh", "-c", "echo Hello, $name"]
RUN
对于RUN最好是连续写
实例RUN apt-get update && apt-get install -y git,这样就可以保证每次安装最新的包,而不是使用apt-get update的镜像层
另外多条RUN命令合成一条写有助于减小镜像体积
CMD和ENTRYPOINT
CMD
CMD指令允许用户指定容器的默认执行的命令,此命令会在容器启动且docker run没有指定其他命令时运行,如果docker run指定了其他命令,CMD指定的默认命令将被忽略,如果Dockerfile中有多个CMD指令,只有最后一个CMD有效。
CMD有三种格式
- Exec格式:
CMD ["executable","param1","param2"],CMD的推荐格式 - Shell格式:
CMD command param1 param2 CMD ["param1","param2"]为ENTRYPOINT提供额外的参数,此时ENTRYPOINT必须使用Exec格式。
对于Dockerfile为CMD echo "Hello world"
- 运行容器
docker run -it [image]将输出: - 但当后面加上一个命令,比如
docker run -it [image] /bin/bash,CMD 会被忽略掉,而执行/bin/bash
ENTRYPOINT
和CMD命令一样,不同的地方在于ENTRYPOINT不会被忽略,一定会被执行,即使运行docker run时指定了其他命令
ENTRYPOINT 有两种格式:
- Exec格式:
ENTRYPOINT ["executable", "param1", "param2"],这是ENTRYPOINT的推荐格式。 - Shell格式:
ENTRYPOINT command param1 param2
ENTRYPOINT的Exec格式用于设置要执行的命令及其参数,同时可通过CMD提供额外的参数
ENTRYPOINT中的参数始终会被使用,而CMD的额外参数可以在容器启动时动态替换掉。
示例以下Dockerfile
ENTRYPOINT ["/bin/echo", "Hello"]
CMD ["world"]
- 当容器通过
docker run -it [image]启动时,输出为:Hello world - 而如果通过
docker run -it [image] Why启动,则输出为:Hello Why
而shell格式会忽略任何CMD或者docker run提供的参数
对于需要启动为守护进程的自然就要使用ENTRYPOINT了,例如httpd,MySQL等
docker镜像命名
执行docker build命令时已经为镜像取了个名字,对应为docker的REPOSITORY,另外还有一个TAG为lasted
特定镜像的名字由两部分组成:repository和tag(都可以是任意字符串)
latest tag
latest其实并没有什么特殊的含义。当没指明镜像tag时,Docker会使用默认值latest,仅此而已。
Docker Hub上很多repository将latest作为最新稳定版本的别名,但这只是一种约定,而不是强制规定。
高效的版本命名方案
每个repository可以有多个Tag,而多个Tag可以对应同一个镜像。
Docker社区普遍的命名方案
- 如果发布了一个最新的镜像,
:latest,:1,:1.9,:1.9.1的Tag都可以对应到最新的镜像(v-1.9.1)上。 - 当发布更新的版本时,打
:latest,:1,:1.9,:1.9.2的Tag到镜像(v-1.9.2)上,这样:1.9.1的Tag还是在镜像(v-1.9.1)上 - 当发布v-2.0.0的镜像时,打
:latest,:2,:2.0,:2.0.0的Tag到镜像(v-2.0.0)上,:1,:1.9,:1.9.2的Tag还是在镜像(v-1.9.2)上,:1.9.1的Tag还是在镜像(v-1.9.1)上
这样做保证了:1总是指向v1里最新的镜像,:1.9种是指向v1.9里最新的镜像,而:latest总是指向最新的镜像。
Docker镜像仓库
公有镜像仓库
搭建私有镜像仓库
使用registry镜像构建私有镜像仓库
$ docker run -d -p 5000:5000 -v /myregistry:/var/lib/registry  registry:2
Unable to find image 'registry:2' locally
2: Pulling from library/registry
d6a5679aa3cf: Pull complete
ad0eac849f8f: Pull complete
2261ba058a15: Pull complete
f296fda86f10: Pull complete
bcd4a541795b: Pull complete
Digest: sha256:5a156ff125e5a12ac7fdec2b90b7e2ae5120fa249cf62248337b6d04abc574c8
Status: Downloaded newer image for registry:2
583d56f9a4e136d476cd1453269ad24e32eb063d212ee93e2041bfde770803f0
-d是后台启动容器-p将容器的5000端口映射到Host的5000端口。5000是registry服务端口-v将容器/var/lib/registry目录映射到Host的/myregistry,用于存放镜像数据
打标签
$ docker tag ubuntu-with-test-dockerfile-v2 127.0.0.1:5000/why/ubuntu-with-test-dockerfile-v2:v1
$ docker images
REPOSITORY                           TAG                 IMAGE ID            CREATED             SIZE
127.0.0.1:5000/why/ubuntu-with-test-dockerfile-v2   v1                  47c7394b2770        2 hours ago         86.2MB
默认会推送到docker.io
$ docker push 127.0.0.1:5000/why/ubuntu-with-test-dockerfile-v2:v1
The push refers to repository [127.0.0.1:5000/why/ubuntu-with-test-dockerfile-v2]
9029e4e295dc: Pushed
ce1207093baa: Pushed
b9b7103af585: Pushed
ca2991e4676c: Pushed
a768c3f3878e: Pushed
bc7f4b25d0ae: Pushed
v1: digest: sha256:ba75ce8c90631a2256d7367261fb6f6311422eda4f5d8935737afb5459cbf948 size: 1564
从本地仓库下载
$ docker pull 127.0.0.1:5000/why/ubuntu-with-test-dockerfile-v2:v1
v1: Pulling from why/ubuntu-with-test-dockerfile-v2
Digest: sha256:ba75ce8c90631a2256d7367261fb6f6311422eda4f5d8935737afb5459cbf948
Status: Image is up to date for 127.0.0.1:5000/why/ubuntu-with-test-dockerfile-v2:v1
镜像操作命令
- images 显示镜像列表
- history 显示镜像构建历史
- commit 从容器创建新镜像
- build 从Dockerfile构建镜像
- tag 给镜像打tag
- pull 从registry下载镜像
- push 将镜像上传到registry
- rmi 删除Docker host中的镜像
- search 搜索Docker Hub中的镜像
rmi
如果一个镜像对应了多个tag,只有当最后一个tag被删除时,镜像才被真正删除
$ docker images
REPOSITORY          TAG                 IMAGE ID            CREATED             SIZE
ubuntu              v1                  93fd78260bd1        6 days ago          86.2MB
ubuntu              v2                  93fd78260bd1        6 days ago          86.2MB
httpd               latest              2a51bb06dc8b        10 days ago         132MB
centos              latest              75835a67d134        6 weeks ago         200MB
registry            2                   2e2f252f3c88        2 months ago        33.3MB
hello-world         latest              4ab4c602aa5e        2 months ago        1.84kB
$ docker rmi ubuntu:v1
Untagged: ubuntu:v1
删除其中一个镜像,只是删除了其tag,镜像本身没有删除
$ docker images
REPOSITORY          TAG                 IMAGE ID            CREATED             SIZE
ubuntu              v2                  93fd78260bd1        6 days ago          86.2MB
httpd               latest              2a51bb06dc8b        10 days ago         132MB
centos              latest              75835a67d134        6 weeks ago         200MB
registry            2                   2e2f252f3c88        2 months ago        33.3MB
hello-world         latest              4ab4c602aa5e        2 months ago        1.84kB
当多个tag都被删除,整个镜像才会被删除
[root@VM_146_207_centos ~]# docker rmi ubuntu:v2
Untagged: ubuntu:v2
Untagged: ubuntu@sha256:6d0e0c26489e33f5a6f0020edface2727db9489744ecc9b4f50c7fa671f23c49
Deleted: sha256:93fd78260bd1495afb484371928661f63e64be306b7ac48e2d13ce9422dfee26
Deleted: sha256:1c8cd755b52d6656df927bc8716ee0905853fada7ca200e4e6954bd010e792bb
Deleted: sha256:9203aabb0b583c3cf927d2caf6ba5b11124b0a23f8d19afadb7b071049c3cf26
Deleted: sha256:32f84095aed5a2e947b12a3813f019fc69f159cb5c7eae5dad69b2d98ffbeca4
Deleted: sha256:bc7f4b25d0ae3524466891c41cefc7c6833c533e00ba80f8063c68da9a8b65fe
当镜像存在容器的时候,需要先删除容器才能删除镜像
$ docker rmi ubuntu-with-test:latest
Error response from daemon: conflict: unable to remove repository reference "ubuntu-with-test:latest" (must force) - container 90f243d22da9 is using its referenced image a11f50d53752
另外还需要注意的是,pull下来的镜像的latest的tag只是显示有,但是实际是没有的
search
可以获取有那些镜像,但是具体的Tag还是要通过浏览器来获取的
docker容器
运行容器
docker run是启动容器的方法,可以支持三种方式指定容器启动时执行的命令
- CMD命令
- ENTRYPOINT命令
- 在
docker run命令行中指定
示例使用run命令启动服务
$ docker run ubuntu pwd
/
通过docker container ls或者docker ps查看运行的容器
$ docker container ls
$ docker container ls -a
CONTAINER ID        IMAGE               COMMAND                  CREATED             STATUS                      PORTS                    NAMES
1859202789dd        ubuntu              "pwd"                    46 seconds ago      Exited (0) 44 seconds ago                            sleepy_galileo
对于未启动的容器可以通过加-a参数查看,容器已经退出了,状态为Exited
容器长期运行
容器的生命周期依赖于启动时执行的命令,只要该命令不结束,容器也就不会退出
$ docker run ubuntu /bin/bash -c "while true; do sleep 1; done"
打开另一个终端查看容器的状态
$ docker ps
CONTAINER ID        IMAGE               COMMAND                  CREATED             STATUS              PORTS                    NAMES
ae227df1f999        ubuntu              "/bin/bash -c 'while…"   5 minutes ago       Up 5 minutes                                 eager_bardeen
但是这样会占用一个终端,参数-d以后台方式启动容器
$ docker run -d ubuntu /bin/bash -c "while true; do sleep 1; done"
8b88e45136423fea3bbaedead6a06a2bd5b466e6aabea61b980e7075c1bee4dc
后台运行docker容器返回了一串字符,这是容器的ID
CONTAINER ID是容器的“短ID”,前面启动容器时返回的是“长ID”。短ID是长ID的前12个字符。NAMES字段显示容器的名字,在启动容器时可以通过--name参数显示地为容器命名,如果不指定,docker会自动为容器分配名字。
容器运行方式推荐
- 服务类容器以daemon的形式运行,对外提供服务。比如web,数据库等。通过
-d以后台方式启动这类容器是非常合适的 - 工具类容器通常给能我们提供一个临时的工作环境,通常以
run -it方式运行
进入容器
docker attach
$ docker attach 8b88e45136423fea3bbaedead6a06a2bd5b466e6aabea61b980e7075c1bee4dc
可通过Ctrl+p然后Ctrl+q组合键退出attach终端,但是我测试了也好使
docker exec
-it以交互模式打开pseudo-TTY,执行 bash,其结果就是打开了一个bash终端,通过exit退出
docker exec -it <container> bash|sh
nsenter通过容器pid
nsenter --target `docker inspect --format "{{.State.Pid}}" <container NAME>` --mount --uts --ipc --net --pid
三者的区别
- 所有attach到同一个容器,这些attach可以获得其他attach到这个容器的终端返回,一旦一个的attach夯住,其他的attach都夯住的,也就是说多个窗口attach到一个容器的时候,只能同时一个操作,没办法异步操作
- docker exec通过it绑定tty终端的方式进入容器
- nsenter,就是namespace enter。是通过容器的pid,set namespace的方式进入容器的
推荐用exec和nsenter
容器常用操作
stop/start/restart容器
docker stop可以停止运行的容器,容器在docker host中实际上是一个进程,docker stop命令本质上是向该进程发送一个SIGTERM信号。如果想快速停止容器,可使用docker kill命令,其作用是向容器进程发送SIGKILL信号。docker start会保留容器的第一次启动时的所有参数docker restart可以重启容器,其作用就是依次执行docker stop和docker start
pause/unpause 容器
暂时让容器暂停工作一段时间,比如要对容器的文件系统打个快照,或者 dcoker host 需要使用 CPU,这时可以执行 docker pause。
处于暂停状态的容器不会占用 CPU 资源,直到通过 docker unpause 恢复运行。
delete容器
docker rm一次可以指定多个容器
容器日志
docker logs -f <container>
容器状态
https://www.cnblogs.com/CloudMan6/p/6961665.html
容器限制
内存限额
容器可使用的内存包括两部分:物理内存和swap
-m或--memory:设置内存的使用限额,例如 100M, 2G。--memory-swap:设置 内存+swap 的使用限额。
docker run -m 200M --memory-swap=300M ubuntu命令允许该容器最多使用200M的内存和100M的swap,默认情况下两个参数的值都为-1,即对容器内存和swap没有限制
对于内存显示可以使用progrium/stress镜像来对容器执行压力测试
docker run -it -m 200M --memory-swap=300M progrium/stress --vm 1 --vm-bytes 280M
--vm 1:启动1个内存工作线程--vm-bytes 280M:每个线程分配280M内存
进程小于内存配额
$ docker run -it -m 300M --memory-swap=300M progrium/stress --vm 1 --vm-bytes 280M
WARNING: IPv4 forwarding is disabled. Networking will not work.
stress: info: [1] dispatching hogs: 0 cpu, 0 io, 1 vm, 0 hdd
stress: dbug: [1] using backoff sleep of 3000us
stress: dbug: [1] --> hogvm worker 1 [6] forked
stress: dbug: [6] allocating 293601280 bytes ...
stress: dbug: [6] touching bytes in strides of 4096 bytes ...
stress: dbug: [6] freed 293601280 bytes
stress: dbug: [6] allocating 293601280 bytes ...
stress: dbug: [6] touching bytes in strides of 4096 bytes ...
stress: dbug: [6] freed 293601280 bytes
stress: dbug: [6] allocating 293601280 bytes ...
280M内存的进程运行在300M内存的容器内,工作线程能正常的进行工作,工作过程为
- 申请280M内存
- 释放280M内存
- 再申请280M内存
- 再释放280M内存
- 一直循环...
进程等于或者大于内存配额
docker run -it -m 300M --memory-swap=300M progrium/stress --vm 1 --vm-bytes 300M
WARNING: IPv4 forwarding is disabled. Networking will not work.
stress: info: [1] dispatching hogs: 0 cpu, 0 io, 1 vm, 0 hdd
stress: dbug: [1] using backoff sleep of 3000us
stress: dbug: [1] --> hogvm worker 1 [6] forked
stress: dbug: [6] allocating 314572800 bytes ...
stress: dbug: [6] touching bytes in strides of 4096 bytes ...
stress: FAIL: [1] (416) <-- worker 6 got signal 9
stress: WARN: [1] (418) now reaping child worker processes
stress: FAIL: [1] (422) kill error: No such process
stress: FAIL: [1] (452) failed run completed in 0s
$ docker run -it -m 300M --memory-swap=300M progrium/stress --vm 1 --vm-bytes 310M
WARNING: IPv4 forwarding is disabled. Networking will not work.
stress: info: [1] dispatching hogs: 0 cpu, 0 io, 1 vm, 0 hdd
stress: dbug: [1] using backoff sleep of 3000us
stress: dbug: [1] --> hogvm worker 1 [6] forked
stress: dbug: [6] allocating 325058560 bytes ...
stress: dbug: [6] touching bytes in strides of 4096 bytes ...
stress: FAIL: [1] (416) <-- worker 6 got signal 9
stress: WARN: [1] (418) now reaping child worker processes
stress: FAIL: [1] (422) kill error: No such process
stress: FAIL: [1] (452) failed run completed in 0s
可以看到worker 6 got signal 9,超过内存限制,在申请内存的时候,收到了信号9被kill了
内存限额特别注意
如果在启动容器时只指定-m而不指定--memory-swap,那么--memory-swap默认为-m的两倍,比如:
docker run -it -m 200M ubuntu`
容器最多使用200M物理内存和200M swap。
CPU限额
默认设置下,所有容器可以平等地使用CPU资源并且没有限制
可以通过-c或--cpu-shares设置容器使用CPU权重,如果不指定默认为1024。
和内存限额不同的是,通过-c设置的cpu share并不是CPU资源的绝对数量,而是一个相对的权重值。某个容器最终能分配到的CPU资源取决于它的cpu share占所有容器cpu share总和的比例
使用progrium/stress镜像启动container_A,cpu share为1024,--cpu用来设置工作线程的数量,对于更多核的主机需要响应的增加其值
$ docker run --name container_A -it -c 1024 progrium/stress --cpu 1
WARNING: IPv4 forwarding is disabled. Networking will not work.
stress: info: [1] dispatching hogs: 1 cpu, 0 io, 0 vm, 0 hdd
stress: dbug: [1] using backoff sleep of 3000us
stress: dbug: [1] --> hogcpu worker 1 [6] forked
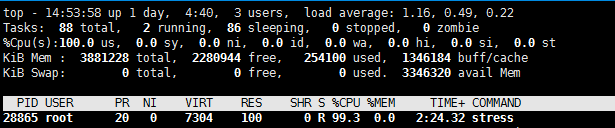
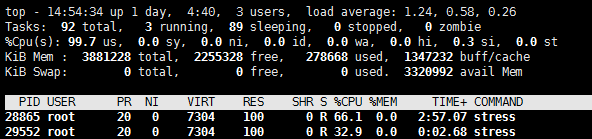
执行top,查看容器对CPU的使用情况,直接使用了全部的内存
使用progrium/stress镜像启动container_B,cpu share为512
$ docker run --name container_B -it -c 512 progrium/stress --cpu 1
WARNING: IPv4 forwarding is disabled. Networking will not work.
stress: info: [1] dispatching hogs: 1 cpu, 0 io, 0 vm, 0 hdd
stress: dbug: [1] using backoff sleep of 3000us
stress: dbug: [1] --> hogcpu worker 1 [6] forked
执行top,查看容器对CPU的使用情况,container_A和container_B占用的CPU的比例为2:1
Block IO限制
Block IO指的是磁盘的读写,docker可通过设置权重、限制bps和iops的方式控制容器读写磁盘的带宽。
不过目前Block IO限额只对direct IO(不使用文件缓存)有效。
Block IO权重
所有容器能平等地读写磁盘,可以通过设置--blkio-weight参数来改变容器block IO的优先级
--blkio-weight设置的是相对权重值,默认为500。
限制bps和iops
- bps是 byte per second,每秒读写的数据量。
- iops是 io per second,每秒 IO 的次数。
可通过以下参数控制容器的bps和iops:
--device-read-bps,限制读某个设备的bps。--device-write-bps,限制写某个设备的bps。--device-read-iops,限制读某个设备的iops。--device-write-iops,限制写某个设备的iops。
启动一个限制bps写入的容器
$ docker run -it --device-write-bps /dev/vda1:30MB ubuntu
在容器内进行写入
time dd if=/dev/zero of=test.out bs=1M count=800 oflag=direct
oflag=direct指定用direct IO方式写文件,这样--device-write-bps才能生效
对比测试,如果不限速可以到多少
测试失败
容器的底层实现技术
cgroup和namespace是最重要的两种技术。cgroup实现资源限额, namespace实现资源隔离。
Cgroup
全称Control Group。Linux操作系统通过cgroup可以设置进程使用CPU、内存和IO资源的限额,存储在/sys/fs/cgroup目录
启动cpu限额容器
$ docker run --name container_B -it -c 512 progrium/stress --cpu 1
$ docker ps -a
CONTAINER ID        IMAGE               COMMAND                  CREATED             STATUS                      PORTS                    NAMES
0cada5d80626        progrium/stress     "/usr/bin/stress --v…"   About an hour ago   Up 34 seconds                                        container_B
查看linux的cgroup配置
$ cat /sys/fs/cgroup/cpu/docker/0cada5d80626aaea751605ecb6222d1d7d4700756038b23afd44c099716fe1d4/cpu.shares
512
Namespace
namespace实现了容器间资源的隔离,Linux使用了六种namespace,分别对应六种资源:Mount、UTS、IPC、PID、Network和User
Mount namespace
让容器看上去拥有整个文件系统
容器有自己根目录,可以执行mount和umount命令,这些操作只在当前容器中生效
UTS namespace
容器有自己的hostname,默认情况下是其短ID,也可以通过-h或--hostname参数指定
IPC namespace
容器拥有自己的共享内存和信号量(semaphore)来实现进程间通信,而不会与 host 和其他容器的 IPC 混在一起。
PID namespace
当前主机拥有三个启动的容器
$ docker ps
CONTAINER ID        IMAGE               COMMAND                  CREATED             STATUS              PORTS                    NAMES
0cada5d80626        progrium/stress     "/usr/bin/stress --v…"   2 hours ago         Up 38 minutes                                container_B
8b88e4513642        ubuntu              "/bin/bash -c 'while…"   25 hours ago        Up 25 hours                                  zealous_mayer
583d56f9a4e1        registry:2          "/entrypoint.sh /etc…"   4 days ago          Up 30 hours         0.0.0.0:5000->5000/tcp   sleepy_hawking
通过ps axf查看容器进程
$ ps axf
 2522 ?        Sl     0:00  \_ /usr/bin/docker-proxy -proto tcp -host-ip 0.0.0.0 -host-port 5000 -container-ip 172.17.0.2 -container-port 5000
 2257 ?        Ssl    1:18 /usr/bin/containerd
 2527 ?        Sl     0:02  \_ containerd-shim -namespace moby -workdir /var/lib/containerd/io.containerd.runtime.v1.linux/moby/583d56f9a4e136d476cd1453269ad24e32eb063d212ee93e2041bfde770803f0 -address /run/containerd/containerd.sock -containerd-binary /usr/bin/containe
 2543 ?        Ssl    0:06  |   \_ registry serve /etc/docker/registry/config.yml
23183 ?        Sl     0:01  \_ containerd-shim -namespace moby -workdir /var/lib/containerd/io.containerd.runtime.v1.linux/moby/8b88e45136423fea3bbaedead6a06a2bd5b466e6aabea61b980e7075c1bee4dc -address /run/containerd/containerd.sock -containerd-binary /usr/bin/containe
23199 ?        Ss     0:20  |   \_ /bin/bash -c while true; do sleep 1; done
21481 ?        S      0:00  |       \_ sleep 1
14015 ?        Sl     0:00  \_ containerd-shim -namespace moby -workdir /var/lib/containerd/io.containerd.runtime.v1.linux/moby/0cada5d80626aaea751605ecb6222d1d7d4700756038b23afd44c099716fe1d4 -address /run/containerd/containerd.sock -containerd-binary /usr/bin/containe
14031 ?        Ss+    0:00      \_ /usr/bin/stress --verbose --cpu 1
14061 ?        R+    37:53          \_ /usr/bin/stress --verbose --cpu 1
在容器内部执行只能看到容器内部的进程
$ docker exec -it 8b88e4513642 /bin/bash
root@8b88e4513642:/# ps axf
  PID TTY      STAT   TIME COMMAND
26775 pts/0    Ss     0:00 /bin/bash
26789 pts/0    R+     0:00  \_ ps axf
    1 ?        Ss     0:20 /bin/bash -c while true; do sleep 1; done
26788 ?        S      0:00 sleep 1
Network namespace
容器拥有自己独立的网卡、IP、路由等资源
User namespace
容器能够管理自己的用户
$ docker exec -it 0cada5d80626 /bin/bash
root@0cada5d80626:/# useradd why
root@0cada5d80626:/# exit
exit
$ su why -
su: user why does not exist

